[Research] Windows LPE Bug Hunting, Served by the Team’s Youngest: Part 3 (EN)
![]()
Introduction
Hello. It feels like 2025 just ended, yet January is almost over already. Did everyone have a good start to the new year?
I’m Libera, taking on the role of writing Part 3 of the Maknaez series as my first research post. I was strongly drawn to the phrase “Windows Zero-day vulnerability,” which led me to join this project as team leader. That passion to discover zero-days is what brought me here.
In Part 2 today, I’ll focus on the Kernel Driver vector—one of our project’s outcomes—and introduce the types and details of the vulnerabilities I uncovered. So, shall we dive right into what vulnerabilities we discovered in the kernel driver?
Target & Summary
Today, I’ll explain why the vulnerabilities I’ll introduce—LPE using the MSR R/W Primitive and Arbitrary Port I/O—were ultimately limited to DoS.
1. Attack Surface
Before looking at the vulnerabilities, let’s cover the prerequisites. As mentioned in Part 1 and Part 2, it took some time, so I’ll keep this brief!
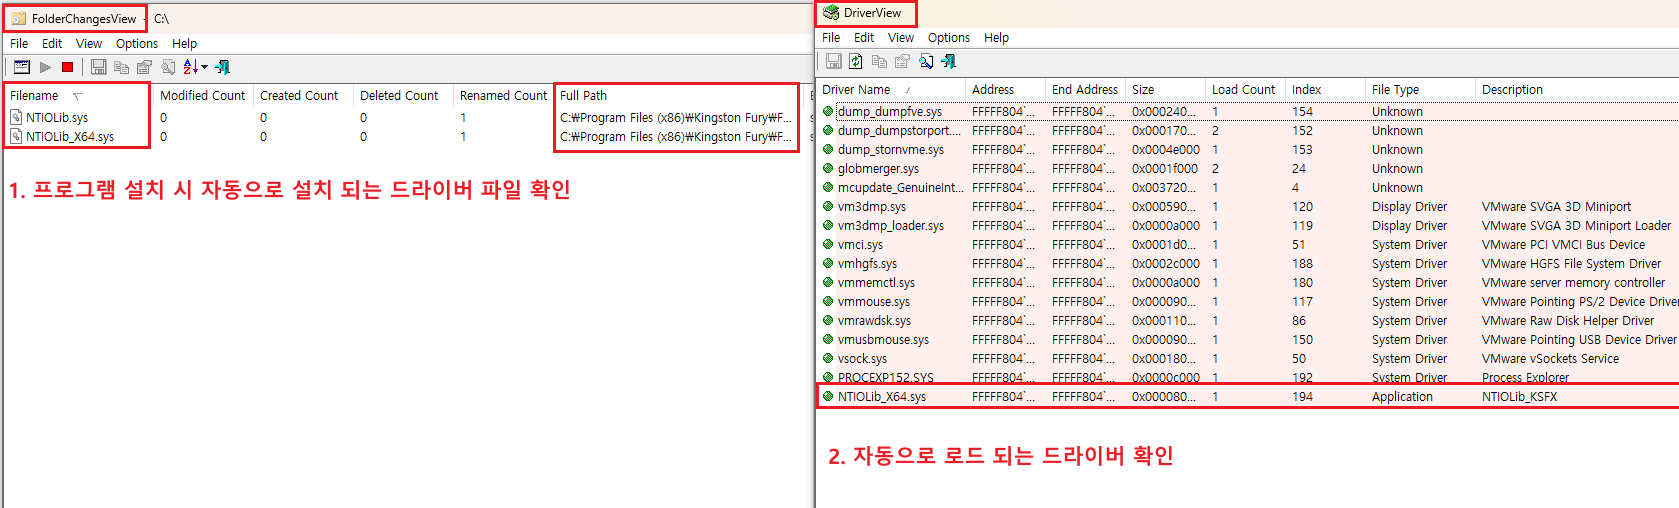
When installing the target program, use FolderChangesView to verify the drivers installed alongside the program during setup, and use DriverView to verify the drivers automatically loaded when the program is installed or executed.
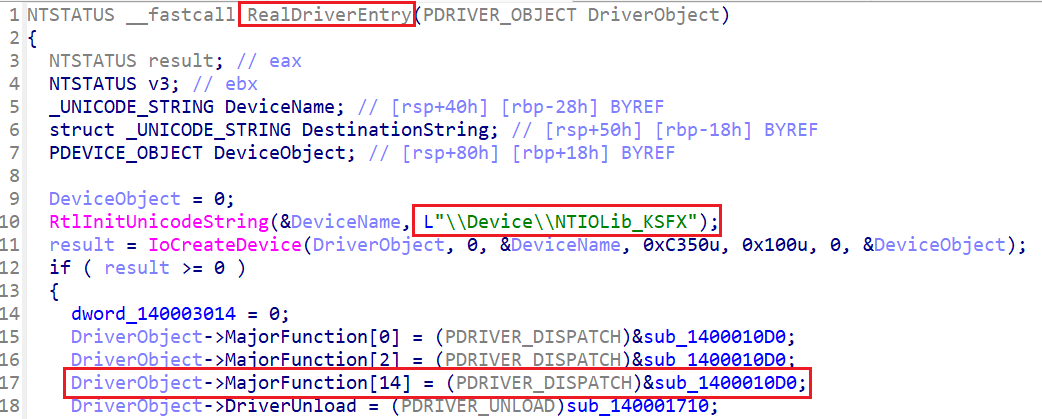
Next, we need to check the driver’s permissions. To do this, we must know the DeviceName. I opened the driver file in IDA and located the DriverEntryto find the DeviceName. Additionally, it’s a good idea to check if MajorFunction[14] is present. MajorFunction[14] points to a function pointer that handles the IRP_MJ_DEVICE_CONTROL in the Windows kernel’s DRIVER_OBJECT structure. This indicates that a Dispatch Routine exists to handle calls to the DeviceIoControl API made by user-mode applications. Now, shall we check the permissions again?
Using WinObj64.exe to check permissions reveals that everyone has RW permissions! This means a medium user can issue DeviceIoControl requests to this driver.
Now that we’ve verified the permissions and MajorFunction[14], shall we dive into analyzing the vulnerability?
2. LPE via MSR Read/Write Primitive
By exploiting an untrusted pointer dereference vulnerability, I identified an MSR read/write primitive and achieved LPE through it. I reported this to the vendor but received no response, so I will unfortunately have to redact certain parts before publishing. I kindly ask for your understanding. 😭
2-1. Static Analysis
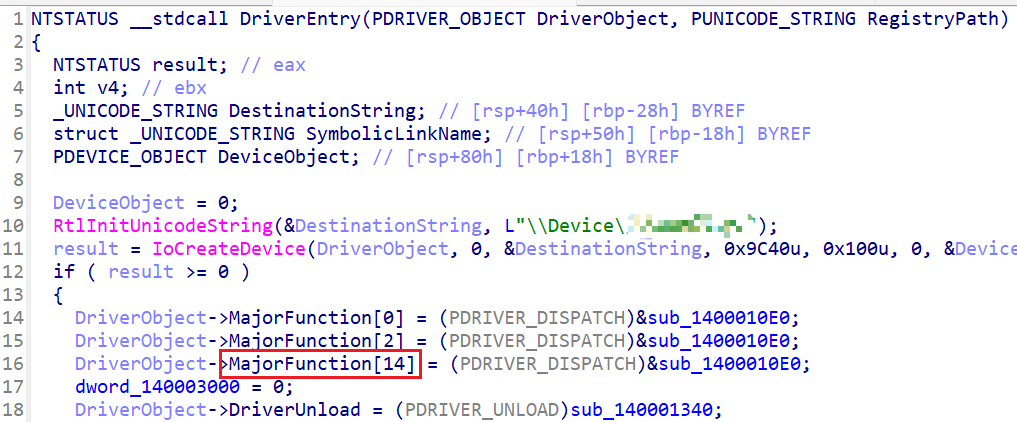
When the user calls the DeviceIoControl API to send a request to this driver, it checks the sub_1400010E0 function, which is the Dispatch Routine (MajorFunction[14]) triggered by this request.
2-1-1. sub_1400010E0() Function - Dispatch Routine
__int64 __fastcall sub_1400010E0(__int64 a1, IRP *IRP)
{
...
  if ( MajorFunction != 14 )
    goto LABEL_54;
  IOCTL = CurrentStackLocation->Parameters.DeviceIoControl.IoControlCode;
  if ( IOCTL <= 0x9C000000 )
  {
		...
	}
  else
  {
    if ( IOCTL != 0x9C000000 )
    {
      if ( IOCTL == 0x9C------ )
      {
        // ReadMsr
        v5 = ((__int64 (__fastcall *)(PVOID, PVOID))sub_140001380)(
                   IRP->AssociatedIrp.SystemBuffer,
                   IRP->AssociatedIrp.SystemBuffer);
      }
      else if ( IOCTL == 0x9C====== )
      {
        //WriteMsr
        v5 = sub_1400013C0(IRP->AssociatedIrp.SystemBuffer, p_Information);
      }
      goto LABEL_54;
    }
    *(_DWORD *)IRP->AssociatedIrp.SystemBuffer = dword_140003000;
    *p_Information = 4;
  }
LABEL_53:
...
}
sub_1400010E0 contains several conditional statements. It is a function triggered when MajorFunction[14], but internally, its functionality varies again depending on which index of MajorFunction[i] it is.
Requests sent via the DeviceIoControl API branch to index 14. Within this index, the IOCTL Code must be checked to branch to the desired functionality. 0x9C------ and 0x9C====== are the IOCTL Codes containing the vulnerabilities we need to trigger.
I/O Control Codes (IOCTL Code)
These serve as communication identifiers between user mode and drivers, and are also used for communication between drivers on the same stack. IOCTL Codes are transmitted using IRP.
For user-mode applications, the DeviceIoControl API is called to pass the IOCTL Code to the driver. The driver then performs the corresponding function based on the received IOCTL Code.
Most drivers use conditional statements to execute the necessary functionality based on the IOCTL Code.
2-1-2. sub_140001380() Function - ReadMsr Primitive
if ( IOCTL == 0x9C------ )
      {
        // ReadMsr
        v5 = ((__int64 (__fastcall *)(PVOID, PVOID))sub_140001380)(
                   IRP->AssociatedIrp.SystemBuffer,
                   IRP->AssociatedIrp.SystemBuffer);
      }
Transmitting IOCTL Code 0x9C------ triggers the sub_140001380 function. At this point, the SystemBuffer passed as an argument points to the kernel buffer where the data sent from user mode is stored.
__int64 __fastcall sub_140001380(unsigned int *SystemBuffer, unsigned __int64 *SystemBuffer2, _DWORD *a3)
{
  unsigned __int64 v3; // rax

  v3 = __readmsr(*SystemBuffer);
  *SystemBuffer2 = ((unsigned __int64)HIDWORD(v3) << 32) | (unsigned int)v3;
  *a3 = 8;
  return 0;
}
Looking at the function sub_140001380, you can see that data sent from user mode is used as an argument to the __readmsr function without any validation.
2-1-3. sub_1400013C0() Function - WriteMsr Primitive
else if ( IOCTL == 0x9C====== )
      {
        //WriteMsr
        v5 = sub_1400013C0(IRP->AssociatedIrp.SystemBuffer, p_Information);
      }
Sending IOCTL Code 0x9C====== triggers the sub_1400013C0 function. At this point, the SystemBuffer passed as an argument also points to a kernel buffer containing the data sent from user mode.
Sending IOCTL Code 0x9C====== triggers the sub_1400013C0 function. At this point, the SystemBuffer passed as an argument also points to a kernel buffer storing data sent from user mode.
__int64 __fastcall sub_1400013C0(__int64 SystemBuffer, _DWORD *a2)
{
  __writemsr(*(_DWORD *)SystemBuffer, *(_QWORD *)(SystemBuffer + 4));
  *a2 = 0;
  return 0;
}
Looking at the sub_1400013C0 function, we can see that data sent from user mode is passed as an argument to the __writemsr function without any validation.
We have confirmed that these two IOCTL codes can be used to pass arbitrary values to the respective MSR read/write functions. Now let’s find out what this MSR is and why exploiting this function is possible!
2-2. How to Exploit using MSR Register
](/2026/02/01/Libera/whs3-project-part3/Er/image5.png)
Source : IIia dafchev blog
MSRs (Model Specific Registers) were introduced to control features specific to particular processor models. While compatibility between models is not guaranteed in principle, some MSRs responsible for core functions like system call handlers are classified as Architectural MSRs and are consistently supported.
The feature we should focus on here is the LSTAR (Long-mode System call Target Address Register) MSR. This register holds the address of the kernel-level system call handler (KiSystemCall64) that the CPU will jump to when executing the syscall instruction. The operating system stores the address of the system call handler in this register. When the syscall instruction executes, the CPU transitions to Ring0 mode (kernel mode), and the instruction pointer (RIP) is set to the value stored in the LSTAR register.
Until the mid-point of Windows 10, kernel addresses could be leaked using APIs like NtQuerySystemInformation even with KASLR. However, it was later patched so that addresses are no longer returned under standard user privileges, making a leak primitive necessary for exploitation. For more details, check out a team member’s previous article on KASLR!
The IA32_LSTAR register holds the actual address of KiSystemCall64, a core function that handles system calls during Windows kernel boot. Therefore, by reading the IA32_LSTAR register via the __readmsr function, we can find the actual address of KiSystemCall64 and determine the kernel base address through its offset.
void __writemsr(
   unsigned long Register,  // [ECX] Select MSR register
   unsigned __int64 Value   // [EDX:EAX] Value to write to the selected register
);
The __writemsr function writes the value of the second argument to the MSR register specified as the first argument. As previously discussed, when the syscall instruction executes, RIP is set to the value stored in the LSTAR register. Therefore, overwriting the LSTAR register with the starting address of the shell code causes the attacker’s shell code to execute with Ring0 (kernel mode) privileges when the syscall is invoked.
Now that we’ve determined how to exploit this, shall we verify that the values I entered are actually being passed correctly?
2-3. Dynamic Analysis

Looking at the __readmsr function first, you can see that it takes c0000082 as an argument, which represents IA32_LSTAR.

The __writemsr function takes IA32_LSTAR as its first argument and FFFF a value I arbitrarily inserted as its second argument.
Now, if we set this arbitrarily inserted value as the starting address for the shell code, the exploit will succeed!!
2-4. Points to Note
It would be great if simply placing the shellcode start address in the LSTAR register made the exploit work, but for a successful exploit, we need to perform three additional steps. If you’re curious about the details of the protection techniques mentioned here, I recommend reading L0ch’s Kernel Mitigation article!
First, bypassing SMEP. Modern Windows applies SMEP/SMAP protections, preventing direct execution of shellcode in user space. As explained earlier, overwriting LSTAR with the shellcode start address doesn’t guarantee immediate execution. Instead, you must overwrite LSTAR with a Stack Pivot gadget to capture the execution flow, then use a ROP Chain to disable the 20th bit of the CR4 register (the SMEP bit).
Second, privilege escalation. Based on the kernel address obtained via the MSR Read Primitive, calculate the offset to find the kernel base address and the system process’s token. Then, overwrite the current process’s token location with the System process’s token to gain System privileges.
Finally, third, system cleanup. The modified LSTAR value, the SMEP bit setting in CR4, and the corrupted stack frame must be restored. If it exits without restoring, a BSOD occurs the moment the next system call is invoked. Therefore, the modified registers must be restored to achieve a stable LPE (privilege escalation)!
3. DoS Vulnerabilities
We identified several vulnerabilities that cause BSODs. Among them, we will examine the results of the Arbitrary Port I/O vulnerability and why it was not possible to achieve LPE.
3-1. Arbitrary Port I/O Vulnerability Trigger & Root Cause
switch ( IoControlCode )
{
  case 0xC350A0D8:
    __outbyte(SystemBuffer_Value, *((_BYTE *)SystemBuffer_Addr + 4));
    return 0;
  case 0xC350A0DC:
    __outword(SystemBuffer_Value, *((_WORD *)SystemBuffer_Addr + 2));
    return 0;
  case 0xC350A0E0:
    __outdword(SystemBuffer_Value, SystemBuffer_Addr[1]);
    return 0;
}
The code above is part of the driver’s Dispatch Routine function. It can be triggered by specific IOCTL codes, each triggering the __outbyte, __outword, or __outdword functions. Since all three functions’ arguments can be controlled by an attacker, manipulating these arguments causes a BSOD.
Sending 0xFE data to the 0xCF9 port causes a forced reboot. Additionally, sending any unusual data other than 0xFE to this port triggers a BSOD. Port 0xCF9 is the Reset Control Register defined in the Intel chipset specification, and 0xFE is 1111 1110 in binary. Consulting the Intel datasheet reveals the bit operations of this register:
- Bit 1 (System Reset): Setting to 1 triggers a system reset.
- Bit 2 (Reset CPU): Setting this to 1 performs a CPU reset.
Therefore, sending 0xFE transmits a command that activates both of these two bits. This ignores the OS’s normal shutdown procedure and immediately forces a reboot.
Now, let’s explore why a BSOD occurs when using functions like __outbyte, which are simply read/write operations.
3-1-1. in, out Functions
The __inbyte, __inword, __indword, __outbyte, __outword, and __outdword functions are not passed through the operating system’s API but are directly translated into machine code. For the in functions, they read data from the port received as an argument in a size appropriate for the function. They load the port number into the DX register, read it using the IN instruction, and store it in AX.
The out functions write the data received as an argument to the port received as an argument. They load the port number and data into registers and use the OUT instruction to transmit the data to the specified port number.
3-1-2. Isolated I/O and BSOD Causes
The x86 architecture physically separates the memory address space (Memory Space) and the I/O address space (I/O Space), a feature known as isolated I/O. The Memory Map is the RAM space we commonly think of, accessed via the MOV instruction. The I/O Map is the space used by the IN and OUT functions. This space spans the range 0x0000~0xFFFF and is directly connected to the registers of hardware devices attached to the motherboard. Therefore, executing __outword(0x64, data) does not write data to memory address 100; instead, it sends an electrical signal to the hardware chip with port 0x64.
The problem arises when this signal is sent to critical or sensitive hardware (e.g., PCI bus configuration). If an attacker overwrites a critical port with arbitrary values, it can corrupt hardware settings or cause the CPU to encounter an unhandled exception. This triggers the OS to display a blue screen as a system protection measure.
3-2. Why doesn’t LPE work?
In the past, exploits worked by manipulating the BAR (Base Address Register) in the PCI Configuration Space to overlap the device’s MMIO (Memory Mapped I/O) address with the physical address where the kernel’s critical data structures reside. However, protective techniques implemented to counter this have blocked this approach.
3-2-1. Asynchronous OS Memory Manager and Hardware State
Fundamentally, the blockage occurred because hardware-level address changes were no longer immediately reflected in the OS’s memory management system.
Suppose an attacker uses an OUT instruction to modify the BAR register value of a PCI device, changing the physical address from 0xA0000000 to 0x10000000, where critical kernel structures reside. The Windows kernel generates a PTE for the device’s physical address and assigns a virtual address either at boot time or when loading a driver. The problem arises because even if the attacker modifies the hardware register (BAR), the mapping information in the page table managed by the OS’s memory manager (MMU) is not updated or corrected.
When the driver accesses the original virtual address, the memory manager (MMU) still sends the transaction to the original address, which is 0xA0000000. However, since the attacker changed it to 0x10000000, no device responds to the transaction sent to the original address. This ultimately results in a Master Abort or reading garbage values, causing a BSOD.
3-2-2. Physical Memory Isolation via VBS and SLAT
In a VBS environment, the hypervisor controls physical memory access. When VBS is enabled, the physical addresses accessed by the OS differ from the actual hardware’s machine physical addresses. This translation is handled by SLAT, the CPU’s hardware virtualization feature.
If an attacker attempts to manipulate BARs to map device memory into kernel code regions or critical data areas, the hypervisor detects an EPT violation. The hypervisor monitors and prevents physical pages configured for MMIO from overlapping with executable code regions or read-only data regions.
In other words, even if hardware registers are manipulated, the hypervisor layer denies access, making physical memory overwriting impossible from the outset.
3-2-3. DMA Protection and IOMMU
This is a defense technique that activates when an attacker attempts to overwrite memory using DMA rather than the CPU. The IOMMU virtualizes the memory addresses accessed by devices. Even if a device requests a write to a physical address, the IOMMU either remaps the address or blocks it, indicating that the device can only write to a specific region. This is called DMA Remapping.
Additionally, Windows closes DMA ports for untrusted external devices or uninitialized devices during the boot process. These devices cannot access system memory until drivers are properly loaded and IOMMU mapping is complete. This is called Pre-boot DMA Protection.
Conclusion
With this Part 3, we conclude our introduction to the “Windows Kernel Driver & Named Pipe LPE Bug Hunting” project conducted during White Hat School’s 3rd session. It’s truly rewarding and delightful to share the results of our hard work over three months with a team of six members. ☺️
I hope this series has been helpful for those starting vulnerability analysis. With that, we’ll wrap up this series here! While I’m not yet sure what the next research post will cover, I’d appreciate your continued interest and support! Thank you.
Reference
- https://cdrdv2-public.intel.com/774206/vt-directed-io-spec .pdf
- https://idafchev.github.io/blog/wrmsr/#2-model-specific-registers
- https://learn.microsoft.com/en-us/windows/security/hardware-security/kernel-dma-protection-for-thunderbolt
- https://learn.microsoft.com/en-us/cpp/intrinsics/readmsr
- https://learn.microsoft.com/en-us/cpp/intrinsics/writemsr
- https://www.coresecurity.com/core-labs/publications/windows-smep-bypass-us

본 글은 CC BY-SA 4.0 라이선스로 배포됩니다. 공유 또는 변경 시 반드시 출처를 남겨주시기 바랍니다.