[Research] Windows LPE Bug Hunting, Served by the Team’s Youngest: Part 2 (EN)
![]()
Introduction
Happy New Year, everyone! This is my second research write-up, and I’m gongjae, taking charge of Part 2 for the “maknaes” 😀
banda already did an awesome job on Part 1, so I wondered if there would be anything left for me to explain… but I still wanted to share the vulnerabilities I personally discovered and hopefully provide a little help to those who are interested in bug hunting. 😄
In this post, we’ll look at several LPE vectors that can arise from Named Pipes, and show that “wow, vulnerabilities can happen in this way too!”
Target
The vulnerability I found is a Named Pipe issue in an antivirus product. It has already been patched, and I reported it to ZDI—so a CVE has been assigned as well.

The cases I’ll show today can be categorized into File-related, Registry-related, and Service-related behaviors. Let’s see what happens when an IPC interface is exposed through an overly permissive Named Pipe—case by case.
0. Attack Surface
Before we get into the individual vulnerabilities, this is the first thing we must check. If Everyone has access, that’s often the very first step toward reaching SYSTEM. It’s very similar to Part 1—but it would be a shame not to show it let’s go through it together anyway.

When you install the target program and check Process Explorer, you can see that there is a process called SASCore64.exe running with SYSTEM privileges! And you can also confirm that there is a Named Pipe in the Handles section.
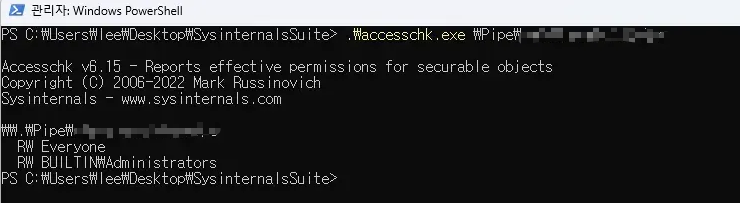
And then, the biggest gatekeeper is the ACL part..!! I checked the permissions using SysinternalsSuite’s accesschk and confirmed that Everyone has RW permission~ Therefore, it means that a medium user can access a process running with SYSTEM privileges without any special permissions, right!
So now, let’s extract the SASCore64.exe binary, open it with IDA, and then check if there are Named Pipe-related APIs in Imports.
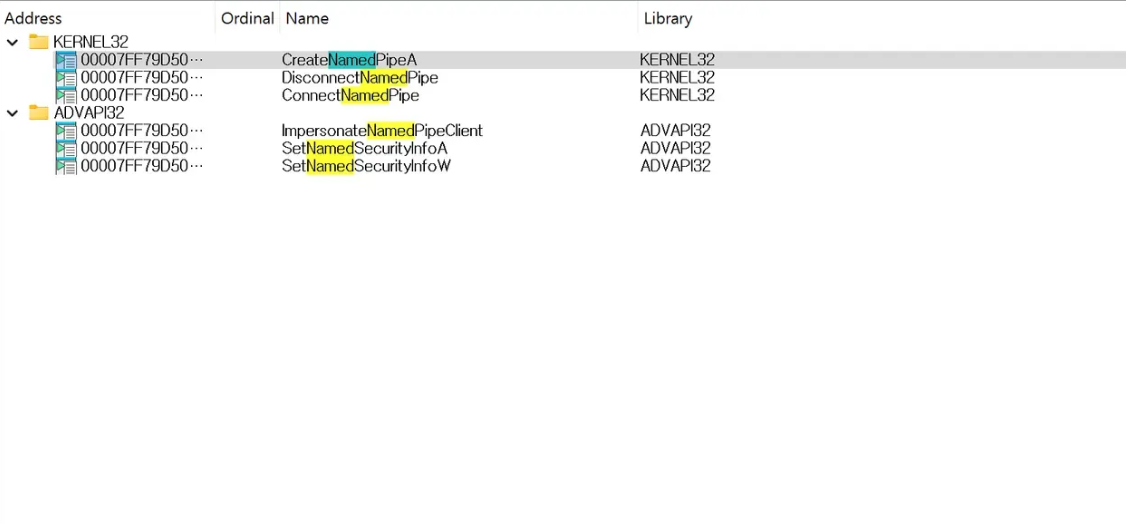
Let’s go to the sub_140013F60 function that has the CreateNamedPipe API.
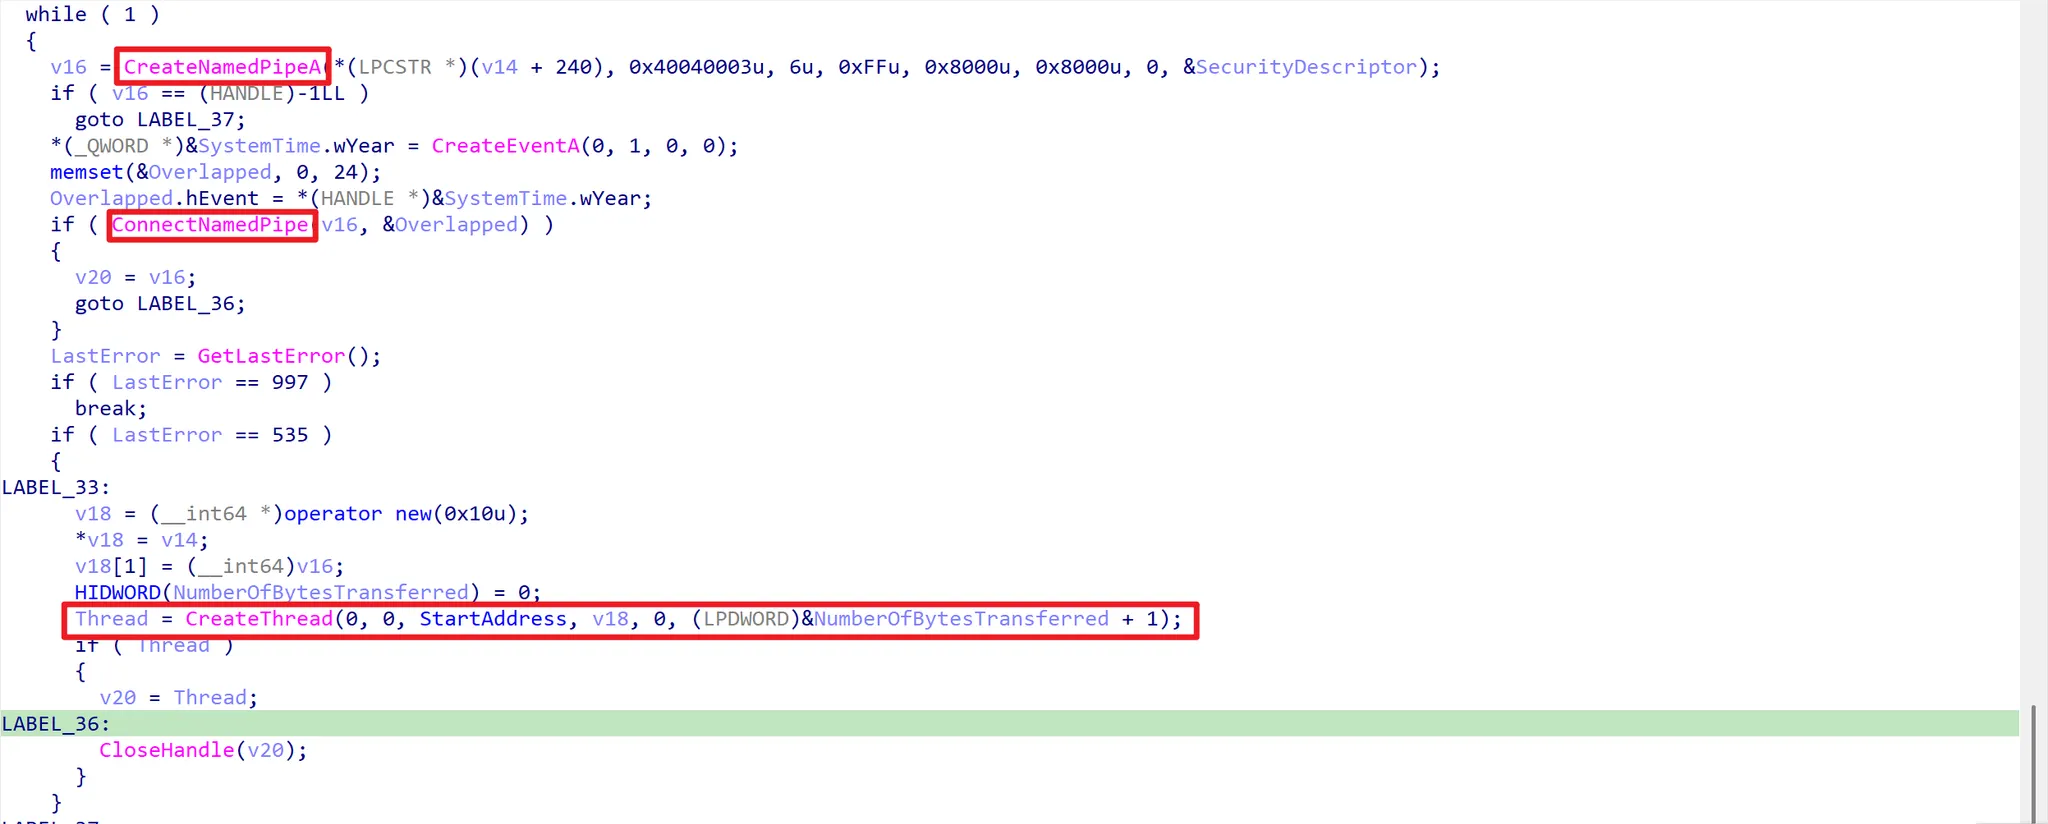
If you look at the code, you can see that it creates a named pipe through CreateNamedPipeA and connects. The key here is that it configures SECURITY_ATTRIBUTES for the Named Pipe, and all local users can have full access! Let’s go to the StartAddress function.
If you look at the code, you can see that it creates a named pipe through CreateNamedPipeA and connects. The key here is that it configures SECURITY_ATTRIBUTES for the Named Pipe, and all local users can have full access! Let’s go to the StartAddress function.
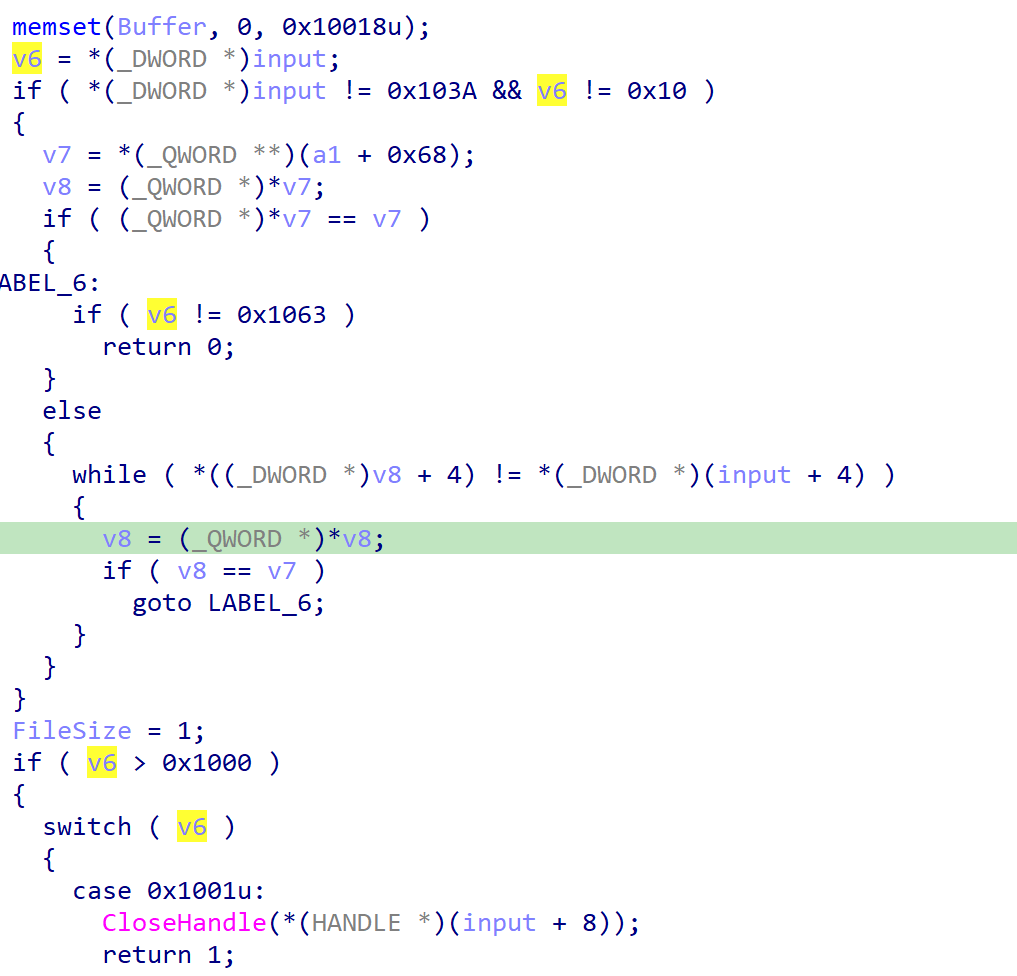
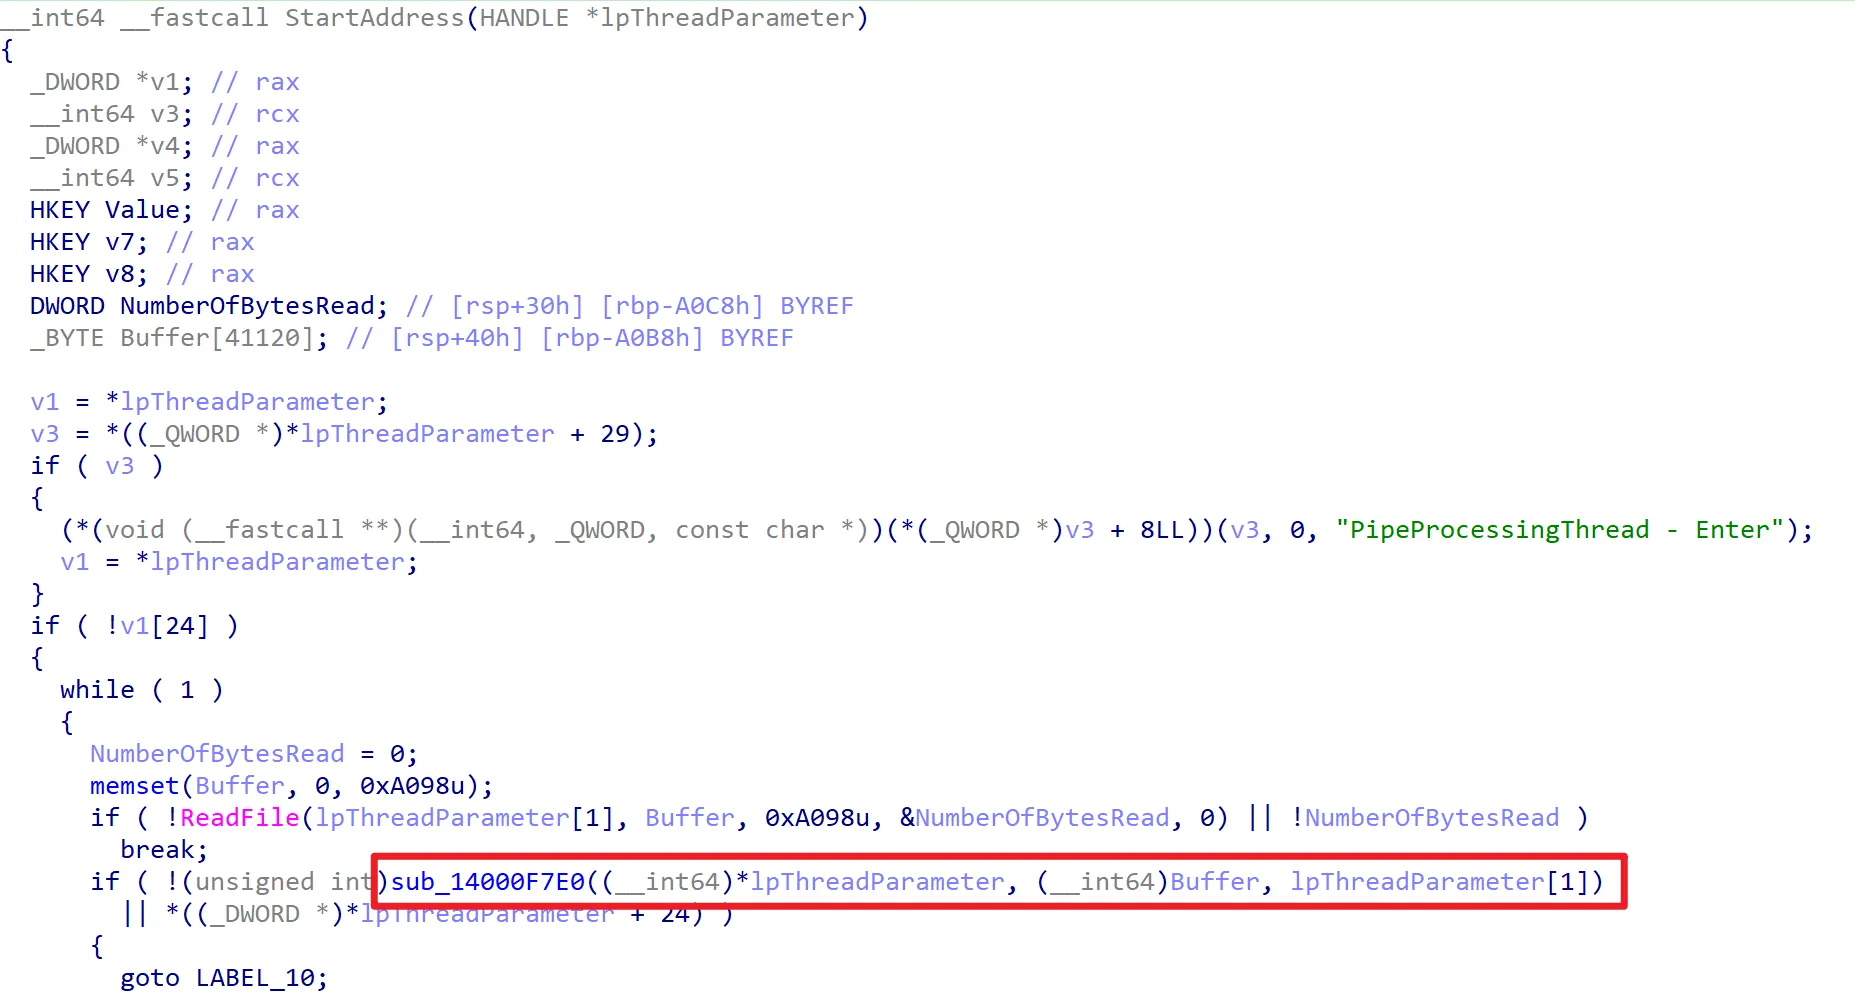
We can put our input value into v6, and it is divided into cases so we can use various functions! However, in order to use the functions, you must first obtain a Token through the 0x103A branch below.
case 0x103A:
{
  // ... (input/time validation and other auxiliary logic)

  if (ImpersonateNamedPipeClient(a3))
  {
    // ... (store registry context in TLS, etc.)

    HANDLE hProc = OpenProcess(PROCESS_ALL_ACCESS, FALSE, *(DWORD *)(input + 8));
    if (hProc)
    {
      HANDLE hToken = NULL;
      if (OpenProcessToken(hProc, TOKEN_ALL_ACCESS, &hToken) && hToken)
      {
        // ... (store the token into the internal session/table)
        CloseHandle(hToken);
      }
      CloseHandle(hProc);
    }

    RevertToSelf();
    FileSize = 1; // session established
  }

  // ... (build response)
  WriteFile(a3, Buffer, 0x10018u, &written, 0);
  return 1;
}
- If ImpersonateNamedPipeClient and OpenProcessToken(…Pid…) succeed, a new node + token is stored in the internal list (a1 + 0x68).
- Since the token value is returned at offset 0x04 among the 0x10018-byte response, you can store this Token and use it.
After obtaining a token in this way, you can use other functions, and these functions are the vulnerability vectors I will talk about.
1. LPE using File-related APIs
First, shall we look at File-related APIs? Windows has various APIs, and most of them verify them so that they can be used safely. The important part is that the user should not be able to touch them.. But what if the user can manipulate important arguments?
1-1. CopyFileW()
If you look at MS’s CopyFileW() function, you can see that it copies an existing file to a new file.
BOOL CopyFileW(
  [in] LPCWSTR lpExistingFileName,
  [in] LPCWSTR lpNewFileName,
  [in] BOOL    bFailIfExists
);
Then, if you can change the file at the desired path into a malicious file with SYSTEM privileges, privilege escalation would happen, right?
case 0x100D:
{
  // ...
  BOOL ok = CopyFileW(
      (LPCWSTR)(input + 8),       // attacker-controlled: src
      (LPCWSTR)(input + 0x1048),  // attacker-controlled: dst
      *(DWORD *)(input + 0x2088)  // attacker-controlled: bFailIfExists
  );

  DWORD err = GetLastError();
  // ... (put ok/err into the response Buffer and return)
  WriteFile(a3, Buffer, 0x10018u, &written, 0);
  return 1;
}
After obtaining the Token, if you branch to case 0x100D, you can put the file path to copy into input+8, and the file path to overwrite into input+0x1048, and call the API!

Why is this LPE..? There are files that we cannot change or delete with normal privileges, right. And if there is a file that runs every few seconds? If you change this file into a malicious file that can run cmd with SYSTEM privileges, then literally a SYSTEM-privileged cmd will open every few seconds!! That’s the principle.👽

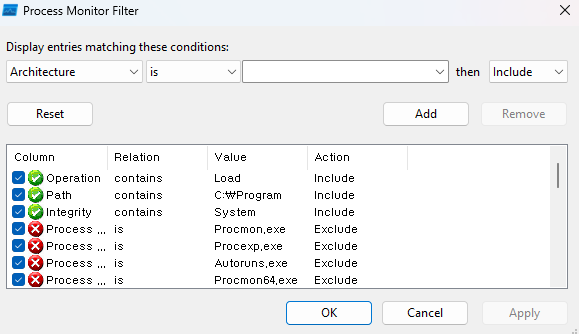
Shall we verify this directly with Process Monitor? This is the Chrome updater process, it runs every few seconds, and its privilege is high so it’s impossible to access with normal privileges. But if you change it into a malicious file using the vulnerability above!?
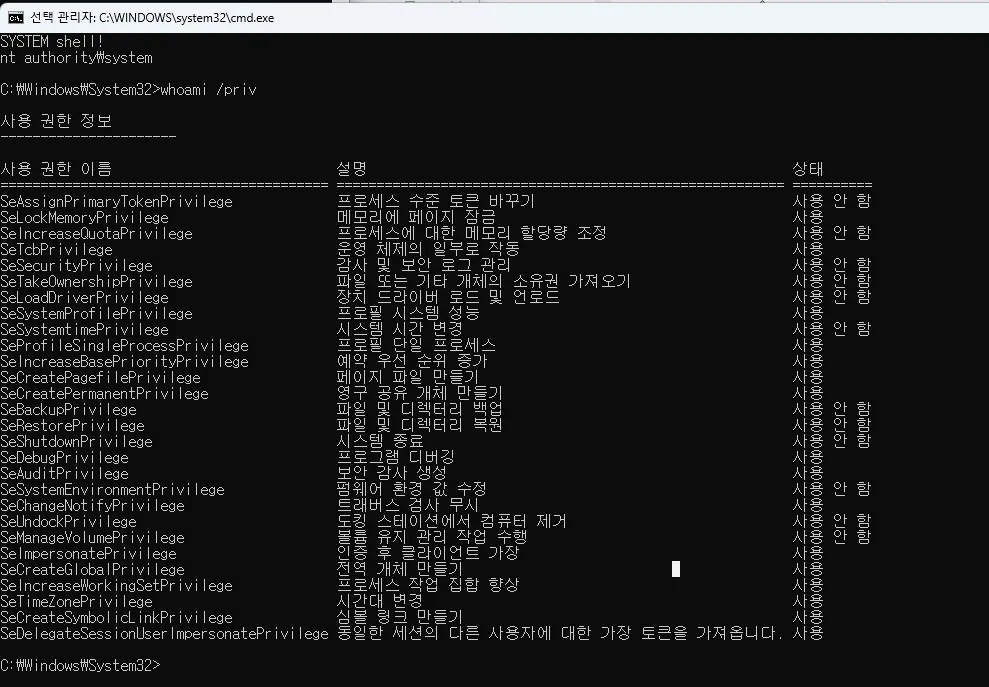
You can confirm that a SYSTEM cmd opens like this! 👏
Shall we confirm a bit more clearly through dynamic analysis?

After attaching to the process with WinDbg, get the base address with the lm command, and then set the base in IDA and set a bp near the CopyFileW() function to check.

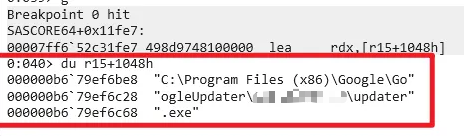
As follows, Dst contains the updater path mentioned earlier.
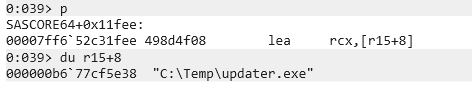
And you can see that the source contains the file path to be copied as-is. This fake updater.exe is a malicious file that launches cmd with a SYSTEM token, and once it is copied, the LPE is successfully achieved.
2. LPE using Registry-related APIs
Now, shall we look at Registry-related APIs!
2-1. SHSetValueW()
LSTATUS SHSetValueW(
  [in]           HKEY    hkey,
  [in, optional] LPCWSTR pszSubKey,
  [in, optional] LPCWSTR pszValue,
  [in]           DWORD   dwType,
  [in, optional] LPCVOID pvData,
  [in]           DWORD   cbData
);
The SHSetValueW() function sets the value of a registry key. If you look at the argument setup, you can set SubKey and ValueName. What this means is, if you can manipulate these arguments, you can arbitrarily change the Value of the registry at the desired path!! Let’s confirm through the code directly.
case 0x102C:
{
  const WCHAR *SubKey    = (const WCHAR *)(input + 16);    // attacker-controlled
  const WCHAR *ValueName = (const WCHAR *)(input + 4176);  // attacker-controlled
  HKEY RootKey           = *(HKEY *)(input + 8);           // attacker-controlled
  DWORD Type             = *(DWORD *)(input + 0xA094);     // attacker-controlled
  LPCVOID Data           = (LPCVOID)(input + 0x2090);      // attacker-controlled
  DWORD DataSize         = *(DWORD *)(input + 0xA090);     // attacker-controlled

  // ... (HKCR wrapping / HKCU TLS substitution / table handle logic, etc.)

  LSTATUS st = SHSetValueW(
      RootKey,
      SubKey,
      ValueName,
      Type,
      Data,
      DataSize
  );

  DWORD err = GetLastError();
  // ... (put st/err into the response Buffer and return)
  WriteFile(a3, Buffer, 0x10018u, &written, 0);
  return 1;
}
If you go to case 0x102C, in the end, you can set the desired registry value through the SHSetValueW function.
offset +0x0008 → HKEY Root (e.g., HKEY_LOCAL_MACHINE)
offset +0x0010 → SubKey
offset +0x1050 → ValueName
offset +0xA068 → Type (e.g., REG_SZ)
offset +0x2090 → Buffer (value to set)
offset +0xA064 → Buffer size
The input structure is as follows.
if (RootKey == HKEY_CLASSES_ROOT)
{
  // wrap into an internal class
  CClassesRoot ctx;
  ctx.h1 = TlsGetValue(...);
  ctx.h2 = TlsGetValue(...);
  SHSetValueW(ctx.h1 or h2, SubKey, ValueName, Type, Data, Size);
}
else if (RootKey & 0x80000000)  // e.g., HKEY_LOCAL_MACHINE, HKEY_USERS, etc.
{
  keyctx = get_handle_from_table(RootKey);
  SHSetValueW(keyctx, SubKey, ValueName, Type, Data, Size);
}
else
{
  // if it's a normal HKEY_CURRENT_USER, substitute it with a TLS-based key
  if (RootKey == HKEY_CURRENT_USER)
    RootKey = TlsGetValue(...);

  SHSetValueW(RootKey, SubKey, ValueName, Type, Data, Size);
}
The core vulnerable logic is like above; in the end, the arbitrary HKEY + SubKey + Value + Data provided by the user goes into SHSetValueW’s arguments 그대로 under SYSTEM privileges.
Then this time too, shall we find a process that runs with SYSTEM privileges and has ImagePath in the Registry in the same way?
I selected the MicrosoftEdgeElevationService service as the target and proceeded. If you check through Process Monitor, you can confirm that when you turn on Edge, the service is automatically loaded with SYSTEM privileges.

After that, let’s check in Services and Registry Editor where this service is executed from.
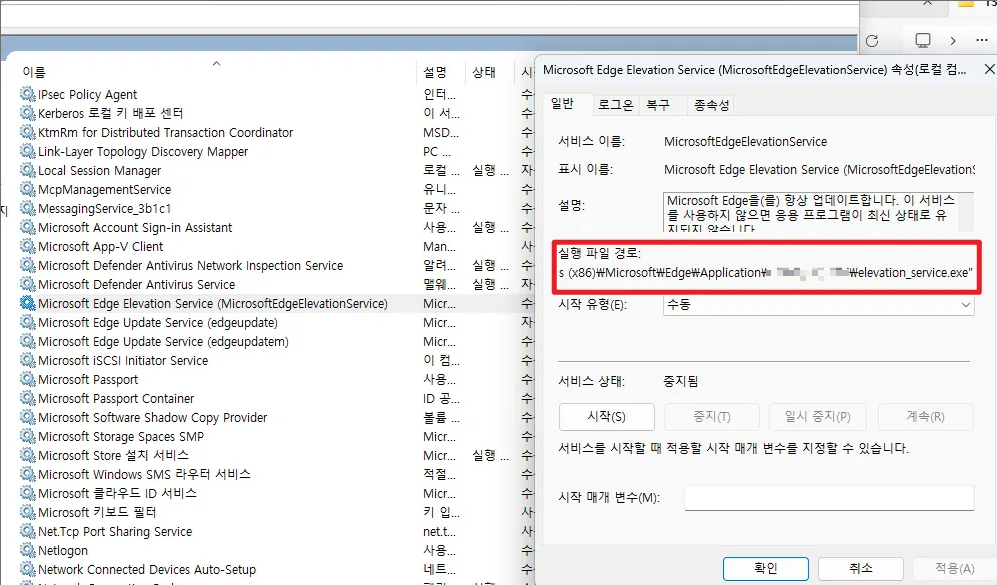

As in the pictures above, you can confirm that it is MicroSoftEdgeElevationService, and you can confirm that ImagePath is "C:\Program Files (x86)\Microsoft\Edge\Application\xxx.xxx.xxx\elevation_service.exe”. Now, after triggering the vulnerability, let’s check again.
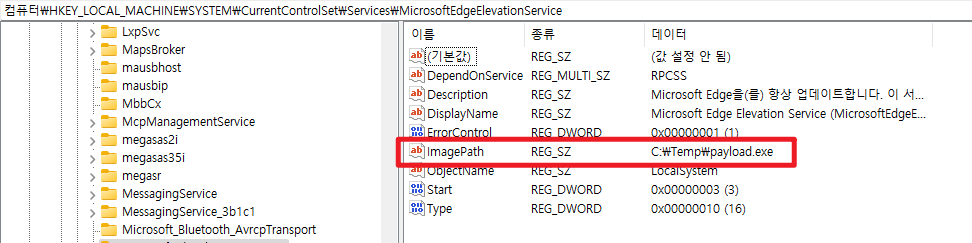
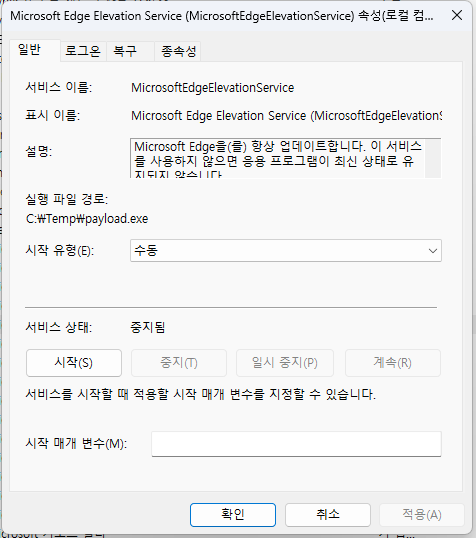
You can confirm that the service’s Path and the registry’s ImagePath have changed like this!! Now, if you run MicrosoftEdge, a cmd with SYSTEM privileges will open!
We can’t skip dynamic analysis this time either, right?
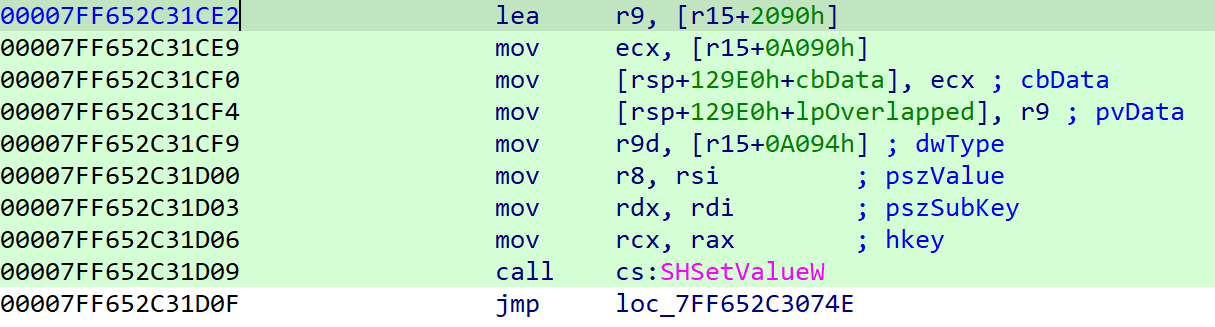

If you look at the Value part, you can confirm that ImagePath is included.

If you look at the SubKey part, you can confirm that the registry path mentioned earlier is included.
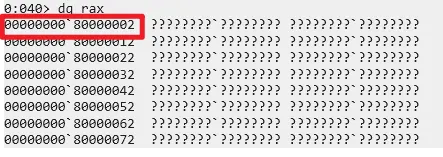
Finally, you can see that the key contains 0x80000002 meaning HKEY_LOCAL_MACHINE. If you use this function, you can change the high-path registry ImagePath that I want into the value I want!
3. LPE using Service-related APIs
Then lastly, shall we look at Service-related APIs! This time, you can achieve LPE using three APIs, so let’s look at them one by one.
3.1 OpenSCManagerW()
SC_HANDLE OpenSCManagerW(
  [in, optional] LPCWSTR lpMachineName,
  [in, optional] LPCWSTR lpDatabaseName,
  [in]           DWORD   dwDesiredAccess
);
First is the OpenSCManagerW() function. The CreateService or StartService that will come later are pretty intuitive about what they do, but this OpenSCManagerW() API must be executed first!
Because services are objects registered in the “SCM database,” you need to have a handle (context) to that DB first for subsequent tasks (create/modify/start). You can say this API is the one that opens and returns that handle.
case 0x103B:
{
  const WCHAR *Machine  = (const WCHAR *)(input + 8);      // attacker-controlled (optional)
  const WCHAR *Database = (const WCHAR *)(input + 0x1048); // attacker-controlled (optional)
  DWORD Access          = *(DWORD *)(input + 0x2088);      // attacker-controlled

  // ... (convert empty string to NULL, etc.)

  SC_HANDLE hScm = OpenSCManagerW(Machine, Database, Access);

  DWORD err = GetLastError();
  // ... (return hScm/err in the response)
  WriteFile(a3, Buffer, 0x10018u, &written, 0);
  return 1;
}
Through case 0x103B branch, you can call the API and obtain the handle:
- input + 8 → lpMachineName
- input + 0x1048 → lpDatabaseName
- input + 0x2088 → dwDesiredAccess
The important thing here is dwDesiredAccess, it must be set to SC_MANAGER_ALL_ACCESS(0xF003F)!
3.2 CreateServiceW()
SC_HANDLE CreateServiceW(
  [in]            SC_HANDLE hSCManager,
  [in]            LPCWSTR   lpServiceName,
  [in, optional]  LPCWSTR   lpDisplayName,
  [in]            DWORD     dwDesiredAccess,
  [in]            DWORD     dwServiceType,
  [in]            DWORD     dwStartType,
  [in]            DWORD     dwErrorControl,
  [in, optional]  LPCWSTR   lpBinaryPathName,
  [in, optional]  LPCWSTR   lpLoadOrderGroup,
  [out, optional] LPDWORD   lpdwTagId,
  [in, optional]  LPCWSTR   lpDependencies,
  [in, optional]  LPCWSTR   lpServiceStartName,
  [in, optional]  LPCWSTR   lpPassword
);
Then now that we got the handle, shall we create a Service?
case 0x103F:
{
  SC_HANDLE hScm = *(SC_HANDLE *)(input + 8);

  const WCHAR *SvcName    = (const WCHAR *)(input + 16);     // attacker-controlled
  const WCHAR *DispName   = (const WCHAR *)(input + 4176);   // attacker-controlled
  const WCHAR *BinPath    = (const WCHAR *)(input + 8352);   // attacker-controlled

  DWORD DesiredAccess     = *(DWORD *)(input + 0x2090);      // attacker-controlled
  DWORD ServiceType       = *(DWORD *)(input + 0x2094);      // attacker-controlled
  DWORD StartType         = *(DWORD *)(input + 0x2098);      // attacker-controlled
  DWORD ErrorControl      = *(DWORD *)(input + 0x209C);      // attacker-controlled

  // ... (normalize Group/Deps/StartName/Password pointers and handle NULL)

  SC_HANDLE hSvc = CreateServiceW(
      hScm,
      SvcName,
      DispName,
      DesiredAccess,
      ServiceType,
      StartType,
      ErrorControl,
      BinPath,
      /* ... */ 0, 0, 0, 0, 0
  );

  DWORD err = GetLastError();
  // ... (return hSvc/err in the response)
  WriteFile(a3, Buffer, 0x10018u, &written, 0);
  return 1;
}
In case 0x103F branch, you can directly register an arbitrary file as a service via CreateServiceW()!
- input + 0x08 →
hSCManagerSC_HANDLE(SCM handle obtained from the previous0x103Bcall)
- input + 0x10 →
lpServiceNameLPCWSTRinternal service name (e.g., L”LPE”)
- input + 0x1050 →
lpDisplayNameLPCWSTRservice name shown to the user (e.g., L”My Payload Service”)
- input + 0x2090 →
dwDesiredAccessDWORDaccess right flags (e.g.,SERVICE_ALL_ACCESS= 0xF01FF)
- input + 0x2094 →
dwServiceTypeDWORDservice type (e.g.,SERVICE_WIN32_OWN_PROCESS= 0x10)
- input + 0x2098 →
dwStartTypeDWORDstart type (e.g.,SERVICE_DEMAND_START= 0x3)
- input + 0x209C →
dwErrorControlDWORDerror control (e.g.,SERVICE_ERROR_NORMAL= 0x1)
- input + 0x20A0 →
lpBinaryPathNameLPCWSTRexecutable file path (e.g., L”C:\Temp\poc.exe”)
- input + 0x30E0 →
lpLoadOrderGroupLPCWSTRload order group (e.g., L”Base”)
- input + 0x4120 →
lpDependenciesLPCWSTRdependency service list
- input + 0x5160 →
lpServiceStartNameLPCWSTRlogon account (e.g., L”NT AUTHORITY\System”)
- input + 0x61A0 →
lpPasswordLPCWSTRpassword for that account (NULL if none)
But you can’t say it’s perfect LPE just by creating it, right? There is also an API that runs it.
3.3 StartServiceW()
BOOL StartServiceW(
  [in]           SC_HANDLE hService,
  [in]           DWORD     dwNumServiceArgs,
  [in, optional] LPCWSTR   *lpServiceArgVectors
);
case 0x1040:
{
SC_HANDLE hSvc = *(SC_HANDLE *)(input + 8); // attacker-controlled (handle from prior call)
BOOL ok = StartServiceW(hSvc, 0, NULL);
DWORD err = GetLastError();
// ... (put ok/err into the response Buffer and return)
WriteFile(a3, Buffer, 0x10018u, &written, 0);
return 1;
}Now it executes StartServiceW() in the case 0x1040 branch that starts the created service.
- input + 8 →
hService(SC_HANDLE) - dwNumServiceArgs →
0(fixed) - lpServiceArgVectors →
NULL(fixed)
You just need to put the handle received as the return value of CreateServiceW() into input + 8 and execute it!
This time too, shall we verify step by step first with dynamic analysis?

First, let’s set a bp near the OpenSCManagerW() function and check.

You can confirm that the SC_MANAGER_ALL_ACCESS(0xf003f) that we inserted is in the dwDesiredAccess part!

After that, if you look at the output screen, you can confirm that it properly receives the hSCM handle.

Now, let’s set a bp near CreateServiceW() and check.

I wrote System in lpServiceStartName.

And lpBinaryPathName has the malicious file path that we will register as a service.

If you look at the output routine after that, you can see that the service is created and you can also get the service handle value.
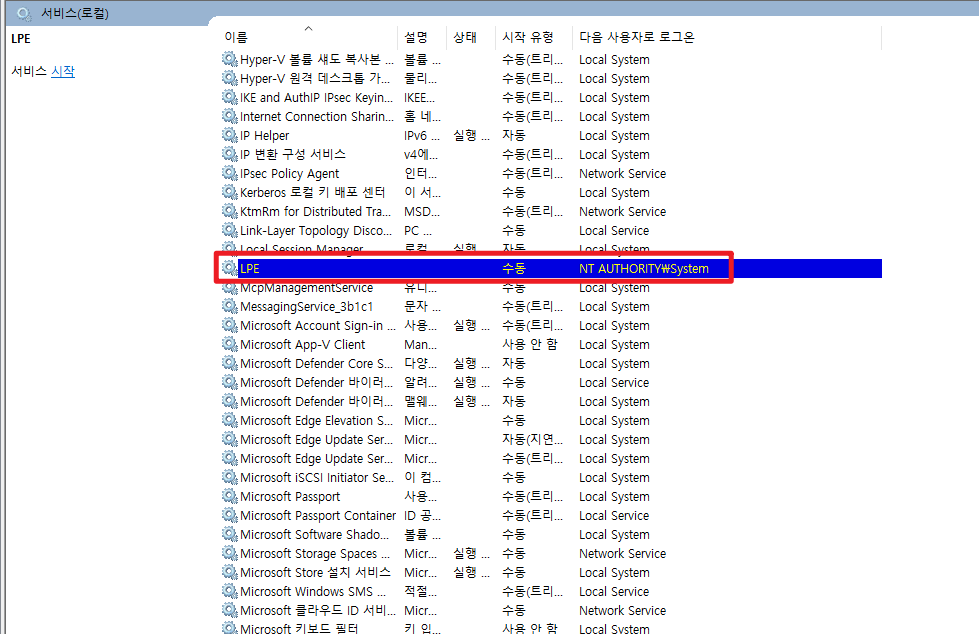
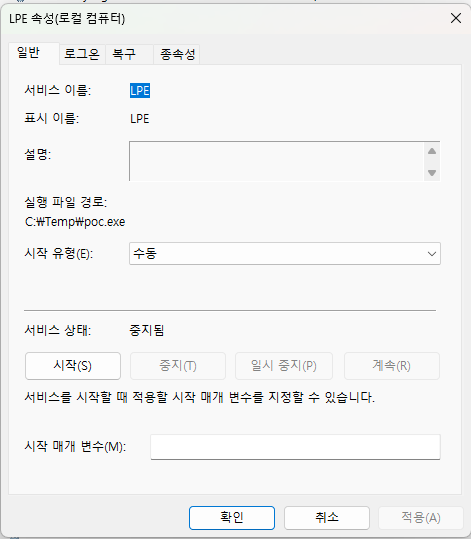
If you check the service, you can see that the LPE service was created and the path is also set to the malicious file path.
Now, if you only execute it via StartServiceW()? The malicious service will run with SYSTEM privileges!!
Conclusion

I hope the explanation of multiple LPE vectors of the Named Pipe vulnerability in this Part 2 helped you!! That due to the permission setting of Named Pipe, there can be a situation where a medium user can act with SYSTEM privileges! As I wrote, I think I wrote it like a very heavy “gobongbap” and failed at controlling the length… but!! I’d appreciate it if you read it thinking “Wow, LPE is possible in this way too!!” 😉 Next time, I will come back with a vulnerability in a Kernel Driver, which is the flower of Windows LPE~ Thank you!
Reference
- https://learn.microsoft.com/ko-kr/windows/win32/api/winsvc/nf-winsvc-openscmanagerw
- https://learn.microsoft.com/ko-kr/windows/win32/services/service-security-and-access-rights
- https://learn.microsoft.com/ko-kr/windows/win32/api/winsvc/nf-winsvc-createservicew
- https://learn.microsoft.com/ko-kr/windows/win32/api/winsvc/nf-winsvc-startservicew
- https://learn.microsoft.com/ko-kr/windows/win32/api/shlwapi/nf-shlwapi-shsetvaluew
- https://learn.microsoft.com/ko-kr/windows/win32/api/winbase/nf-winbase-copyfilew

본 글은 CC BY-SA 4.0 라이선스로 배포됩니다. 공유 또는 변경 시 반드시 출처를 남겨주시기 바랍니다.