[Research] Windows LPE Bug Hunting, Served by the Team’s Youngest: Part 1 (EN)
![]()
Introduction
Hello, 2025 is already coming to an end. Is everyone enjoying the end of the year? 🎅 Some of our team members participated in a project at the Whitehat School on the topic of ‘Windows Kernel Driver & Named Pipe LPE Bug Hunting’. It was back in May 2025… I’m banda, and I started looking for Windows vulnerabilities after our mentor simply said, ‘Join the project.’

Today, I’ll be writing Part 1, focusing on sharing some great bug hunting tips, especially on the Kernel Driver & Named Pipe vectors! Also, our team members will be covering more informative content in the upcoming series, so please make sure to read them! In this series, we will look at the two elements, Kernel Driver and Named Pipe, as separate LPE attack surfaces and introduce the vulnerabilities we found.
Chapter 1: Kernel Driver as an Attack Surface
1.1 Overview of the Kernel Driver Attack Surface
In the Windows environment, LPE vulnerabilities often occur due to a lack of trust boundary validation between user mode and kernel mode, making kernel drivers a good target. A WDM-structured kernel driver basically processes an IRP (IRP_MJ_DEVICE_CONTROL) and receives the IOCTL code and the lengths of the input and output buffers from the kernel through the IO_STACK_LOCATION structure. At this point, it accesses the user input buffer through each field of the IRP structure depending on the IOCTL transfer method!
Especially in WDM with METHOD_BUFFERED, the I/O Manager allocates a kernel buffer and provides its pointer as Irp->AssociatedIrp.SystemBuffer, with both input and output passing through this buffer. In other words, vulnerabilities can arise because this IOCTL processing logic is designed to interpret user input within the kernel address space, and because the I/O Manager does not perform validation on user input when constructing the IRP. Keeping this in mind, let’s look at the process of collecting and analyzing targets.
1.2 Kernel Driver Target Collection
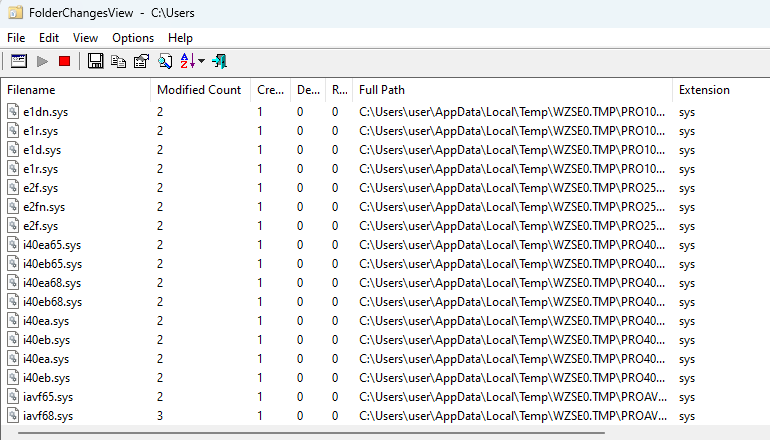
First, I need to quickly find the third-party drivers I’ve installed, right? In the first step, I use FolderChangesView to track the .sys files created in the user environment, checking the created sys file names and their paths.
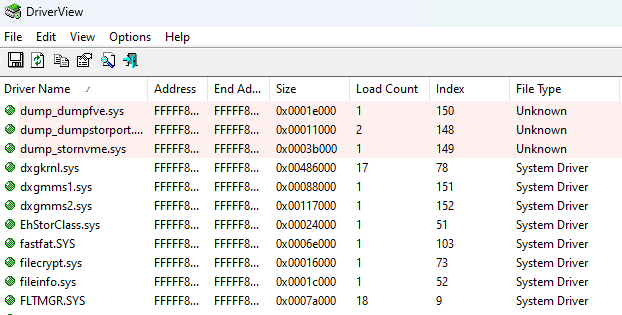
Since we need to analyze drivers that are actually loaded and running in the kernel, the next step is to use DriverView to check the list of currently loaded drivers. A loaded state means that the IOCTL and IRP processing routines are active, right?
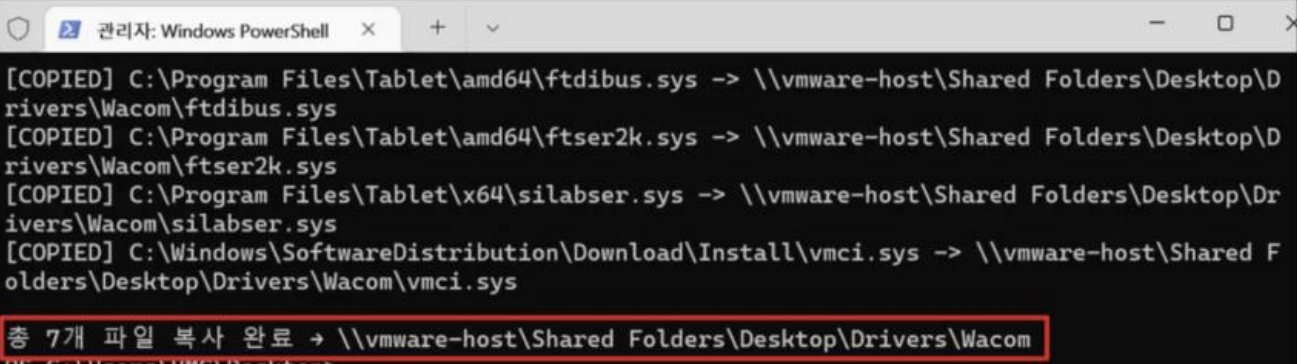
And we created a simple automation tool to extract .sys files through FolderChangesView and copy them from the driver’s directory to an analysis directory. We can start the analysis by checking if the extracted files have been moved correctly to the analysis directory.
1.3 Kernel Driver Analysis
Driver analysis can be performed in the following order.
- Exposed
DeviceName→ Determine user accessibility - Check accessibility of the
\Devicenode with WinObj - Start WDM driver analysis using IDA/Plugins
- Identify IOCTL Table through IDA
- Analyze
DispatchRoutine→ Check input validation parts/structures/fields - Perform dynamic analysis by tracing function flow/Device request processing with WinDBG
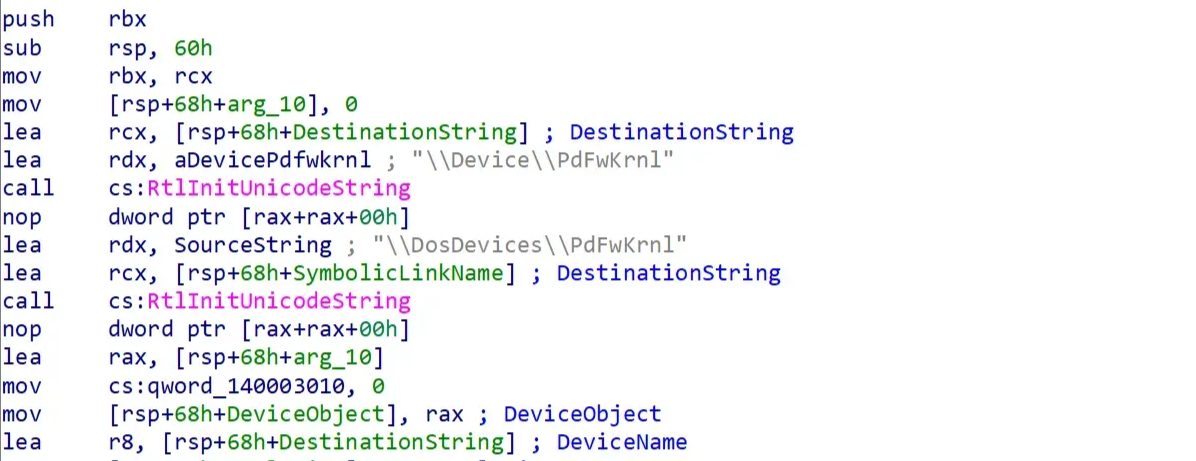
The first step is to check if the Device and Symlink are exposed in DriverEntry. If, for example, a Device Name like \Device\PdFwKrnl and a Symlink like \DosDevices\PdFwKrnl are created, it means we have secured a possible entry point to send requests to the driver from user mode using CreateFile/DeviceControl. We then check which dispatch routine (DispatchDeviceControl) IRP_MJ_DEVICE_CONTROL is connected to through the DriverObject->MajorFunction table.

Once we have information about \Device, we need to check if this driver exposes an actually accessible entry point from user mode and how access control is configured. In WinObj, we verify that the Device Object we found is actually created under \Device and also check for the existence of a Symlink. Then, we open the Security tab for both the Device and Symlink to ensure that a general user (Everyone) has Read/Write permissions! This is necessary for a general user to open a handle and send IOCTL requests.
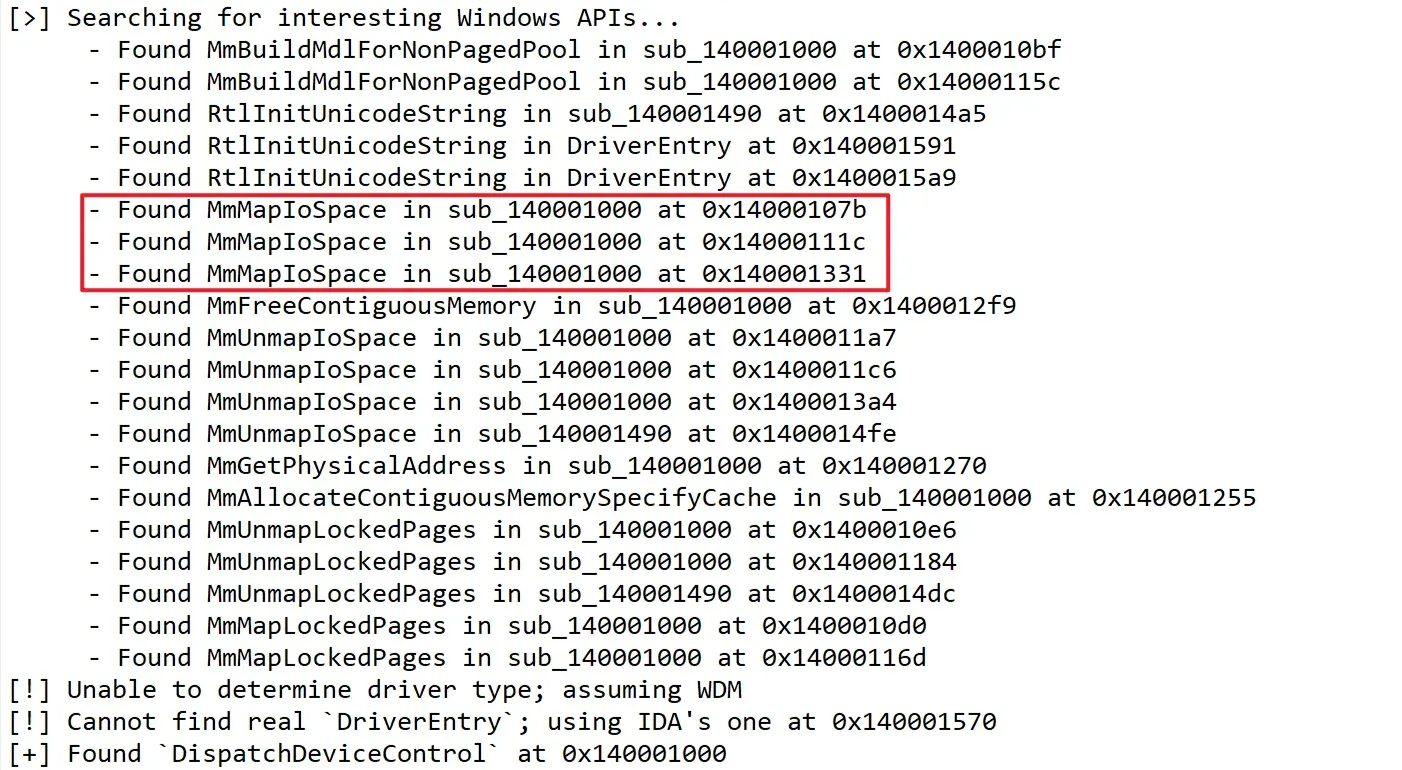
Afterward, I quickly identified the main dispatch routines using IDA’s DriverBuddy and determined it was a WDM driver. DriverBuddy helps find traces of kernel API calls, and as an example, we can see that call points like MmMapIoSpace, MmUnmapIoSpace, MmBuildMdlForNonPagedPool, and MmMapLockedPages are located near DispatchDeviceControl. In particular, a routine like MmMapIoSpace that maps a physical address to a kernel virtual address can become a vulnerability if an attacker can indirectly control the physical address, length, and cache type. So, in my case, I will designate this as an analysis vector and analyze the code.
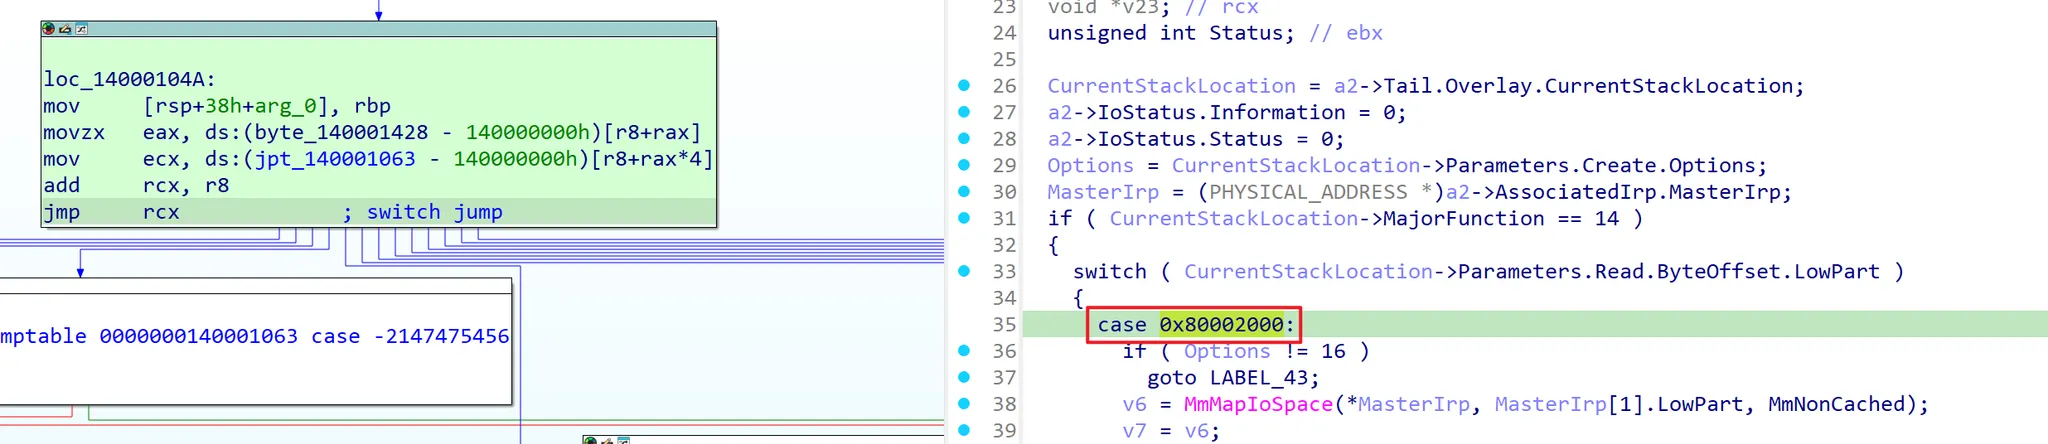
Then, I proceed to reverse-engineer the IOCTL branching structure based on the switch-case inside DispatchDeviceControl. In the case of the WDM driver above, you can see that specific IOCTL Cases branch in the form of 0x80002000, 0x80002004, 0x8000201C… within the DispatchDeviceControl‘s switch-case. Here, I was able to identify the IOCTL Case directly linked to the MmMapIoSpace call. By classifying these cases based on their behavior, you can check how input validation for things like option values, lengths, and pointer handling is processed.
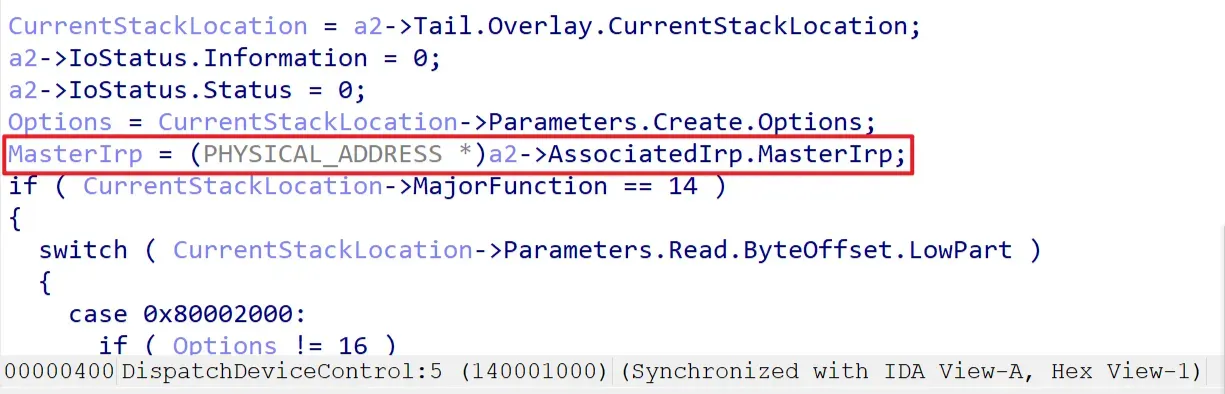
For example, the key point in this analysis is the 0x8000202C case. In this case, a flow appears where specific offset values from the input buffer within the IRP are interpreted as arguments like dst/src/size, extracted, and passed to memmove. From a WDM perspective, if the IOCTL in the DeviceIoControl path is METHOD_BUFFERED, the I/O Manager places the address of a kernel-allocated buffer into IRP→AssociatedIrp.SystemBuffer and fills that buffer with content copied from the user input.

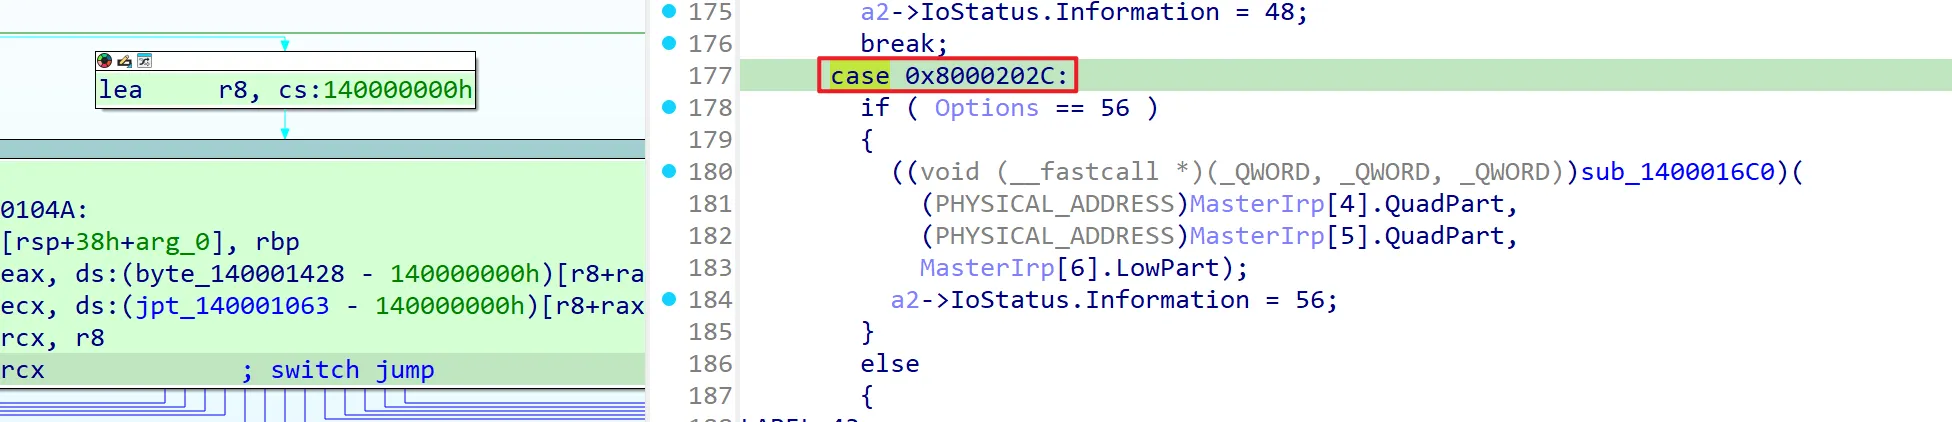
Checking how to enter the 0x8000202C case, if the input buffer length is just 0x38, it trusts the values taken from offsets (+0x20/+0x28/+0x30) within that buffer as a pointer/length and passes them to memmove(dst, src, size). This confirms that a read/write primitive can be established in this way.
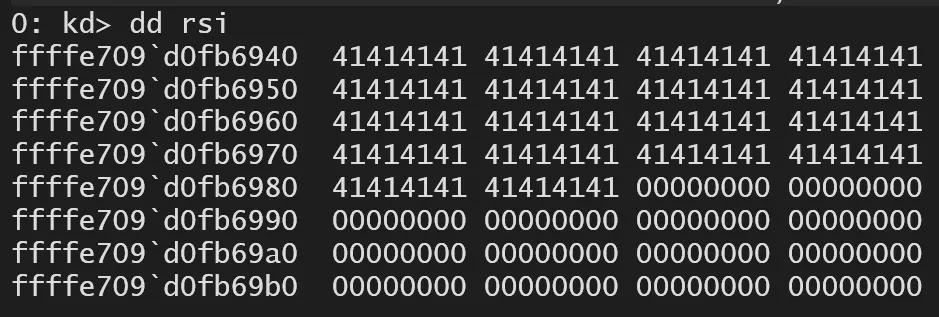
Afterward, you can follow the function flow in WinDBG using the information obtained from static analysis. We confirmed earlier that in the 0x8000202C case, the values from SystemBuffer(rsi)+0x20/0x28/0x30 are put into memmove(dst, src, size). If you write a payload and check the area around the SystemBuffer of METHOD_BUFFERED pointed to by rsi… you can see that it’s overwritten with ‘A’s as intended, right?
Once the vulnerability is confirmed, it’s time to exploit it. For example, in the case above, if you call DeviceIoControl with dst=output_buf (user address), src=desired kernel address to read, and size=8 in the IOCTL input structure, the kernel performs memmove(dst, src, size), establishing an 8-byte arbitrary read. Using the familiar NtQuerySystemInformation handle table (for Windows bug hunters) to get the EPROCESS address, we add TOKENOFFSET to the obtained SYSTEM EPROCESS address to read the EPROCESS->Token value. Then, in the same way, we find the current EPROCESS address, calculate the Token field’s location, and perform an Arbitrary Write by setting dst=current EPROCESS+TOKENOFFSET, src=prepared SYSTEM token pointer, and size=8 in the IOCTL to achieve privilege escalation. As you can see, the detailed payload construction depends on the type of vulnerability found.
Chapter 2: Named Pipe as an Attack Surface
2.1 Overview of the Named Pipe Attack Surface
Now that we’ve looked at kernel drivers, it’s time to examine Named Pipes. This section assumes a slight understanding of the Named Pipe communication method, so I recommend checking out the related research article 👉here! Although Named Pipes are used as an IPC communication mechanism, they are managed as kernel objects and, like kernel drivers, are frequently used by SYSTEM-privileged processes to communicate with user mode. In particular, there are many cases where a service process trusts the Named Pipe input as an internal message, parses it into a structure, or connects it to sensitive operations like permission changes, registry actions, or process execution. A lack of validation can lead to LPE. Curious about how to approach IPC differently from IOCTL? Let’s find out!
2.2 Named Pipe Target Collection
General target collection proceeds in the following order: (1) select SYSTEM/service process candidates, (2) obtain the pipe handles opened by that process, and then (3) check if non-administrators like Everyone have Read/Write access through the pipe’s ACL.
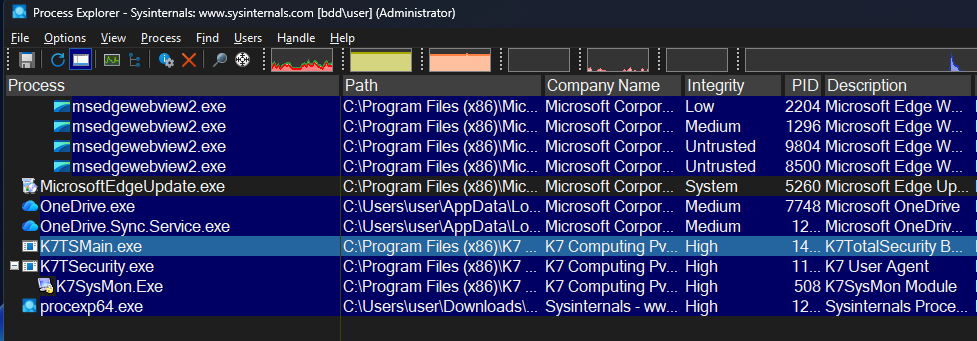
I start by selecting process candidates using Process Explorer. My criteria for narrowing down targets are checking if the execution account is a SYSTEM process, if it’s a third-party service, if a Named Pipe exists in its HANDLEs, and if its Integrity Level is SYSTEM.
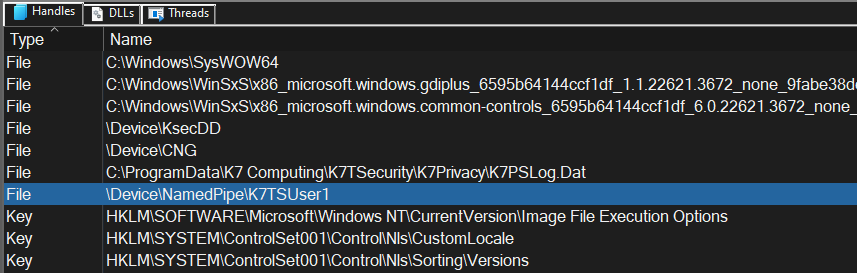
You can find out if a NamedPipe exists in the Handles tab at the bottom of Process Explorer. An item with Type ‘File’ and a Name starting with \Device\NamedPipe\... is a Named Pipe. The collected \Device\NamedPipe\... path becomes the mapping point in user mode, like \\.\pipe\....
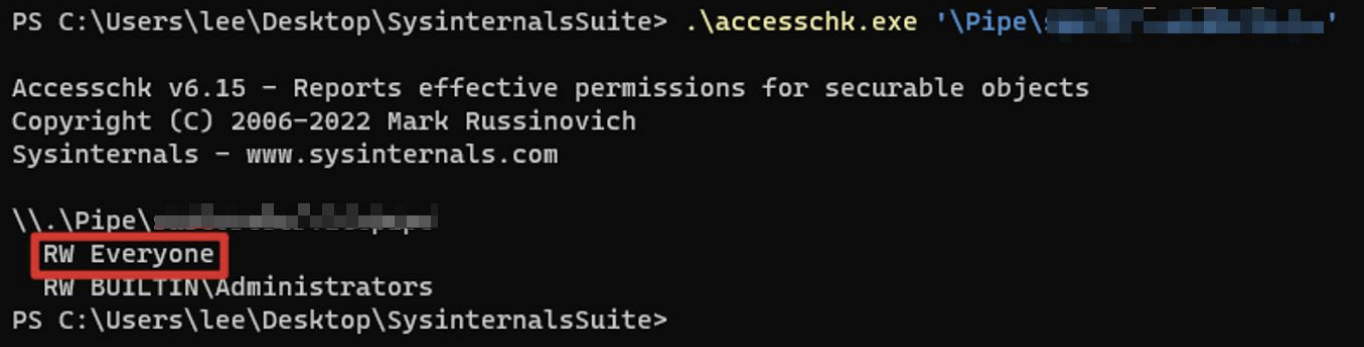
However, there’s one major hurdle left… the ACL. If you go through the trouble of confirming a Named Pipe exists but can’t read or write to it… you have to say goodbye to that Named Pipe. 😭 If only Administrators have RW access and others have no permissions, it’s hard to see it as a successful LPE vector. You need to use a tool like accesschk to inspect the pipe’s ACL and check if broad groups like Everyone, Authenticated Users, or Users have RW access, then narrow down your targets.
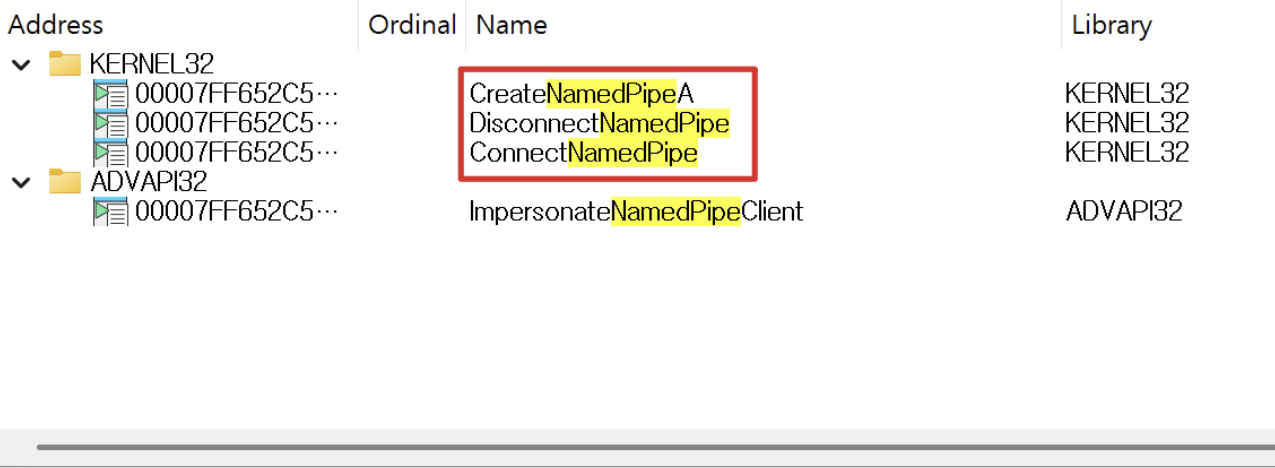
Once a target is selected, the target collection process is completed by opening the binary, quickly searching for APIs like CreateNamedPipeA/W, ConnectNamedPipe, and DisconnectNamedPipe to confirm it’s a server implementation, and then analyzing the code by checking the Connect → Read flow, parsing branches, and permission-related branches like token/access control.
2.3 Named Pipe Analysis
The analysis could be conducted in the following order.
- Select server (SYSTEM service) process candidates with Process Explorer.
- Verify if the collected
\Device\NamedPipe\...is the connection point for\\.\pipe\...in user mode. - Check Pipe ACL with accesschk → Verify if Read/Write is open for broad groups like Everyone.
- In IDA, trace the flow like
CreateNamedPipe*→ConnectNamedPipe→ReadFile/WriteFileand identify the request handling function dispatch. - Narrow down to branches where a request leads to privilege-sensitive operations like registry/HKLM access or service configuration.
- Perform dynamic analysis by capturing events with ProcMon.
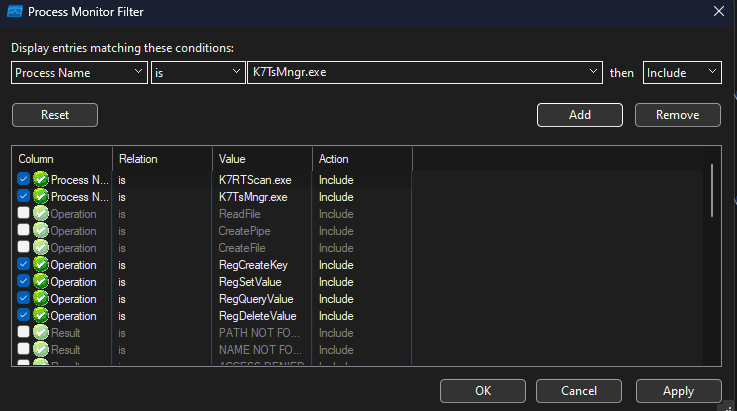
Once a target is set, dynamic analysis begins by using ProcMon to see what vulnerable behavior the pipe I/O leads to. First, narrow down the server process that creates and receives the pipe and the client process that connects and sends to the pipe. Then, prepare to trace IPC call flows like CreateNamedPipe, CreateFile, ReadFile, and WriteFile within the scope of those processes. It’s a good practice to register filters for registry key-related events or core named pipe I/O events under ‘Process Name’ and ‘Operation’, and to fix the filter for the server’s Integrity Level as System. This makes it easier to check if user input can lead to privilege escalation to SYSTEM.
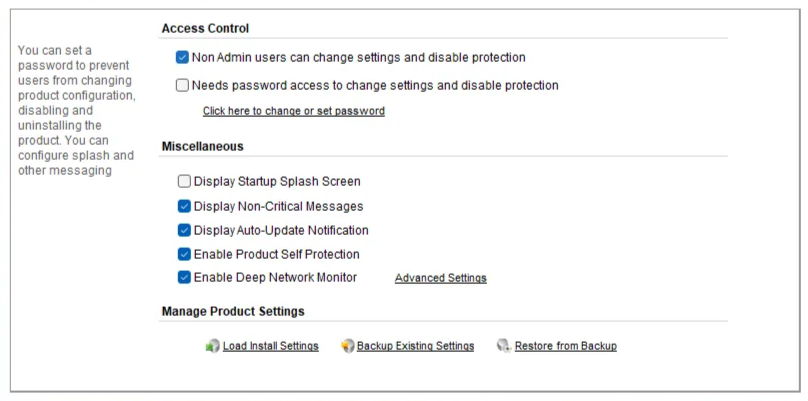
As it happens, the program I analyzed has a checkbox in its settings that allows Non-Admins some administrative functions via Access Control. It makes sense for an antivirus. But this isn’t typical, and even when I keep clicking the “Allow setting changes / disable protection” checkbox as a non-administrator, no UAC prompt appears. Suspicious, right? Let’s prioritize this service for investigation.
PS C:\Users\banda\Downloads\AccessChk> .\accesschk.exe -accepteula -lv "\pipe\K7TSMngrService1"

\\.\Pipe\K7TSMngrService1
  DESCRIPTOR FLAGS:
      [SE_DACL_PRESENT]
      [SE_SACL_PRESENT]
      [SE_SACL_AUTO_INHERITED]
      [SE_SELF_RELATIVE]
  OWNER: NT AUTHORITY\SYSTEM
  LABEL: Low Mandatory Level
        SYSTEM_MANDATORY_LABEL_NO_WRITE_UP
  ACCESS_ALLOWED_ACE_TYPE: NT AUTHORITY\SYSTEM
        FILE_ADD_FILE
        FILE_CREATE_PIPE_INSTANCE
        FILE_APPEND_DATA
        FILE_LIST_DIRECTORY
        FILE_READ_ATTRIBUTES
        FILE_READ_DATA
        FILE_READ_EA
        FILE_WRITE_ATTRIBUTES
        FILE_WRITE_DATA
        FILE_WRITE_EA
        SYNCHRONIZE
        READ_CONTROL
  ACCESS_ALLOWED_ACE_TYPE: Everyone
        FILE_ADD_FILE
        FILE_CREATE_PIPE_INSTANCE
        FILE_APPEND_DATA
        FILE_LIST_DIRECTORY
        FILE_READ_ATTRIBUTES
        FILE_READ_DATA
        FILE_READ_EA
        FILE_WRITE_ATTRIBUTES
        FILE_WRITE_DATA
        FILE_WRITE_EA
        SYNCHRONIZE
        READ_CONTROL
After checking the ACL directly, as suspected, the DACL for \\.\pipe\K7TSMngrService1 is set too loosely. Since ‘file read’, ‘file write’, and ‘file append’ are allowed for Everyone, it means that virtually anyone can request a connection to this pipe to write and read. Once this is confirmed, from this point on, let’s perform static analysis on the dispatch or parsing routines to see with our own eyes which requests lead to privilege-sensitive operations.
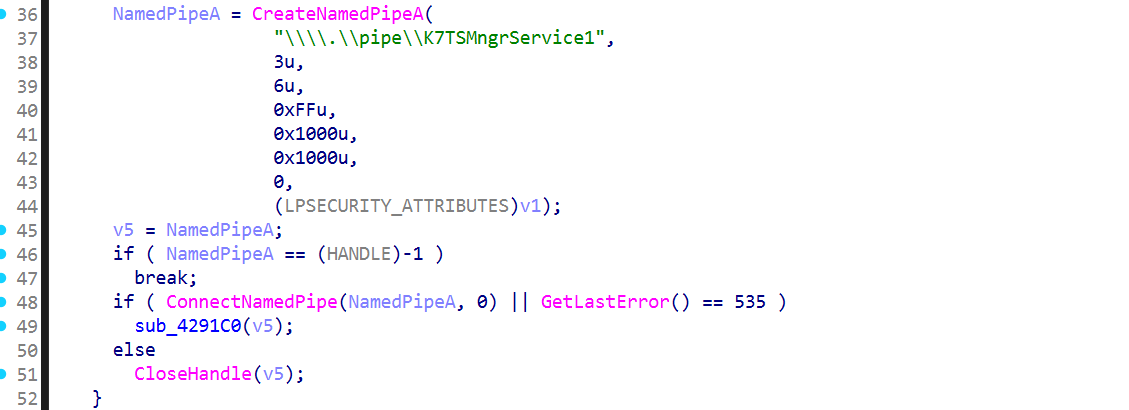
Now that we’ve confirmed the permission information, it would be good to check the Named Pipe’s server code through static analysis, right? It’s best to check the broad structure from the creation point. For example, here we can see a flow where a Named Pipe is created with CreateNamedPipeA("\\\\.\\pipe\\K7TSMngrService1", ...) and, upon a successful ConnectNamedPipe, it dispatches to a request handler function! Once this pattern is confirmed, the next step is to check the protocol validation part, like what header is read with ReadFile.
// request header (28 bytes)
typedef struct _K7TS_REQ_HDR {
uint32_t magic; // 'K7TS'
uint32_t ver; // 0x1010
uint32_t hdr_sz; // 28
uint32_t reserved; // 0
uint32_t op; // v21
uint32_t in_len; // nNumberOfBytesToRead
uint32_t out_len; // v23
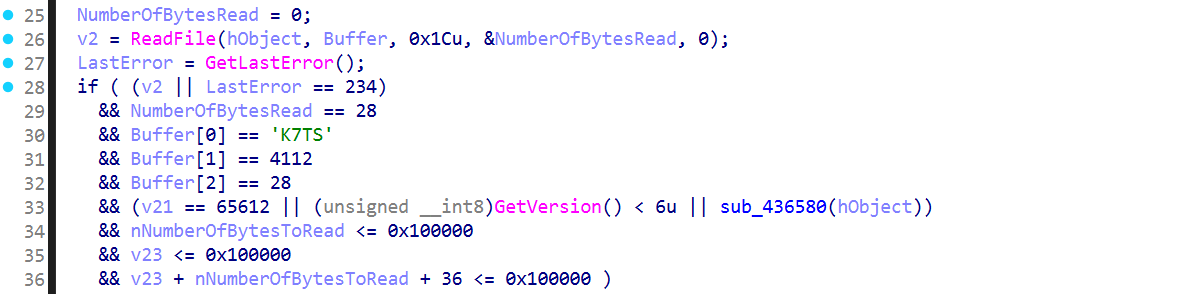
} K7TS_REQ_HDR;For example, to communicate with \\.\pipe\K7TSMngrService1, how should the request buffer be structured to succeed? Looking at the code, it performs a protocol validation routine: it targets the pipe \\.\pipe\K7TSMngrService1, sets result = 0x4B375453('K7TS'), ver=0x1010, hdr_sz=28, and limits the request type and I/O length to 1MB. Only then does it allocate a heap buffer, receive the request with ReadFile, pass it to an internal dispatcher to create a response, return a 36-byte response header + response body with WriteFile, and finally terminate the session with DisconnectNamedPipe and CloseHandle. We’ve learned crucial information for connecting and communicating with the pipe!
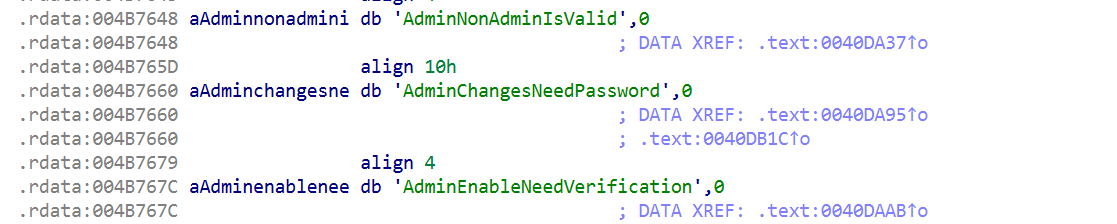
Now that we’ve checked the validation routine, let’s look for the part that leads to a privilege-sensitive operation, like allowing a normal user to enable administrative functions as we saw in the settings earlier. Following the string references, we could see that K7TS components directly reference registry-based policy flags through strings like AdminNonAdminIsValid, AdminChangesNeedPassword, and AdminEnableNeedVerification. With this single pipe request, the SYSTEM service is performing a Write to HKLM. If the validation isn’t sufficiently restrictive, it could become a primitive for a normal user like us to perform a SYSTEM registry write.
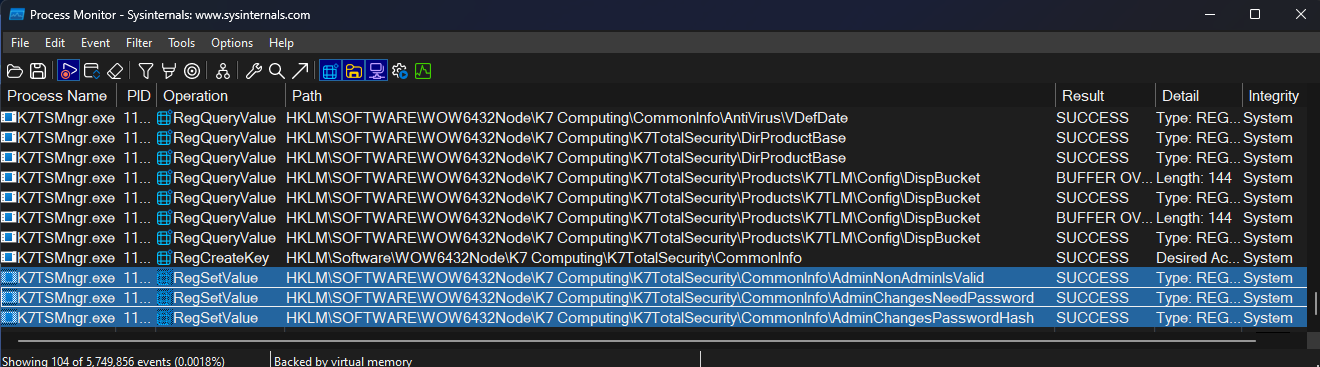
Now, based on the information gathered above, I sent a request that satisfies the protocol conditions and checked the Process Monitor logs. Since a Named Pipe is an IPC endpoint, it’s good to carefully check for events centered around points of change, such as registry/HKLM, service settings, file read/write, and process execution. For example, the current ProcMon log shows that after I, a normal user, send a request through the pipe, the SYSTEM-privileged K7TSMngr.exe performs a write operation to HKLM. By triggering writes to related keys like AdminNonAdminIsValid, AdminChangesNeedPassword, and AdminChangesPasswordHash, I reconfirmed that security boundaries like requiring administrator rights or allowing non-administrators could be bypassed.

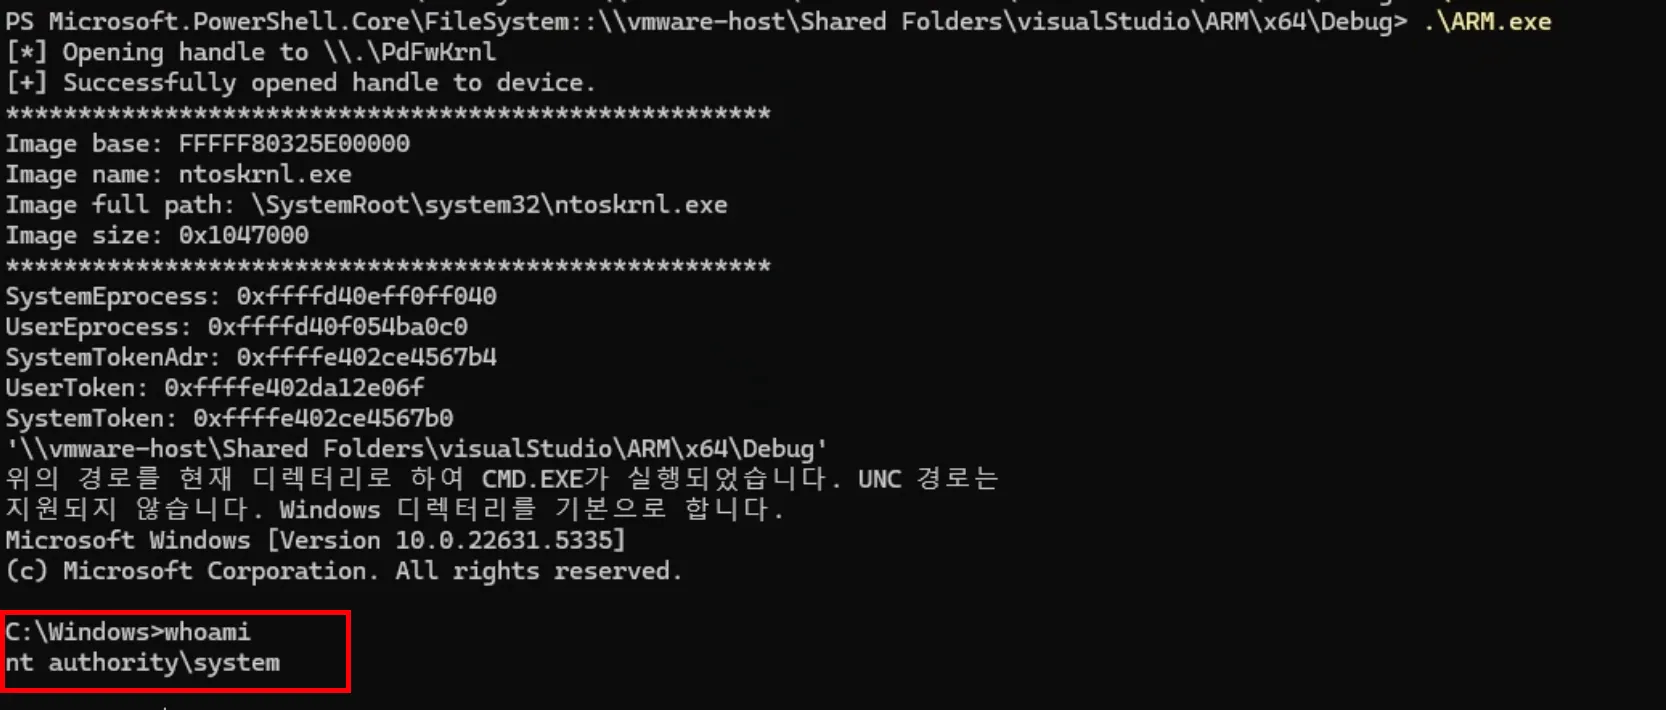
Now, let’s try the LPE. First, as a normal user, I send a connection request to \\.\pipe\K7TSMngrService1 with a request that satisfies the K7TS header and magic format, making the SYSTEM service configure the registry settings on my behalf. Then, using HKLM IFEO, I target the key HKLM\SOFTWARE\Microsoft\Windows NT\CurrentVersion\Image File Execution Options\K7TSHlpr.exe and replace the intended debugger with cmd.exe /c C:\temp\payload.bat. And…? The LPE is successful! The entity processing the K7TSMngrService1 pipe request was K7TSMngr.exe. Through static analysis, I was able to confirm a vulnerability where the auxiliary process K7TSHlpr.exe, which performs internal operations, runs in a high-privilege context. This is what allowed us to execute our desired bat file.
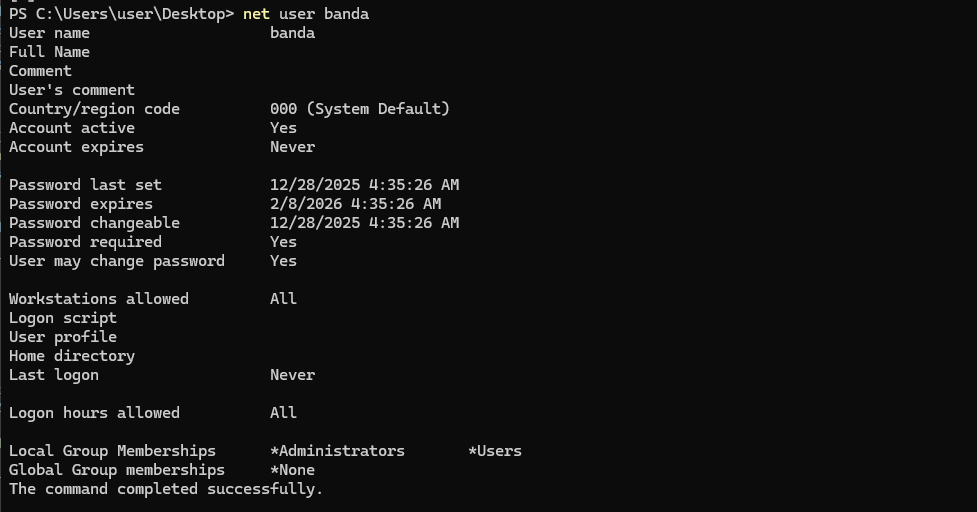
Through privilege escalation, you can see that the user is now a member of the Administrators group in Local Group Memberships. Additionally, I hope it’s helpful to know that vulnerabilities in Named Pipes often involve ACLs, lack of permission checks, memory vulnerabilities, path manipulation, and race conditions!
Conclusion
I hope the Kernel Driver and Named Pipe collection and analysis process in this article has been helpful to you! Please note that while I referred to old CVEs when explaining the process, the verification was done in a Win11 24H2 environment. TMI, but as I was writing and opening up the tools, driver targets kept catching my eye, and I kept getting sidetracked… haha. In the next series, we will introduce the vulnerabilities we found! Thank you.
Reference

본 글은 CC BY-SA 4.0 라이선스로 배포됩니다. 공유 또는 변경 시 반드시 출처를 남겨주시기 바랍니다.